




Kẹp giữ sợi Filament
 Bytinx_1344834Likes1.2KDownloads6K
Remix of Giá đỡ/mount Inductive ABL Sensor/Probe cho Sovol SV06 By Brianne_1384298
Build another version of this model.
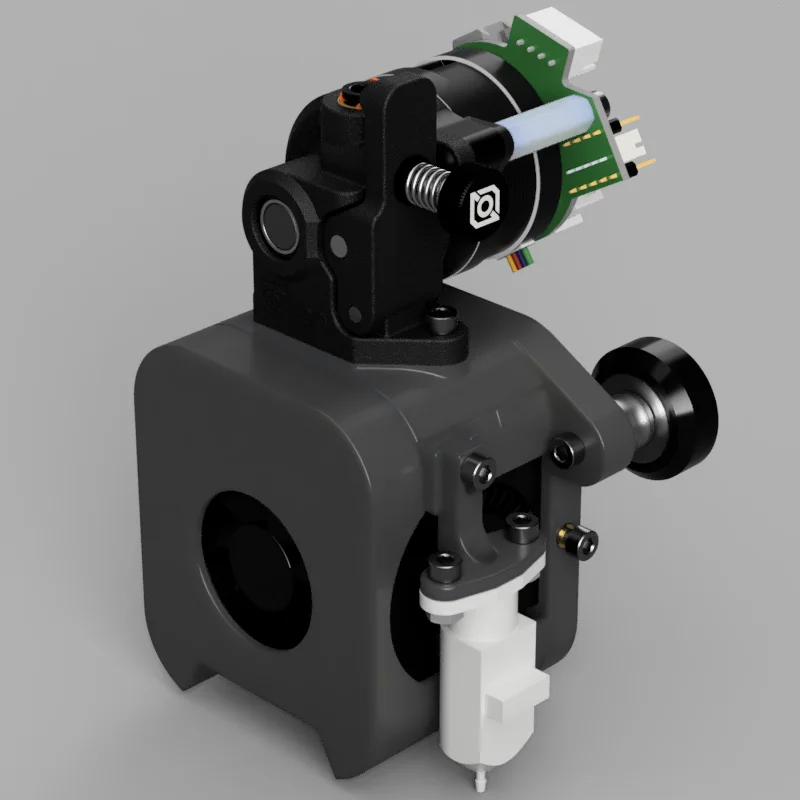
I wanted a way to use Chirpy2605's Dragonburner on a V-Wheel bedslinger I got off of facebook marketplace for cheap (Biqu B1 SE Plus). I saw a few designs that used an adapter plate, but they typically were custom built for individual printers and lost some Y axis travel. I eventually found Hellfirehd's Welder design, which had no Y-axis lost and should work for most V-Wheel printers. My Biqu B1 Plus uses a slightly different belt path than an Ender 5 or Sovol Sv05, so I modified the Welder's X-Carriage to accommodate that. I also wanted to use a hotend with a higher flow rate than an e3d V6, so I created a Dragon Hotend mount. The BOM is unchanged from the Welder's original BOM (shown below).
BOM:
2 x 4010 Blower Fans
1 x 3010 Axial Fan
1 x V6 or Dragon Style Hotend
1 x Orbiter 2 Mounting Style Extruder
1 x 3D Touch
11 x M3 Heat Inserts
2 x M3 Hex Nuts (for 3D touch)
2 x SHCS M3x40mm (Used to attach Extruder Mount to Cowl & X-Carriage)
2 x SHCS M3x25mm (only for V6 Style Hotend)
2 x SHCS M3x12mm (for Extruder)
5 x SHCS M3x10mm/12mm (2 used for securing belts to X-Carriage; 2 for attaching Cowl to X-Carriage; 1 for securing 3D touch to Hotend Mount)
2 x SHCS M3x8mm (for 3D touch)
I recommend assembling the toolhead first, then attaching the X-Carriage to the X extrusion. Tighten all the V-wheels such that the movement is clean (You may need to switch to BHCS screws if not using them already). Next, loosen the top two wheels to make space for routing the wires from the toolhead between the X-Carriage and the X extrusion. After securing the toolhead to the X-Carriage, re-tighten the top wheels. Lastly, attach the extruder if you haven't already.
Bytinx_1344834Likes1.2KDownloads6K

 Byprusa-researchLikes0Downloads2.7K

 ByBrokentooth_designsLikes17Downloads146

 Byarhi_585078Likes64Downloads540

 Bygafyx3dLikes0Downloads120

 ByHanzo3dLikes155Downloads413

 BydarienLikes0Downloads1K

 ByGeek5DLikes147Downloads484

 ByNadirLikes25Downloads114

 ByvertigomakesLikes0Downloads560

 By3DSourcererLikes48Downloads377

 Byartme-3dLikes0Downloads333