



Kẹp giữ sợi Filament
 Bytinx_1344834Likes1.2KDownloads6K
Build another version of this model.
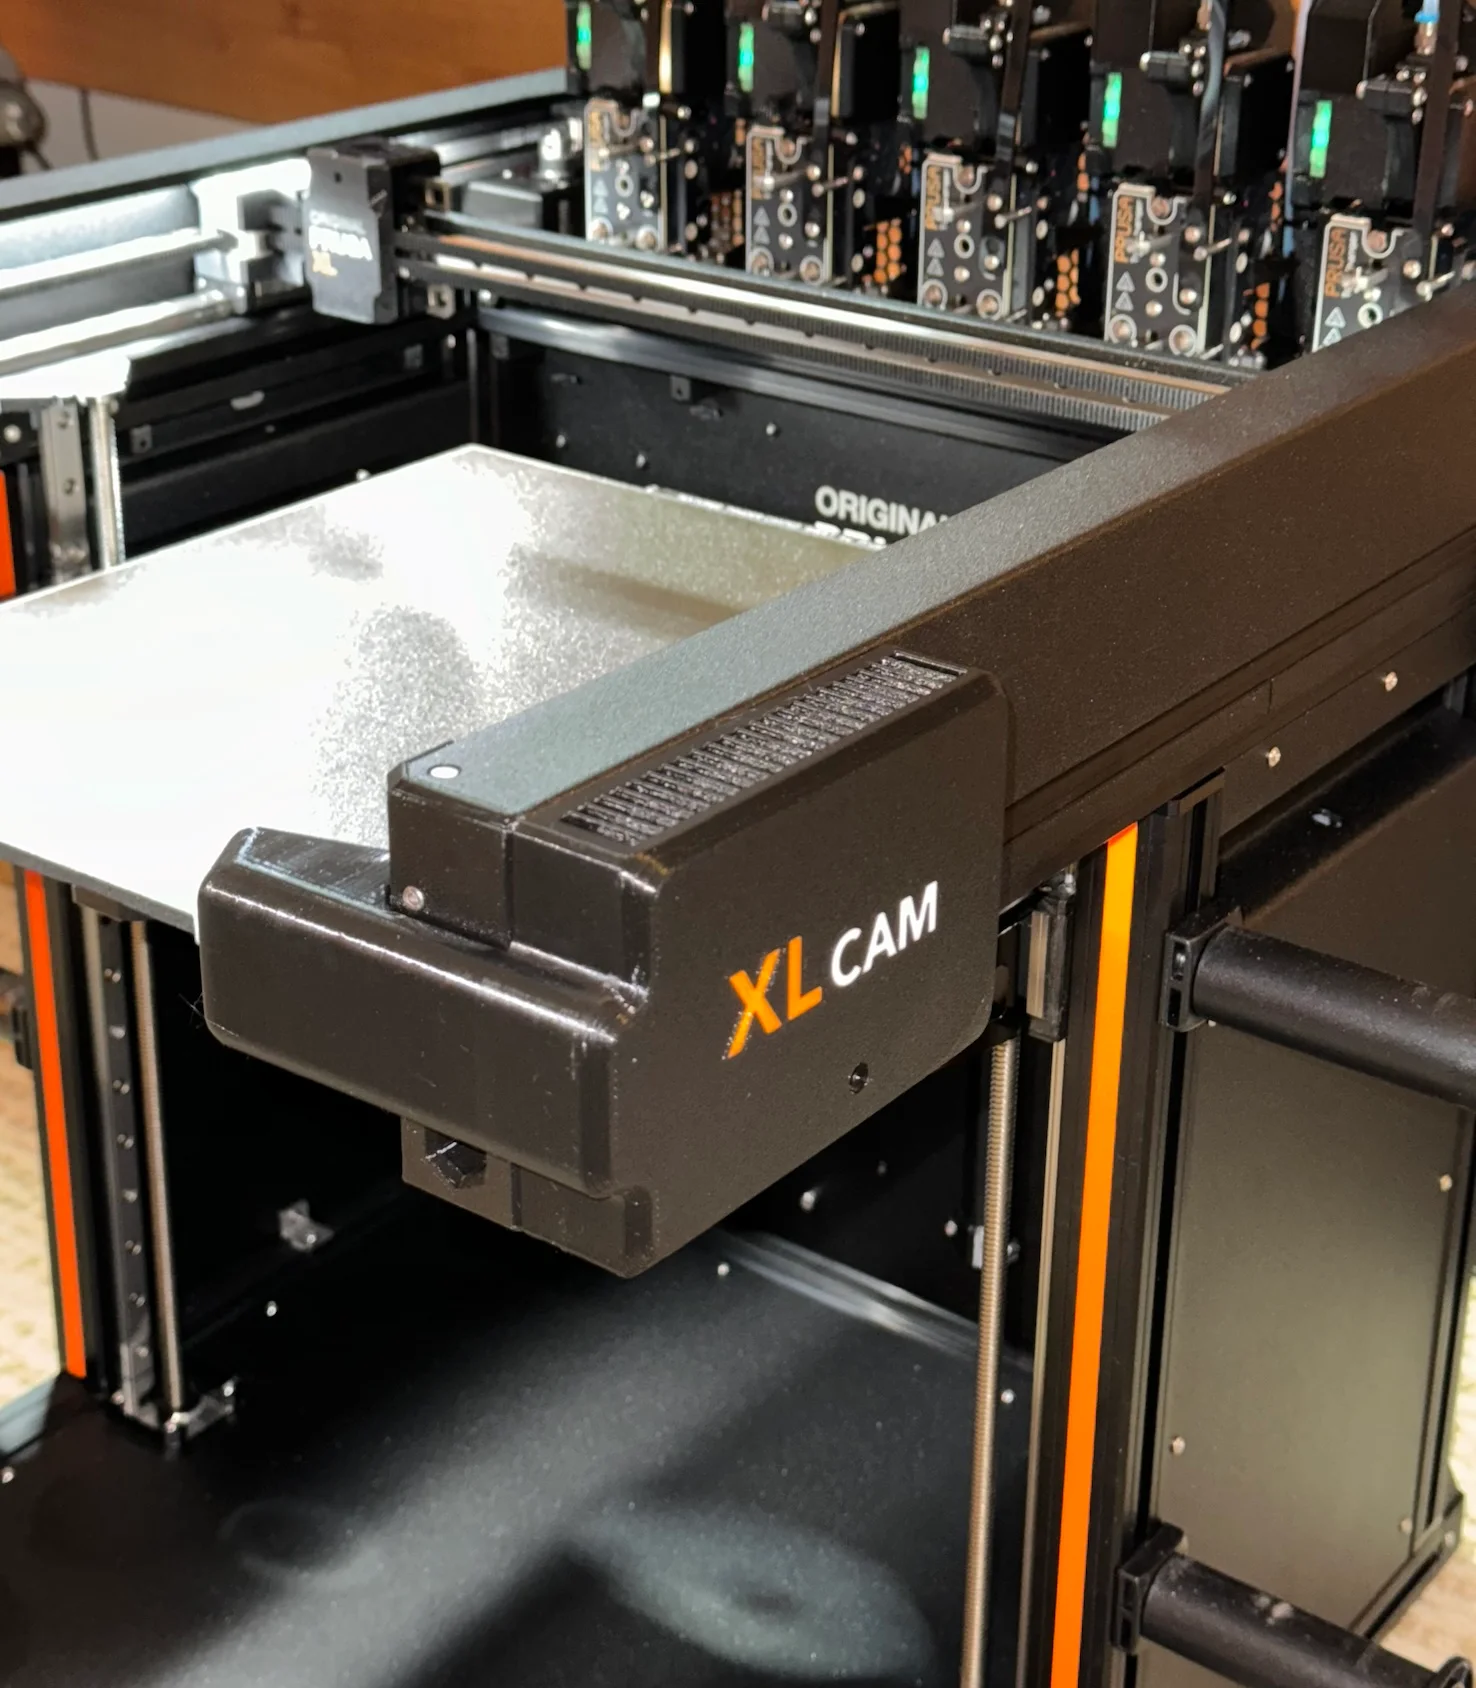
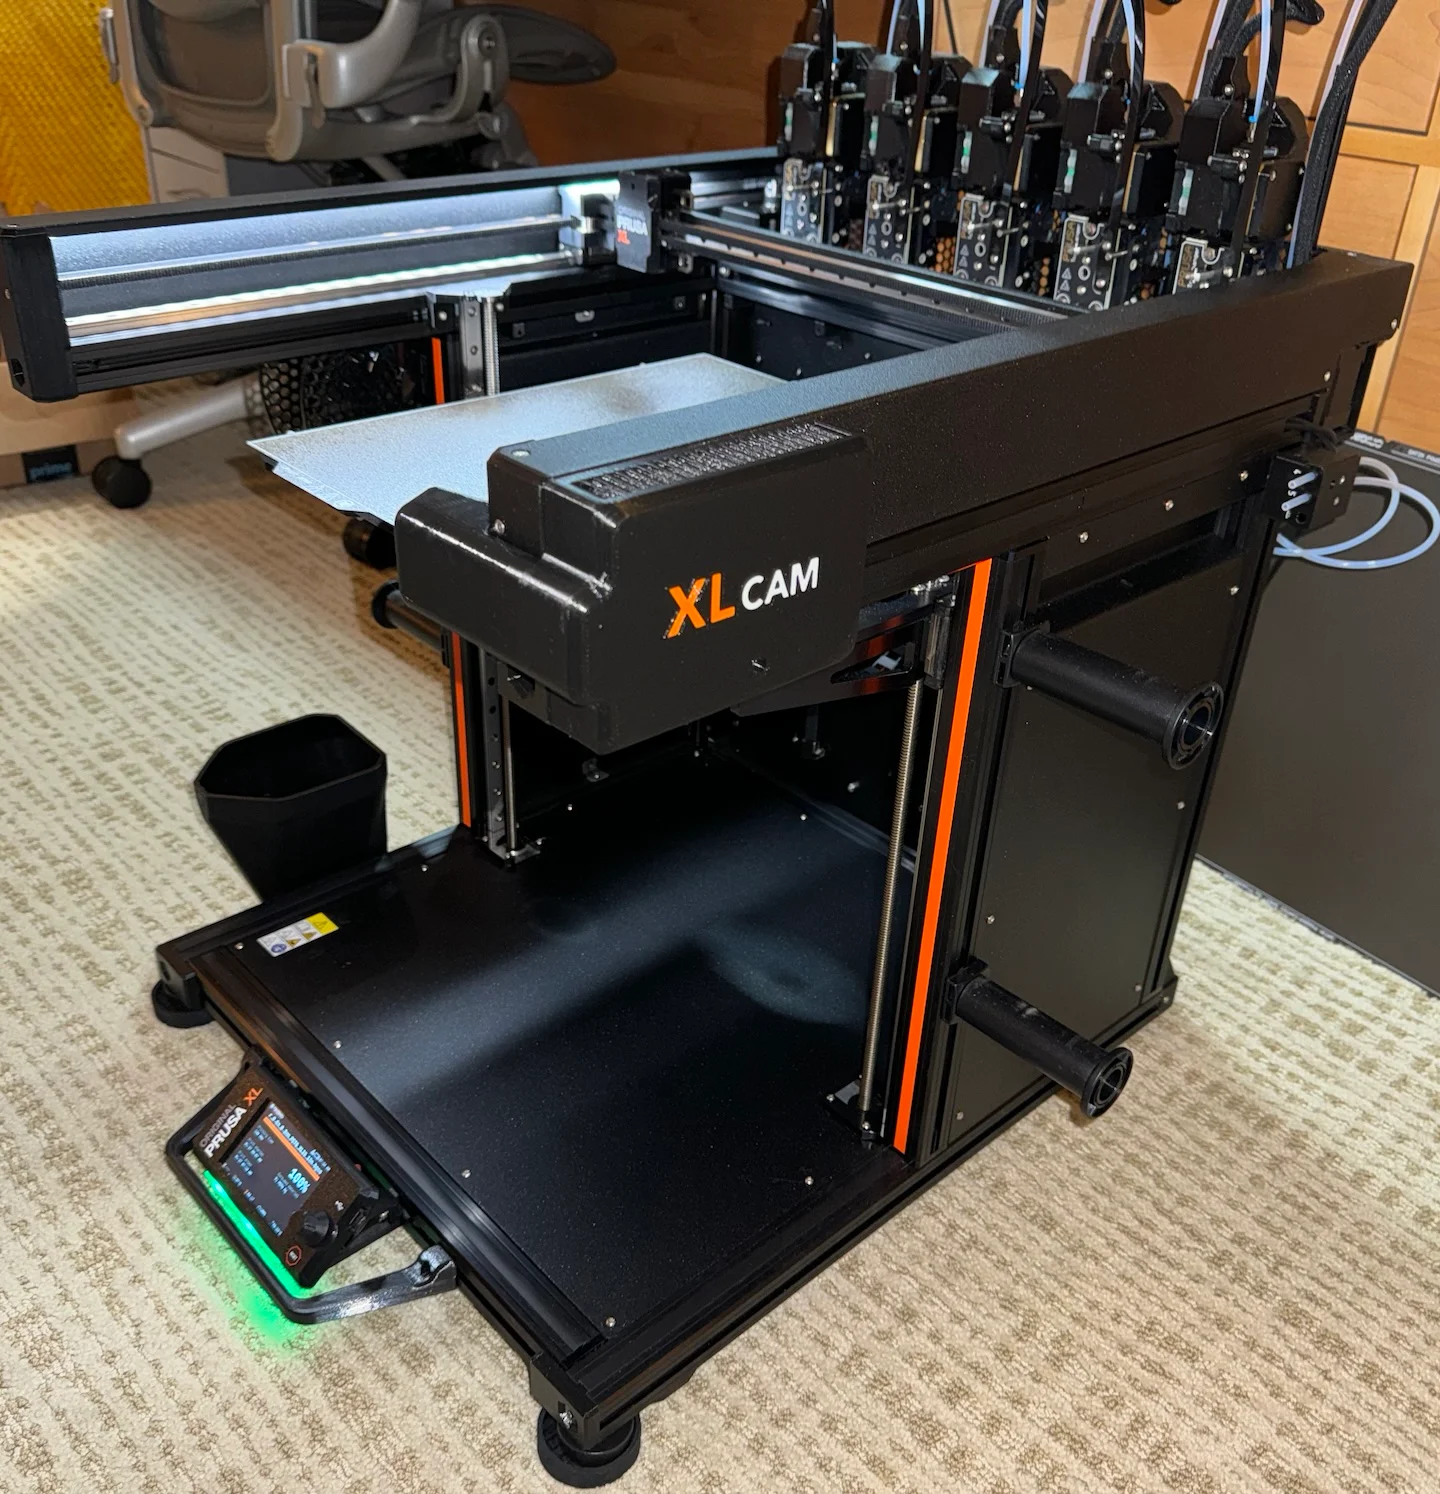
Update 2024/04/27: Published XLCam v2. Better viewing angle and new mounting location.
Update 2024/04/02: Added link to screw assortment.
Update 2024/27/02: Added info for adjusting the camera aim.
Update 2024/29/01: Added links for USB-C right angle and long camera cable. Noted 4GB capacity used on RPi 4.
STLs are provided for left and right mounting. I printed in PETG, Black, Orange, White. Orient the model on the flat surface in PrusaSlicer then paint supports on the lower edges of the camera shroud. Set supports for enforcers only.
The Raspberry Pi 4 (I used a 4GB) and camera V2 are held in place with a couple of screws each. You'll need a longer ribbon cable for the camera and a right angle USB-C adapter for the power cord. The USB-C cable and ethernet cables can be routed down the slot in the aluminum extrusion. An STL is provided for a Chanel cover that snaps in place.
USB-C right angle
Long camera cable
Screw Assortment
A single 4mm screw and a T-nut are used to hold the case in place.
The camera module and Pi are attached with small screws (see link to screw assortment above; super handy for all sorts of projects).
You can add one or more washers behind the camera module on one or two of the posts to adjust the aim of the camera to your liking.
I have my Pi set up to serve a video stream locally and also to upload snapshot images to PrusaConnect every 20 seconds. You can use any Pi software you like, the instructions for my setup are below:
Start with an image of the lite version of the latest RPi OS; I used Bookworm 64-bit. Set the host name; I used “xlcamera”. Set a user name and password.
Boot up the Pi and SSH into it at xlcamera.local.
libcamera-hello
sudo nano /boot/config.txt
add the following line:
gpu_mem=256
sudo apt update
sudo apt install git
sudo apt-get install imagemagick
git clone https://github.com/ayufan-research/camera-streamer.git --recursive
sudo apt-get -y install libavformat-dev libavutil-dev libavcodec-dev libcamera-dev liblivemedia-dev v4l-utils pkg-config xxd build-essential cmake libssl-dev
cd camera-streamer/
nano html/camera.html
XLCam
<body style="margin: 0; padding:0;">
nano cmd/camera-streamer/http.c
add:
extern unsigned char html_camera_html[];
extern unsigned int html_camera_html_len;
and
{ "GET", "/camera", http_content, "text/html", html_camera_html, 0, &html_camera_html_len },
makesudo make install
nano service/camera-streamer-printercam.service
; Official Raspberry Pi v2.1 8MP camera based on the Sony IMX219 chip
; https://www.raspberrypi.com/products/camera-module-v2/
;
[Unit]
Description=camera-streamer web camera for Pi Camera on Raspberry PI
After=network.target
; v2 camera
ConditionPathExists=/sys/bus/i2c/drivers/imx219/10-0010/video4linux
[Service]
User=root
ExecStart=/usr/local/bin/camera-streamer
--camera-path=/base/soc/i2c0mux/i2c@1/imx219@10
--camera-type=libcamera
--camera-format=YUYV
; camera module v2
--camera-width=1640 --camera-height=1232
; use full height for all streams
--camera-snapshot.height=1232
--camera-video.height=1232
--camera-stream.height=1232
--camera-fps=15
; use two memory buffers to optimise usage
--camera-nbufs=2
; bump brightness slightly
--camera-options=brightness=0.1
--camera-options=sharpness=9
--camera-options=noisereductionmode=HighQuality
--http-listen=0.0.0.0
--http-port=80
--rtsp-port
DynamicUser=yes
SupplementaryGroups=video i2c
Restart=always
RestartSec=10
Nice=10
IOSchedulingClass=idle
IOSchedulingPriority=7
CPUWeight=20
AllowedCPUs=1-2
MemoryMax=250M
[Install]
WantedBy=multi-user.target
sudo systemctl enable $PWD/service/camera-streamer-printercam.service
sudo systemctl start camera-streamer-printercam
sudo systemctl stop camera-streamer-printercam
journalctl -xef -u camera-streamer-printercam
sudo nano /etc/fstab
add:
tmpfs /tmp tmpfs rw,nosuid,noatime,nodev,size=256M,mode=1777 0 0
Reboot
Live stream should now be available at:
xlcamera.local/camera
nano uploadsnapshots.sh
Fingerprint: This is a unique string identifying the camera. An example would be:
a606dbc84f08373703b8eb6c4d7805b1fd687c45
Change 10 of the digits in that string to other random digits and you should be good.
Token: Sign in to Prusa Connect, go to the Camera page for the printer, then add a new Other camera. Use the token that's shown in the script below.
--------------------
#!/bin/bash
# Set default values for environment variables
: "${HTTP_URL:=https://webcam.connect.prusa3d.com/c/snapshot}"
: "${DELAY_SECONDS:=20}"
: "${LONG_DELAY_SECONDS:=60}"
FINGERPRINT="???"
TOKEN="???"
SNAPSHOTURL="http://127.0.0.1/snapshot"
sleep "5"
while true; do
now=$(date)
# grab from streamer
curl -s "$SNAPSHOTURL" -o /tmp/output.jpg
# If no error, upload it.
if [ $? -eq 0 ]; then
# echo "$now: Uploading snapshot..."
datestr=$(date)
convert /tmp/output.jpg -quality 85 -filter lanczos -resize 800 -pointsize 18 -fill white -undercolor '#00000080' -gravity southwest -annotate +10+10 "${datestr}" /tmp/annotated.jpg
# POST the image to the HTTP URL using curl
curl -X PUT "$HTTP_URL"
-H "accept: /"
-H "content-type: image/jpg"
-H "fingerprint: $FINGERPRINT"
-H "token: $TOKEN"
--data-binary "@/tmp/annotated.jpg"
-s
--compressed
# Reset delay to the normal value
DELAY=$DELAY_SECONDS
else
echo "$now: Snapshot returned an error. Retrying after ${LONG_DELAY_SECONDS}s..."
# Set delay to the longer value
DELAY=$LONG_DELAY_SECONDS
fi
sleep "$DELAY"
done
Make file executable
chmod +x uploadsnapshots.sh
crontab -e
fill in your
@reboot /home/<user>/uploadsnapshots.sh >> /home/<user>/snapshots.log 2>&1
Create log file:
echo > snapshots.log
Reboot and everything should be good to go.
Bytinx_1344834Likes1.2KDownloads6K

 Byprusa-researchLikes0Downloads2.7K

 ByBrokentooth_designsLikes17Downloads146

 Byarhi_585078Likes64Downloads540

 ByHanzo3dLikes155Downloads413

 BydarienLikes0Downloads1K

 ByGeek5DLikes147Downloads484

 ByvertigomakesLikes0Downloads560

 By3DSourcererLikes48Downloads377

 Byartme-3dLikes0Downloads333

 ByWyomingWolf_261196Likes52Downloads428

 Bytopronix_2170418Likes41Downloads297