



Kẹp giữ sợi Filament
 Bytinx_1344834Likes1.2KDownloads6K
Remix of Prusa Core One: Bản Remix Cánh Tay Gạt Vòi Phun & Hộp Nhựa Tự Lọc By 6d6178
Build another version of this model.
 Cánh tay gạt nozzle CORE OneByAmethystZhou_4393968 · 03/10/2026
 Khay Chứa Phế Liệu Máy In 3D Prusa Core OneByeof_6203 · 03/05/2026
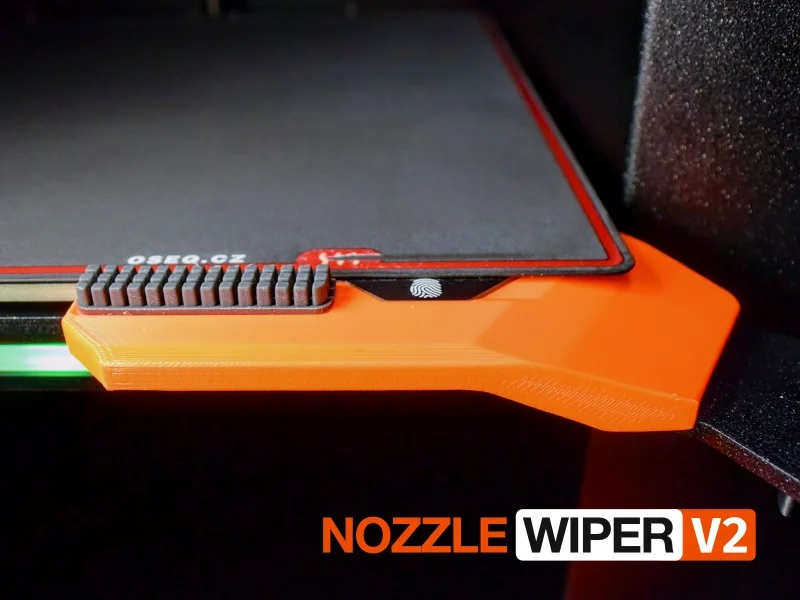
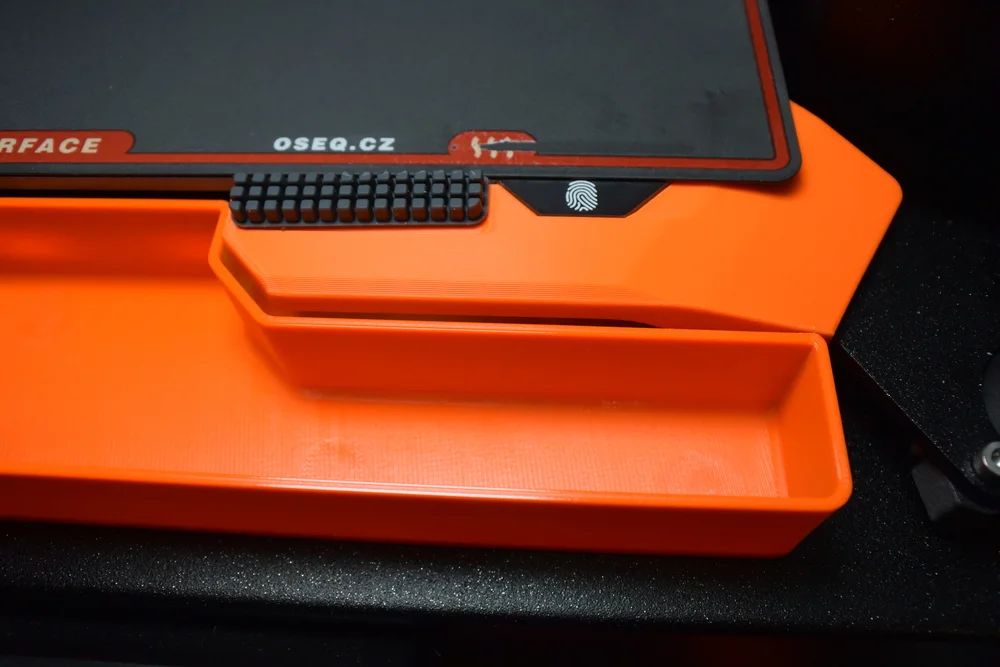
This is version 2 of the Nozzle Wiper Arm with Purge Bin for the Prusa Core One that uses Bambu Lab A1 nozzle wiper silicone pads.
It's an iteration of version 1 and based on the Core One Nozzle Wiper Remix V1.1 and the Core One Purge Bin Remix by Ed, which are based on designs by PCR and nicohirsch, respectively.
This new version is based on laser 3D scan data of the Core One with reworked dimensions for a perfect fit. It features:
Precise dimensions for improved fit for wiper arm and purge bin based on 3D scans
Left side and right side mounting options
Improved silicone pad position allows wiping on the whole pad
Slim profile version for unobstructed LED status bar visibility
Draw your own nozzle wiping sequence with an online nozzle wiping path generator
All the improvements from V1 are still there:
Printable without supports
Multiple attachment options: Heat-set inserts (Voron or RatRig spec), hex nut, square nut
Multiple magnet options for purge bin
Should I upgrade from V1?
Due to the silicone pad placement in version 1, the nozzle can only reach part of the pad for wiping. In V2, the nozzle can reach the full pad which gives you more freedom and creativity to experiment with nozzle wiping sequences. Additionally, the slim version of V2 gives you an unobstructed view of the LED status bar.
If you require full-pad wiping or better status bar visibility, upgrading to V2 is recommended.
Can I use the new Nozzle Wiper Path Generator tool for V1 or other remixes?
Yes. The tool is aware of the printer's limitations and only lets you draw within the part of the pad that the nozzle can reach. It works with any wiper arm that places the pad at the font edge of the bed.
Is this compatible with BIQU CryoGrip sheets?
No. The lifting tab of the CryoGrip sheet occupies the same space that wiping arm need to place the silicone pad close enough to the bed. You can find CryoGrip compatible remixes of V1 but they have the same limitations as V1.
There are multiple variations of the wiper arm. I try to list some pros and cons to help you decide.
Left: If your door hinges are on the left (default), it keeps the right front corner of the bed clear, making it easier to lift the sheet.
Right: Shorter travel distance from parking position to the silicone pad.
Slim: Almost unobstructed LED status bar, higher chance of warping during printing.
Thick: Same aesthetic as V1, more LED status bar obstruction, beefier.
I would pick the slim version unless you're having issues printing it or prefer the thicker aesthetic.
Make sure to download the correct file for the heat-set insert type you have. Voron spec and RatRig spec inserts are supported, two very common insert formats.
Qty
Description
Sourcing
1
Bambu Lab silicone nozzle wiper for A1 printer
Bambu Lab Store, Aliexpress
1
M3 D5.0 L4.0 (Voron spec) or M3 D4.6 L4.0 (RatRig spec) brass heat-set insert
1
M3 x 8mm socket head or button head cap screw
Core One spare parts, Aliexpress
You should have a M3nS square nut in your spare parts bag or left over from your build.
Qty
Description
Sourcing
1
Bambu Lab silicone nozzle wiper for A1 printer
Bambu Lab Store, Aliexpress
1
M3 square nut thin (DIN 562 / Prusa M3nS)
Core One spare parts, Prusa, Aliexpress
1
M3 x 10mm socket head or button head cap screw
Core One spare parts, Aliexpress
Qty
Description
Sourcing
1
Bambu Lab silicone nozzle wiper for A1 printer
Bambu Lab Store, Aliexpress
1
M3 hex nut (DIN 934 / Prusa M3n)
Core One spare parts, Aliexpress
1
M3 x 12mm socket head or button head cap screw
Core One spare parts, Aliexpress
Print the part with its front face facing down. The STL files are pre-rotated into the right orientation for printing.
The part is long and skinny which makes it very prone to warping on the narrower side. It's highly recommended using a brim and possibly adhesives like Magigoo or similar if you choose to use a material that likes to warp.
You can go with the "0.2mm Structural" profile but I personally like to beef things up a little and add a few extra perimeters.
Material
Use a material that is suitable for the temperatures inside the enclosure. I used Prusament PC Blend and tested ASA as well.
Other suitable materials: PC Blend CF, other PC, ASA, ABS, etc.
CF and GF materials can help reduce warping.
Other settings:
Layer height: 0.2mm
Extrusion width: 0.45mm
Perimeters: 4
Infill: 15% Gyroid
Supports: No
Brim: Recommended
Step 1 - Insert Nuts
Install the heat-set insert, square nut, or hex nut in the printed part, depending on which attachment option you chose.
Step 2 - Attach Silicone Pad
Stick the A1 silicone pad onto the designated area on the printed part (see Adhesive section below). Roughing up the area can give the adhesive more grip and improve adhesion.
Pay attention to the rounded and sharp corners of the pad. Orient the pad so the rounded corners face towards the front.
Step 3 - Attach Wiper Arm
Move the bed to roughly 50mm Z-height via Control → Move Axis → Move Z on the LCD so that you have enough space underneath the bed to use a screwdriver.
Place the printed Wiper Arm onto the left or right arm of the bed frame and align it with the tab of the bed (the one with the fingerprint). Then secure the arm with an M3 screw from the bottom. The correct screw length is specified in the "Attachment Options" sections above.
There isn't currently a definitive answer regarding the optimal adhesive for the silicone pad. Please experiment and share your results in the comments.
Here are my personal findings so far:
Factory Adhesive: I tested the pre-applied adhesive of the pads from Aliexpress. The bond failed and the pad detached from the PC Blend arm after only a couple of prints.
Silicone Adhesive: This video suggests using silicone adhesive to bond the pad. I suspect this likely only works if you first remove the factory adhesive from the pad, but I have not tested this myself.
3M 300LSE Tape: I am currently using 3M 300LSE adhesive transfer tape applied on top of the silicone pad's factory adhesive and it's been holding like a champ for several months.
It's a thin high-strength adhesive for low surface energy materials (such as many thermoplastics) and temperature resistant up to 148°C. Note that this tape will likely not stick directly to the silicone i.e. without the pad's factory adhesive intact. This tape is also not easy to source.
Differential Tape: During research I found that a differential tape with a silicone adhesive on one side and an acrylic adhesive on the other side would be ideal. Unfortunately, I haven't been able to source one.
You may also try superglue or two-part epoxy. Since silicone is notoriously difficult to bond to, I recommend applying your adhesive on top of the pad's pre-applied factory adhesive.
Please help others and share your findings. I'll link helpful comments here.
Draw your own custom nozzle wiping sequence online with the new Core One Nozzle Wiper Path Generator tool.
Replace the stock nozzle cleaning G-code (G29 P9 X208 Y-2.5 W32 H4) in the "Start G-code" in the printer settings with the generated G-code.
Always test the wiping sequence before including it in your printer profile. The tool provides standalone slowed-down test files to dry-run the sequence.
Qty
Description
Sourcing
2
Short M3 socket head cap screws (exact length is non-critical / approx. 6-12mm)
Spare parts, Aliexpress
Some
Neodymium block or disc magnets, strength doesn't matter (see Magnet Options below)
You don't need to use all the magnet pockets in the printed part. Use as many as you like. The alignment of the bin is achieved by two SHCS screws, the magnets just prevent it from sliding around or rattling, and provide a nice snap feel.
There are several premade magnet options available:
up to 5 20x5x2mm block magnets
up to 5 20x6x2mm block magnets (Prusa spec)
up to 5 20x10x2mm block magnets
up to 10 6x2mm disc magnets
up to 8 8x2mm disc magnets
up to 5 10x2mm disc magnets
If your magnet type is not available you can customize the Purge Bin magnets in Onshape and change the type, dimensions, rows, columns, and clearance in the Configurations panel in the upper left of the sidebar.
To export, right-click on the part and select “Export”. In the Export dialog, select STL as the output format and set the units to millimeters.
Print the Purge Bin with the built-in "0.2mm Structural" profile in a material that can withstand the temperatures. Considering that it bears no load and isn't close to a heat source, PETG should be sufficient.
To fit the bin onto the Core One bed, rotate the part 35 degrees counter-clockwise.
Step 1 - Install Magnets
The magnet pockets have a 0.2mm diametric clearance, e.g. the pocket for a 6mm magnet is 6.2mm in diameter. This should result in a tight fit but it's not a press-fit installation. To prevent the magnets from falling out, apply a dot of superglue or epoxy adhesive into the pocket before inserting the magnet.
If you don't have magnets, that's cool too, as long as you install the alignment screws (see next step).
Step 2 - Install Alignment Screws
Insert two M3 socket head cap screws (SHCS) into the sheet metal at the bottom of the printer, as shown in the image below. These serve as alignment pins for the Purge Bin.
Step 3 - Install Purge Bin
Install the Purge Bin at the front on the bottom of the printer. Align the bin on both sides with the alignment screws that you installed in the previous step.
Before you continue printing, test the alignment of the Purge Bin and Wiper Arm to avoid collisions due to misalignment.
With the Wiper Arm and the Purge Bin installed, slowly lower the bed all the way to the bottom via Control → Move Axis → Move Z on the LCD and make sure the Wiper Arm doesn't collide with the Purge Bin. There should be about 2mm clearance between the arm and the bin.
All parts are available in STEP format. In the Design Resources folder you can find a full assembly of the Wiper Arm and Purge Bin with a dummy silicone pad in STEP format, as well as all the 3D scans used for this project in STL format.
You can also create a copy of the CAD to modify in Onshape:
https://cad.onshape.com/documents/5b3897977821cb84aa960c8c/v/c6c39514038bf5a222950ac4/e/6e4dc12b048003864f109dd6
Bytinx_1344834Likes1.2KDownloads6K

 Byprusa-researchLikes0Downloads2.7K

 Byp3rr1ff3ryLikes0Downloads152

 Bydet-manLikes0Downloads175

 Bygummiegecko8477Likes0Downloads167

 BydalleLikes0Downloads149

 Bypeter-van-der-waalLikes0Downloads258

 Byarhi_585078Likes64Downloads545

 BykingnothingLikes0Downloads183

 ByfilamentalistLikes71Downloads111

 ByHanzo3dLikes155Downloads417

 BydarienLikes0Downloads1K