



Đôi cánh Hermes, sứ giả của các vị thần
 ByOldLadyLikes876Downloads2K
Build another version of this model.
Project Summary
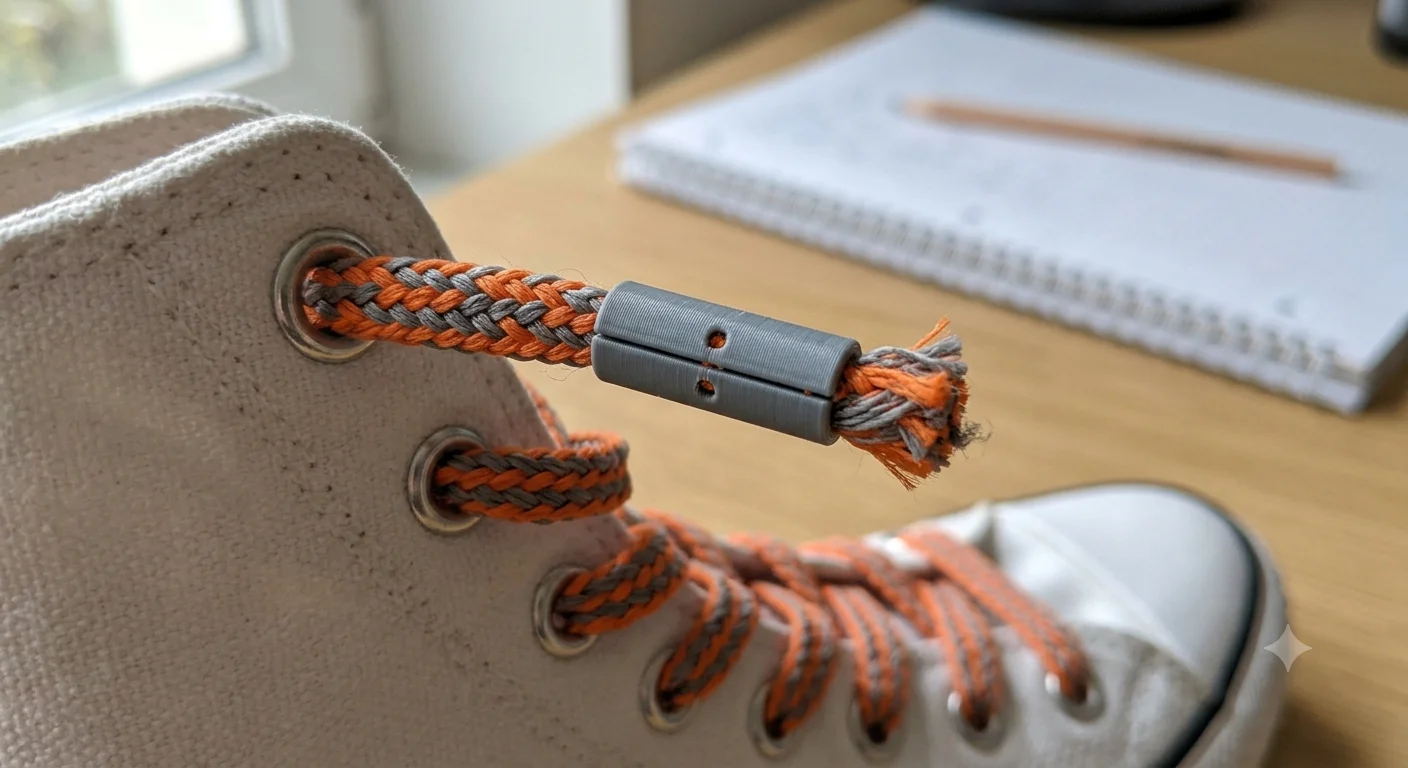
A universal frustration solved with pure 3D-printed geometry. When the plastic tip (aglet) of a shoelace breaks and frays, lacing shoes becomes impossible. SnapAglet is a micro-scaled, 100% print-in-place mechanical clamp designed to instantly repair frayed laces without glue, tape, or metal hardware.
Utilizing 180-degree rotational symmetry, you print the exact same model twice. When flipped face-to-face, the sub-millimeter alignment pins and friction-lock sockets snap together perfectly, compressing the frayed lace into internal biting ridges. At just 11mm long and 3.2mm thick, the assembled clip easily glides through standard shoe eyelets.
3D Printing Instructions
Because this model relies on sub-millimeter tolerances for the snap-fit pins, precise print settings are essential for success.
Orientation: Place the model completely flat side down on the build plate. It is designed to print with zero support material.
Quantity: You need to print exactly 2 copies of the file to create one complete clamping set.
Layer Height: 0.12mm (High Detail) is highly recommended. Anything thicker may cause the micro-alignment pins to lose their round shape.
Wall Loops / Perimeters: 3 or 4. Because the model is so narrow, this will effectively make the clip 100% solid plastic, giving it the structural strength to take a beating on your shoes.
Material: Standard PLA or PLA-CF (Carbon Fiber). PLA provides the rigidity needed for a crisp, permanent friction snap-lock. Avoid flexible materials like TPU.
Bed Adhesion: A brim is generally not needed if your bed is clean, but if you experience curling due to the tiny footprint, add a 2mm outer brim.
Step-by-Step Assembly Guide
Note: No glue or tools are strictly required, though a small pair of pliers can make final securing much easier on your fingers.
Prepare the Lace: Twist the frayed end of your broken shoelace tightly between your fingers to bunch the loose threads together. If the frayed mess is excessively long, trim it back slightly.
Seat the Lace: Take your first printed half and lay the twisted lace directly into the central semi-circular channel. Ensure the lace rests firmly against the internal gripping teeth.
Align the Clamp: Take the second printed half and rotate it 180 degrees horizontally. The two pins on the left side of Part A will now align perfectly with the two sockets on the right side of Part B.
Snap and Lock: Press the two halves together tightly. Squeeze firmly near the ends until you feel a definitive "click" as the friction pins lock home.
Test: Give the lace a firm tug to ensure the internal teeth have successfully bitten into the fabric. Thread it through your shoe eyelets and you are ready to go!
ByOldLadyLikes876Downloads2K

 ByremingtonLikes162Downloads557

 ByDevis_1367119Likes416Downloads2K

 ByFC2M3DLikes200Downloads1.3K

 ByVinors3DLabLikes949Downloads2.1K

 ByPeterholmdk_32956Likes92Downloads384

 ByDariusV_119229Likes148Downloads253

 By2viewsLikes391Downloads388

 ByTperroneDesignLikes60Downloads142

 ByvanessaLikes0Downloads119

 ByNorkkon_252760Likes76Downloads210

 ByDreaming3D_2585787Likes10Downloads18