


Steam Machine Companion Cube / Vỏ đựng Weighted Storage Cube
 ByJaronLikes310Downloads1K
Build another version of this model.
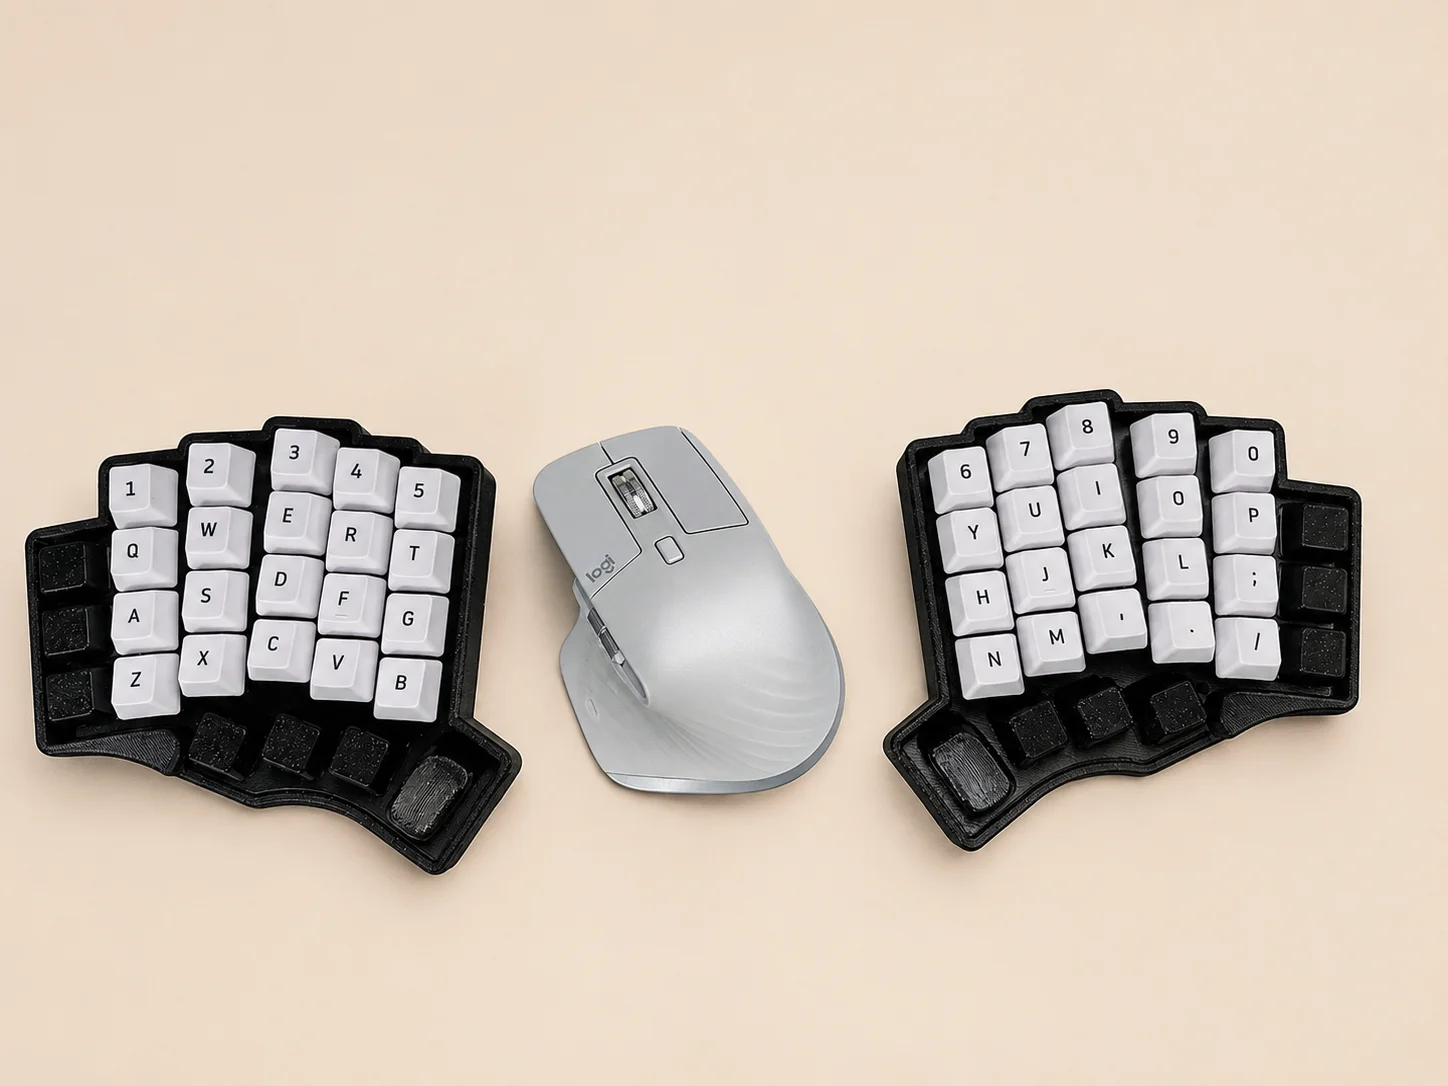
Wireless Split Mechanical Keyboard Case
This is a fully printable case and plate set designed for a 54-key wireless split mechanical keyboard using two nice!nano v2 controllers or compatible clones.
The case has been printed and tested using PLA, PLA+, PETG, and ABS. All four materials produced functional parts, so you can choose a material based on your preferred appearance, durability, and printing setup.
Print Information
All test parts were printed on a Creality K1.
Average print times across the four tested materials were:
Each case: approximately 2 hours and 30 minutes
Each switch plate: approximately 45 minutes with ironing enabled
Actual print times may vary depending on your layer height, print speed, infill, wall count, and ironing settings.
Materials and Components Required
5 × M2 heat-set inserts
5 × M2 6 mm hex bolts
2 × nice!nano v2 controllers or compatible clones
2 × 500 mAh LiPo batteries (34mmX53mmX5mm Dimensions Max)
54 × MX-compatible switches
52 × 1U keycaps
2 × 1.5U keycaps
10 × 6 × 2 mm silicone cabinet bumpers or keyboard feet
Filament of your choice
Controller Installation
The MCU is intended to be glued into place inside the case.
For a less permanent installation, position the MCU in its slot and apply hot glue to the rear of the controller. Fill the visible gap or slot behind the MCU, then extend the hot glue slightly over the rear edge of the controller. This should hold the controller securely during normal use while still allowing it to be removed and replaced more easily than if it were installed with superglue.
Before applying any glue, fully test the keyboard and confirm that both halves are functional and properly synced together. Make sure every key, controller, battery connection, and wireless connection is working correctly. Testing everything before securing the components can prevent unnecessary headaches if troubleshooting is needed later.
The reset and ground pins are positioned so they can be probed in the future without removing the controller from the case.
Take care not to cover the USB port, battery connector, reset and ground pins, or any other components that may need to remain accessible.
Wiring and Battery Placement
Before closing the case, carefully manage and position all wiring so that it does not interfere with the screw posts, heat-set inserts, or the edges where the case sections meet.
Make sure no wires are pinched, stretched, or placed directly over a screw hole. The wires should sit naturally inside the available channels and open spaces without being compressed when the case is tightened.
Pay special attention to the LiPo battery and its wiring. The battery should not be pressed against sharp solder joints, switch pins, screws, or other components that could puncture or damage it. Do not overtighten the case if there is resistance, as this may indicate that a wire or battery is being pinched.
The base beneath the battery is only 1 mm thick to accommodate the larger 500 mAh battery. This thickness has proven to be sufficient in the ABS-printed case. When printing the case in PLA, PLA+, PETG, or other materials, inspect the battery base carefully after printing and continue to monitor it during use for excessive flexing, warping, cracking, or other signs of weakness.
Test-fit the case before installing the screws to confirm that everything closes properly without excessive pressure on the wiring or LiPo battery.
Files and Modifications
All available design files have been included.
I would love to see this model modified, improved, remixed, or adapted into something even better. Please feel free to make changes and share any improvements you create.
I would also love to see your completed builds and how you chose to customize the keyboard.
ByJaronLikes310Downloads1K

 Byw3rN42Likes127Downloads930

 ByTomDDLikes89Downloads572

 ByJwidessLikes34Downloads372

 ByBroBuilds3D_4455044Likes32Downloads450

 ByckthLikes148Downloads2.4K

 ByVikingptty_1943738Likes50Downloads228

 ByAustin Wolt WoltLikes162Downloads375

 ByBrokentooth_designsLikes30Downloads223

 ByJKMCZLikes11Downloads174

 Byjodinskylab_3390035Likes144Downloads162

 ByBoxseez_169293Likes13Downloads104