



Thằn lằn cử động linh hoạt - In tại chỗ (Không cần support)
 Bycream110_291842Likes924Downloads7.7K
Build another version of this model.
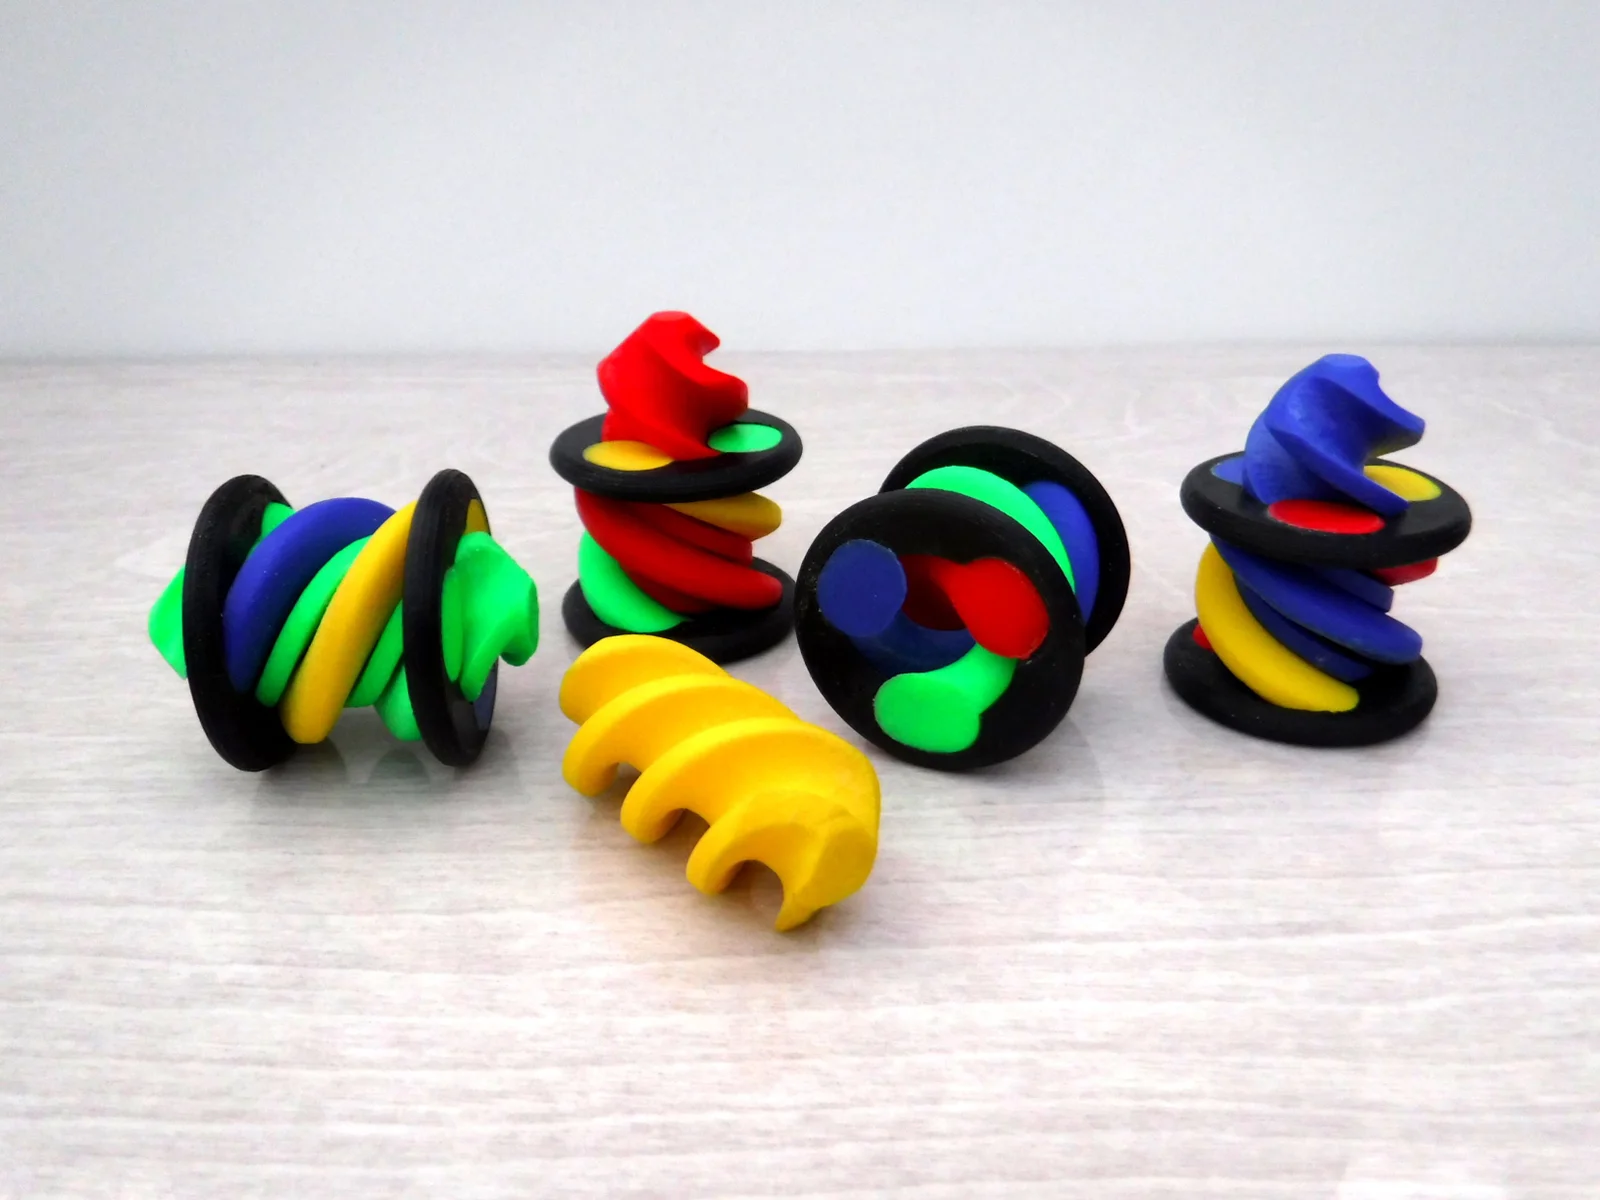
A multi coloured passthrough in the form of a helical striped candy, resulting in an eye catching and tactile fidget.
Looking at the many passthrough models the theme with a few exceptions is that the models consist of only two parts were one passes through the other.
I decided to adopt a different approach in the design using a total of 6 parts although final construction will produce two distinct elements in a recognisable passthrough form.
The solid central (shuttle), has a continuous spiral which is uniform along the majority of its length terminating in truncated conical ends.
The outer (bobbin), consists of three separate coloured stripes attached to two screw on end pieces with open centres to form a hollow cylindrical spiral through which the solid spiral can pass.
The three outer spirals and the central spiral are printed in one operation complete with the required spacing in close proximity but not attached to each other. Printing them together helps maintain support minimising any additional support.
The two end pieces were printed separately to the spirals.
This model was created using BlocksCAD.
Size -Shuttle: 21(dia) x 58(H) mm, Bobbin: 45(dia) x 36(H) mm
Weight overall: 41g
Supplies
Plastic Adhesive
Sanding Paper
Adhesive tape
Pliers
Know your tools and follow the recommended operational procedures and be sure to wear the appropriate PPE.
Print Settings
Filament: PLA in a variety of colours (black, red, blue, green & yellow), but any single or multiple colour combinations may be used as suits personal preference.
Layer Height: 0.1mm
Infill:100%
Print Speed: 150mm/s or slower for spirals, default speed for end pieces
Base Adhesion: Skirt or Raft if there are problems with adhesion
Support: Yes for the Spirals, No for the end pieces.
Support Structure: Normal
Support Placement: Touching Buildplate
Support Pattern: Zig Zag
Files orientated for printing directly.
Because the spirals are printed together multi coloured versions require multiple print runs in the requied colour then separating and recombining as required.
Post Processing
Remove the supports (these should break off relatively easily but if not pliers can be used), and raised areas sanded back.
If necessary sand smooth the contact surfaces of the spirals to remove any aberrations.
Assembly
With the three outer spirals aligned to the inner spiral.
Fit an end piece ensuring it sits level to the end of the spirals and that the centre spiral can be rotated.
Press the flat ends of the spirals on a flat surface and apply tape to the end piece covering the spiral ends and around the three spirals.
Apply the remaining end piece to the other end.
Partially rotate the end piece from the outer spirals without removing it and apply a little* adhesive to the exposed area where the spirals will contact and rotate the end piece to align with the spiral flat ends.
*Apply with care as excessive adhesive may bleed to the central spiral preventing its rotation or removal.
Press the end piece on a flat surface to maintain alignment of the spiral end to the end piece while the glue sets.
Remove the tape from the end piece and repeat the process.
Once the end pieces are firmly attached remove the tape from around the spirals.
Sand the flat faces of the end pieces to remove any print lines or excessive adhesive as required.
If necessary sand any areas (centre spiral or inner surfaces of the bobbin), that impede rotation.
Happy fidgeting
Bycream110_291842Likes924Downloads7.7K

 ByOnemoredaveLikes861Downloads6.9K

 Byquibeck_3353173Likes103Downloads951

 Byfilament-frenzyLikes0Downloads454

 ByTheMakerStuffLikes315Downloads1.9K

 BySzvmkn_3779340Likes231Downloads1.3K

 ByHacker Man ManLikes248Downloads1.5K

 Byfluffytails37Likes184Downloads769

 Byjs14581_2767550Likes118Downloads3.3K

 ByAristotelisNellasLikes18Downloads708

 ByNoNameIdea_4437934Likes124Downloads695

 Bysean-liangLikes0Downloads115