The wraith FPV drone
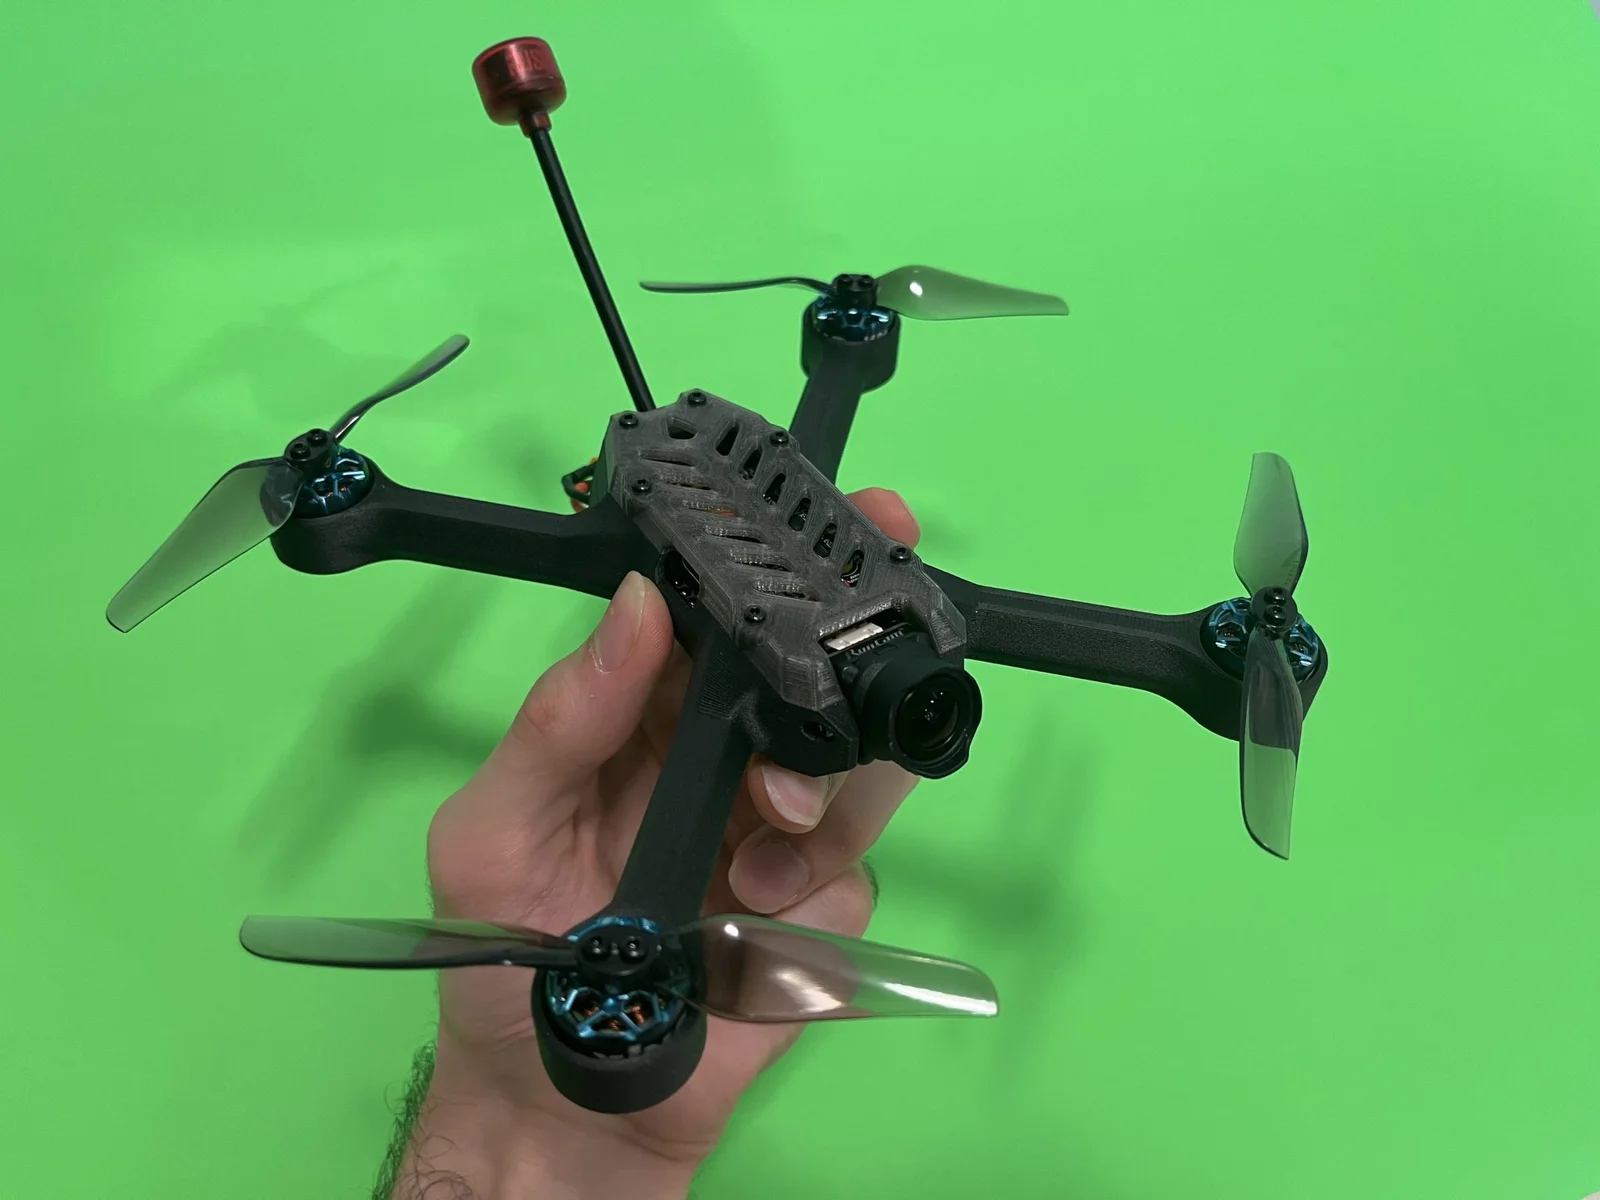
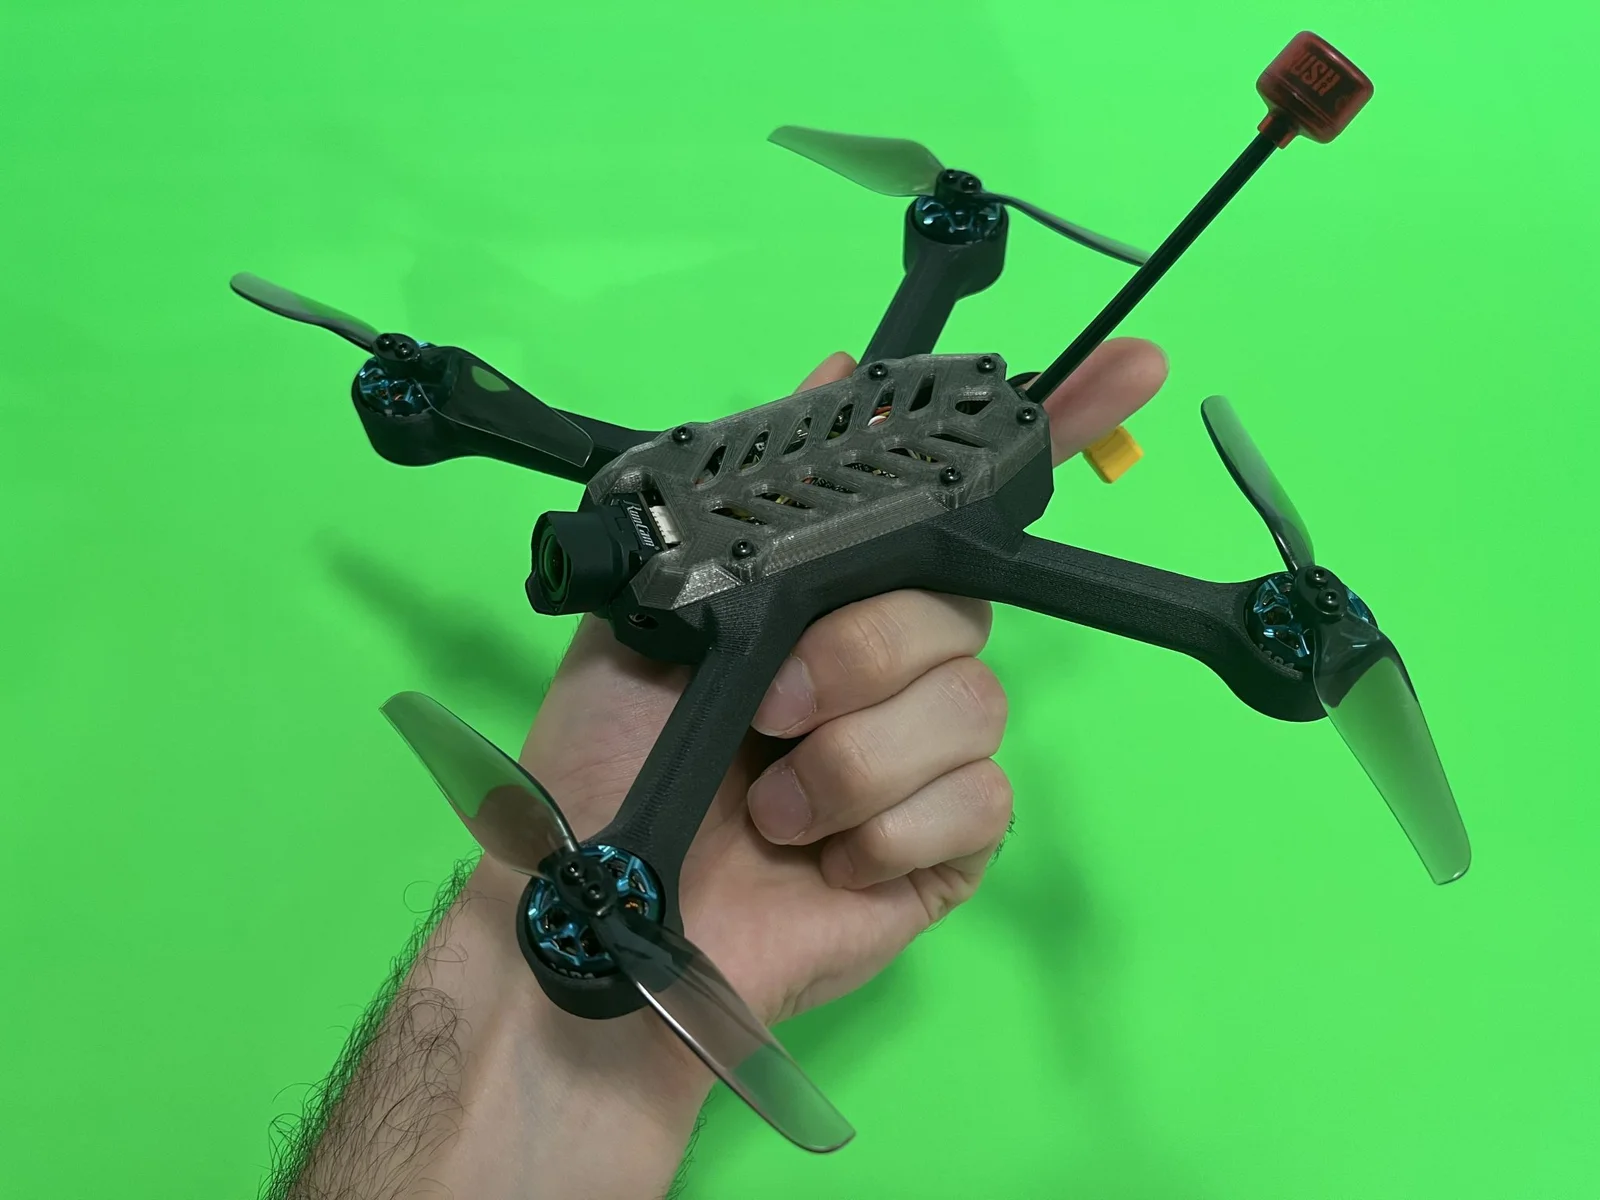
This is a 4 inch drone frame. Mine is printed using carbon fiber PA6 nylon for the body and translucent smoke PETG for the top. I'll list out the specific electronic and mechanical hardware that I used below. This list will also contain the general part specs that will work with this build, but I'll also leave links to the exact parts I'm using, in case you just want something that's guaranteed to work.
Electronics
Part name
Recommended part / source
20mm x 20mm ESC / Flight Controller Stack (1x)
SpeedyBee F405 Mini FC / ESC stack
https://www.aliexpress.us/item/3256805742710853.html?spm=a2g0o.productlist.main.21.3e73UoUxUoUxb0&algo_pvid=7fb26787-17ea-4b5d-a962-6b4b1588e262&algo_exp_id=7fb26787-17ea-4b5d-a962-6b4b1588e262-10&pdp_npi=4%40dis%21USD%2143.97%2130.78%21%21%2143.97%2130.78%21%402101c59517324255129243187e8f18%2112000034891261205%21sea%21US%212015206608%21X&curPageLogUid=agdFVicK0P4q&utparam-url=scene%3Asearch%7Cquery_from%3A#nav-store
ELRS receiver (1x)
Happymodel EP1 or EP2 ELRS receiver
https://www.aliexpress.us/item/3256806067687347.html?spm=a2g0o.productlist.main.1.61462eebRXwyfX&algo_pvid=6779036f-36c7-4999-aebc-62bad5df302f&algo_exp_id=6779036f-36c7-4999-aebc-62bad5df302f-0&pdp_npi=4%40dis%21USD%2168.39%2121.20%21%21%21493.45%21152.97%21%402101c72a17324257755175777e6846%2112000040192703527%21sea%21US%212015206608%21X&curPageLogUid=ZrT4kgek9BAM&utparam-url=scene%3Asearch%7Cquery_from%3A
. 1404, 1405, 1407, or 1408 brushless motor (4x)
Note: Choose a higher KV motor if you want to fly on 3-4s. Choose a lower KV motor if you want to fly on 6s
iFlight 1404 XING motors
https://www.aliexpress.us/item/3256803369284038.html?spm=a2g0o.productlist.main.3.4f6c689d6I5vA6&algo_pvid=5caf9b53-7f10-44d9-b966-ac1cb7009480&algo_exp_id=5caf9b53-7f10-44d9-b966-ac1cb7009480-1&pdp_npi=4%40dis%21USD%2169.99%2148.99%21%21%2169.99%2148.99%21%402101ef7017324259295121916ec637%2112000036145751204%21sea%21US%212015206608%21X&curPageLogUid=VNFtLiZTYIfg&utparam-url=scene%3Asearch%7Cquery_from%3A
Analog VTX (1x)
Note: Internal space is limited. Not all VTXs will fit inside. This design is made to perfectly fit a Zeus Nano.
HGLRC Zeus Nano
https://www.aliexpress.us/item/3256803835461412.html?spm=a2g0o.productlist.main.3.67f83b8a65amuz&algo_pvid=2208c0e9-ad5a-4773-8ce5-b026b31b7d02&algo_exp_id=2208c0e9-ad5a-4773-8ce5-b026b31b7d02-1&pdp_npi=4%40dis%21USD%2124.20%2116.46%21%21%2124.20%2116.46%21%402103273e17324264408925366e6c6a%2112000027771480164%21sea%21US%212015206608%21X&curPageLogUid=Qtl3SJghE33V&utparam-url=scene%3Asearch%7Cquery_from%3A
19mm analog FPV camera (1x)
Runcam Phoenix 2 SE
https://www.aliexpress.us/item/3256806575561005.html?spm=a2g0o.productlist.main.27.4dee33e7eyzIU9&algo_pvid=fa872a04-1b6b-45fe-8e8b-cef8271736fe&algo_exp_id=fa872a04-1b6b-45fe-8e8b-cef8271736fe-13&pdp_npi=4%40dis%21USD%2165.00%2120.80%21%21%21468.96%21150.07%21%402101c5c217324259982142655e7d8c%2112000038217552579%21sea%21US%212015206608%21X&curPageLogUid=hKoDZ4tFtUbZ&utparam-url=scene%3Asearch%7Cquery_from%3A
150mm FPV antenna (1x)
Note: make sure that the connector of your antenna matches that of your VTX
HGLRC 150mm Antenna (IPEX connector)
https://www.aliexpress.us/item/3256804081986030.html?spm=a2g0o.productlist.main.1.fa9761e3MPGRL7&algo_pvid=b97a0269-faec-4bda-bd60-0efab396eccc&algo_exp_id=b97a0269-faec-4bda-bd60-0efab396eccc-0&pdp_npi=4%40dis%21USD%215.37%214.62%21%21%215.37%214.62%21%402103246617324262856695224e6bb2%2112000028576959748%21sea%21US%212015206608%21X&curPageLogUid=YZgo7rItr72t&utparam-url=scene%3Asearch%7Cquery_from%3A
LiPo Battery (1x)
Note: Whether you should use 4s or 6s depends of the KV of your motors. Aim for a capacity of ~15 watt hours. Make sure your battery can keep up with the current draw of the motors. I went with a niiice juicy high voltage 4s.
CODDAR 850mAh 4S 15.2V HV
https://www.amazon.com/CODDAR-Battery-Connector-Brushless-CD4S730100HV/dp/B0CYL6Q9YW?crid=35THRGO4LR2JF&dib=eyJ2IjoiMSJ9.VPq3qhvk-npILfCWJ1Ybt8qOJoLo6IUVd7oj0R86XAaFOBTOyuAgrF11SdeZj3rE.Zyy-9NPrSs21M4lE0da5fFSzQIi0DYErVhWinePlbk4&dib_tag=se&keywords=coddar%2B730&qid=1732427087&s=electronics&sprefix=coddar%2B730%2Celectronics%2C83&sr=1-2&th=1
ELRS controller
Note: There is a variety of controllers to choose from, and I can't think of a single bad one. On a budget, I'd recommend the Radiomaster pocket. And c'mon, who here isn't on a budget… in this economy.
Radiomaster Pocket Controller
https://www.aliexpress.us/item/3256805717833079.html?spm=a2g0o.productlist.main.3.662e25cellTbHq&algo_pvid=cee63c40-181d-480f-81cd-6014cfff6964&algo_exp_id=cee63c40-181d-480f-81cd-6014cfff6964-1&pdp_npi=4%40dis%21USD%2176.02%2155.49%21%21%21548.50%21400.40%21%402101c5a717324365526251579efa8a%2112000034793408652%21sea%21US%212015206608%21X&curPageLogUid=2D3R9oq9O5lj&utparam-url=scene%3Asearch%7Cquery_from%3A
*Stuff on Aliexpress goes out of stock all of the time, and prices fluctuate rather wildly. Please do shop around by the item name if these links have gone out of stock, search for better prices.
Mechanical Parts:
Part name
Recommended part / source
4 inch propeller (2x CW, 2x CCW)
Note: Technically, you can get away with a 3.5in propeller, but for best performance use a 4inch.
iFlight 4030 propeller
https://www.aliexpress.us/item/3256804692765122.html?spm=a2g0o.productlist.main.1.41624288FZwGe5&algo_pvid=11a18a7b-fa63-4789-b35b-29f3fa4d72e1&algo_exp_id=11a18a7b-fa63-4789-b35b-29f3fa4d72e1-0&pdp_npi=4%40dis%21USD%216.36%213.12%21%21%216.36%213.12%21%402103246417324274389873083eb1b5%2112000030868998263%21sea%21US%212015206608%21X&curPageLogUid=WDRCndbjGWVN&utparam-url=scene%3Asearch%7Cquery_from%3A
M2x4 insert nut (6x)
Note: for securing top
M2 x 4 insert nut
https://www.aliexpress.us/item/3256804349544912.html?spm=a2g0o.productlist.main.1.388f77ffcvPJSJ&algo_pvid=f0eb4652-4be7-43cd-a958-b0e456bdba5a&algo_exp_id=f0eb4652-4be7-43cd-a958-b0e456bdba5a-0&pdp_npi=4%40dis%21USD%211.68%211.40%21%21%211.68%211.40%21%40210330dd17324352416827734e9c78%2112000029512459857%21sea%21US%212015206608%21X&curPageLogUid=QvDV9DnaP957&utparam-url=scene%3Asearch%7Cquery_from%3A
M2x20 screw (4x)
Note: These are used to secure the stack and should come included with it, no need to buy em.
M2x20 screw (4x)
M2x10 screw (6x)
Note: Don't cheap out on these cause if they strip it'll be a real pain in butt. These are for securing the top
M2x10 screw
https://www.aliexpress.us/item/3256803591402861.html?spm=a2g0o.productlist.main.5.3f7e306armJv68&algo_pvid=9fcdd80e-43c7-41e4-9618-083434ce0bf9&algo_exp_id=9fcdd80e-43c7-41e4-9618-083434ce0bf9-2&pdp_npi=4%40dis%21USD%210.99%210.94%21%21%210.99%210.94%21%402101c5c217324353453042189e7d8a%2112000035679051450%21sea%21US%212015206608%21X&curPageLogUid=2lzm2OyTGrZq&utparam-url=scene%3Asearch%7Cquery_from%3A
M2x8 screw (24x)
Note: 16 for attaching motors. 8 for securing the propellers
M2x8 screw
https://www.aliexpress.us/item/3256803591402861.html?spm=a2g0o.productlist.main.5.3f7e306armJv68&algo_pvid=9fcdd80e-43c7-41e4-9618-083434ce0bf9&algo_exp_id=9fcdd80e-43c7-41e4-9618-083434ce0bf9-2&pdp_npi=4%40dis%21USD%210.99%210.94%21%21%210.99%210.94%21%402101c5c217324353453042189e7d8a%2112000035679051450%21sea%21US%212015206608%21X&curPageLogUid=2lzm2OyTGrZq&utparam-url=scene%3Asearch%7Cquery_from%3A
M2x5 screw (4x)
Note: 2 for securing camera, 2 for securing Zeus Nano VTX, if you choose to use it
M2x5 screw
https://www.aliexpress.us/item/3256803591402861.html?spm=a2g0o.productlist.main.5.3f7e306armJv68&algo_pvid=9fcdd80e-43c7-41e4-9618-083434ce0bf9&algo_exp_id=9fcdd80e-43c7-41e4-9618-083434ce0bf9-2&pdp_npi=4%40dis%21USD%210.99%210.94%21%21%210.99%210.94%21%402101c5c217324353453042189e7d8a%2112000035679051450%21sea%21US%212015206608%21X&curPageLogUid=2lzm2OyTGrZq&utparam-url=scene%3Asearch%7Cquery_from%3A
200mm velcro strap (1x)
Note: for securing battery
200mm velcro strap
https://www.aliexpress.us/item/3256804143880125.html?spm=a2g0o.productlist.main.1.7499633cYBpfzO&algo_pvid=ec9828d3-b0a5-4d50-88de-d2bff81faa45&algo_exp_id=ec9828d3-b0a5-4d50-88de-d2bff81faa45-0&pdp_npi=4%40dis%21USD%213.34%212.96%21%21%213.34%212.96%21%402103209b17324354840941985e938a%2112000028781159031%21sea%21US%212015206608%21X&curPageLogUid=WvBtFfLKAs04&utparam-url=scene%3Asearch%7Cquery_from%3A
Double check that order before you purchase
Filament Selection Guide:
Recommended filaments
CF or GF nylon, PC, PP
Acceptable, but try not to crash filaments
PETG, ABS, ASA
Please for the love of god don't filaments
PLA, TPU
Bonus - NASA tier filaments
PEEK
Total Cost Estimate: $150 (drone)
$65+ (controller)
Final Assembled Weight: 150g
Assembly Guide:
(please have some prior drone experience,that said I'll be happy to help just leave a comment or something if you've got a question)
- Go ahead and print off both pieces. I'll wait. Oh, I should mention - use the goodsettings, no supports needed.
- Start with the motors. First cut the motor wires down to 10cm. Then, thread the wires through the drone's arms, and tighten the motors down with the M2x8 screws, be careful not to overtighten.
- Suspend onlythe ESC part (there are two pieces in the stack) of the stack 2cm or so above its future spot in the drone using a soldering helping hand or some other method. Make sure the ESC module is facing forward (same for the flight controller when you install it later)
- Be careful soldering, strip all the motor wires and (preferable) using a pair of tweezers, solder them to the ESC pads. Do notsolder them facing straight outward as this will increase the thickness of the ESC too much, rather having them perpendicular to the plane of the ESC board, or looping in and around the stack screws.
- Thread an antenna through the hole in the back of the drone, and snap the connector into its place on the VTX. I purchased the Zeus Nano option that comes with a RUSH Cherry Antenna, it is the perfect size and its stem is exactly 4mm in diameter, and the drone was designed to accommodate it, but thinner antennas will fit trough the hole as well.
- Prepare the XT30 connector that came with ESC (or your preferred connector) and cut the wires down to 80mm each (or whatever length you prefer).
- Solder the XT30 wire leads to the ESC, then pa




 ByDirectedHunt42Likes2Downloads180

 ByleonicLikes0Downloads1.4K

 ByZED4EverLikes313Downloads5.2K

 ByrozcyLikes0Downloads110

 ByfifindrLikes500Downloads4K

 BypklLikes0Downloads124

 BymoonyxLikes0Downloads699

 ByVC_DesignLikes679Downloads3.6K

 ByDan Schwartz SchwartzLikes744Downloads3.4K

 Byvc-designLikes0Downloads3.2K

 Bythorin-oakenshieldLikes0Downloads533

 Bytorii-creative-studioLikes0Downloads450