



Còi Tàu Hơi Nước Mini
 ByfifindrLikes500Downloads4K
Build another version of this model.
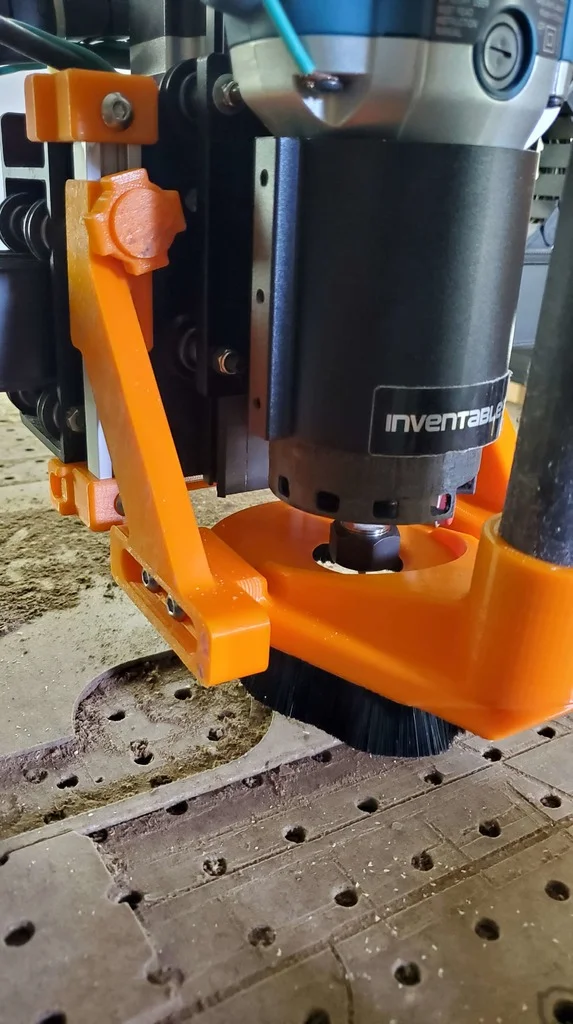
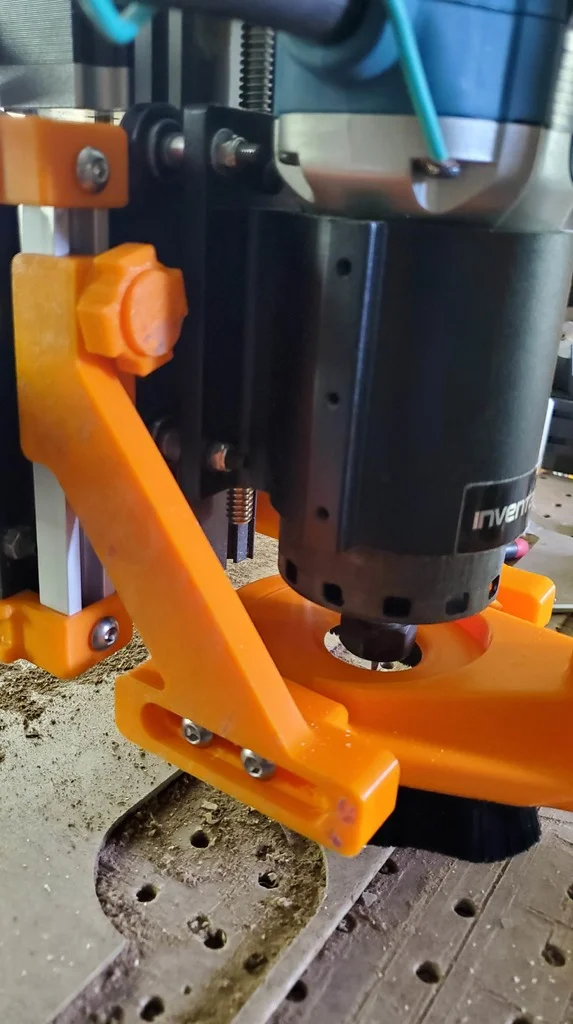
https://www.thingiverse.com/thing:3053371 is a great dust shoe for the X-Carve CNC but I made a couple small modifications and also have gotten a list of other parts for a BOM that was missing from the original.
The reason I like this dust shoe is it is independent of the Z-axis. Several versions attach to the spindle holder and move with the spindle which can sometimes cause the dust shoe to push on the work piece and/or clamps. This version mounts to the X-Axis carriage and lets you lock the height in before the cut starts so you just adjust it down to your work piece height and the spindle will travel up and down freely in the hole of this dust collector.
The parts I changed were: the left and right arm. I made the hole sides and the slot size larger so it fit the screw I used in my BOM. I made the rectangle slot in the top and bottom brackets a little bigger because the t-track I used needed lots of sanding to get it to fit and still needed a clamp to press it in. I also created the "brush insert" which is a piece to use if you get the brush I used that will take up the extra space in the slot and help hold the brush place for gluing/screwing.
In addition to the 3D printed parts you will need:
Printer Brand:
FlashForge
Printer:
Creator Pro
Rafts:
No
Supports:
Yes
Resolution:
200
Infill:
50
Filament: Overture PLA Orange
Notes:
I used lots of walls and infill because I wanted this to be strong enough to be jerked around by the CNC and have the weight of the vacuum hose pulling on it.
Post-Printing =============
Assembly
Cut the T-track to make two 140 mm pieces. Check the bottom and top bracket fitment on the T-track. I personally had to sand the edges of the t-track quite a bit then press them in with a clamp but then modified the rectangle the t-tracks go in so they should fit better.
Put the t-track into both the top and bottom bracket then use the screw holes on the mounts to mark holes in the t-track for drilling. Either drill large enough for the 1/4-20 screws to go through into a nut placed behind the t-track or small enough to tap with a 1/4-20 tap then you shouldn't need the nuts. Slide the t-tracks into the top bracket then use two 1/4-20 button head screws (and nuts if you didn't tap the t-track holes) to mount the t-track pieces to the top bracket.
Unscrew the top two screws on the plate that holds your Z stepper to the extrusion and weave the top bracket (with t-tracks) under the motor and down onto the frame. Rescrew down your motor plate. Slide the t-nuts into the bottom of the t-tracks and then slide the bottom bracket up onto the t-tracks and secure with two more button head screws (and nuts if you didn't tap the t-track holes).
Put the two hex bolts through the screw bottom then press in the screw top to keep them in. Slide these bolts through the holes of the left and right arms. Set the left and right arms up close to the t-track where they will go. Use a tool (I used an allen tool) to slide the t-nuts up higher than where the hex bolt is then push the hex bolt tip into the t-track and carefully lower the t-nut until you can start threading the hex bolt into it. Do this for both arms.
Put the brush into the slot on the bottom of the DustBootLG and mark how much length of brush you need. I recommend cutting it a little long (like 1/8 to 1/4 inch or so) because mine ended up having a tiny gap. The next part I needed another person for, one of us lined the plastic part of the brush into the slot and held it in place and the other put the brush insert inside the brush and down into the slot. Then either glue or use some very tiny screws to make sure the brush insert is tight and won't slip out.
Put the Cover into the DustBootLG (screw down if you want, mine was very tight so I didn't bother screwing it in) then slide the DustBootLG between the two arms. Use four button head screws in the slots of the arms to connect to the DustBootLG holes.
Set your dust boot height by putting the brush down to the work piece and/or max bed clamp height and tightening the hex bolts.
Category: Machine Tools
ByfifindrLikes500Downloads4K

 ByVC_DesignLikes679Downloads3.6K

 ByDan Schwartz SchwartzLikes744Downloads3.4K

 ByZED4EverLikes313Downloads5.2K

 Bysaiganesh_pan_830533Likes65Downloads154

 Bychubbs8697_2027893Likes585Downloads1.7K

 Byquibeck_3353173Likes965Downloads1.9K

 ByRungeKuttaLikes229Downloads1.2K

 ByEadubsLikes228Downloads1.3K

 ByJeremyVillalo_760366Likes68Downloads767

 Bykjus_448782Likes314Downloads673

 BySchmitzBertLikes95Downloads629