



Tiny Colosseum — Bộ sưu tập mô hình kiến trúc thu nhỏ
 ByAdrianSkaba_564069Likes292Downloads989
Build another version of this model.
This is a windmill. but it is not powered by the wind but by a 9V battery or a 12V source. rev regulator.
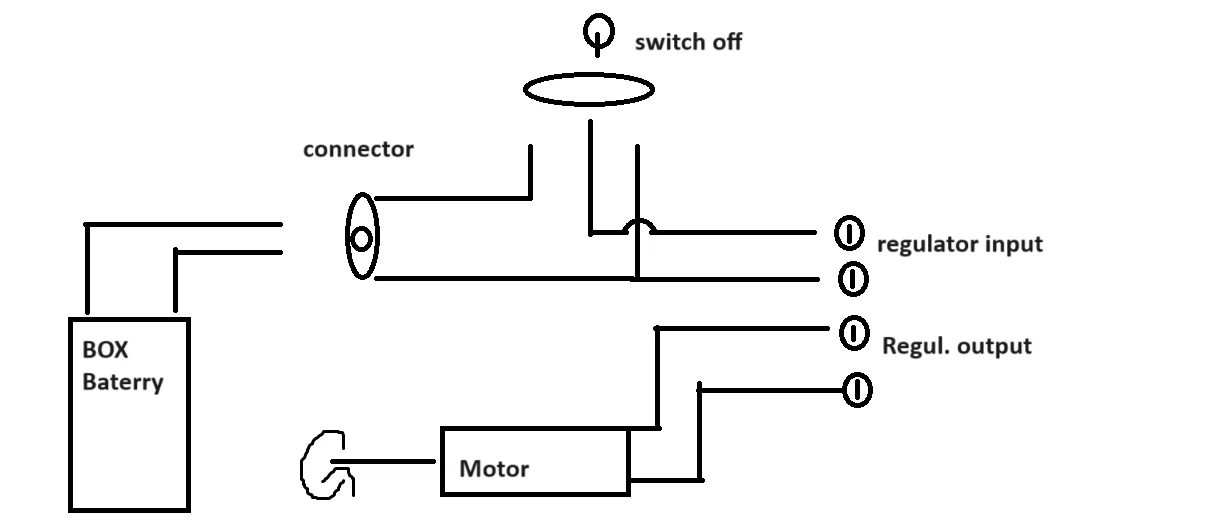
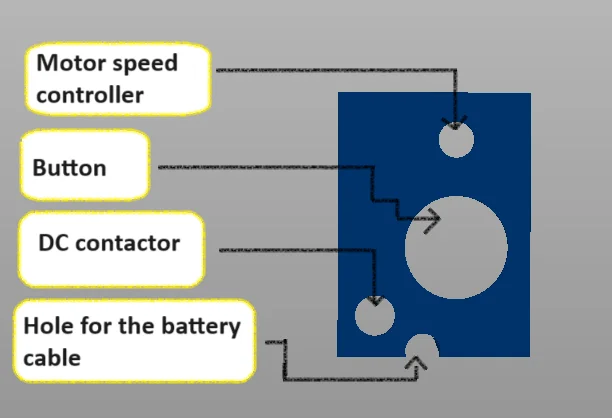
It is necessary to buy a Battery box with connector (male), Female connector, switch, speed regulator, motor. holes are set to these references
Switch
https://dratek.cz/arduino/1244-prepinac-kolebkovy-led-dioda-zluta.html
Cable
https://dratek.cz/arduino/885-vodice-10kusu-krokodyl-klip.html
Rev.regulator
https://dratek.cz/arduino/2037-regulator-rychlosti-dc-motoru-5v-35v-5a-20khz.html
Connector
https://dratek.cz/arduino/34676-dc-jack-samice-do-panelu-5.5-x-2.1-mm.html
Motor
https://dratek.cz/arduino/123002-stejnosmerny-motor-s-prevodovkou-dc-12v-60-rpm-n20.html
Baterry box
https://dratek.cz/arduino/51379-bateriovy-box-9v-s-krytem-a-on-off-prepinacem-dc-2-1mm-konektor.html
it is advisable, but not a condition, to use a ball bearing to attach the propeller
https://www.majkl3d.cz/p/lozisko-608zz?gclid=Cj0KCQjwj5mpBhDJARIsAOVjBdrx3_DNDGQ2R8PfTz1sfklKGKixtkRwjH6zny1zkljbBJkRXdVEUNYaAhM5EALw_wcB
608Z
Connection Connect the battery box via the connector (male) to the female connector. thread the cable through the opening. Connect from the connector to the switch. If you have a switch like mine, you have to connect both + and - (because of the led light). I have it + and - on the sides and the + then goes from the center. then connect + and - to the appropriate place in the regulator and from the regulator to the motor.
I fixed the motor with electrical tape to keep it in position.
Check your components carefully, they may be different.
first run the cables before connecting the components so that everything fits together. I recommend soldering and not having unnecessarily long cables. I recommend gluing the plastics afterwards.
as an improvement that I didn't do, you can supplement the led with lighting inside
I will be happy for tips and ideas, or complaints so that I can possibly correct the problems
3D PRINTING SETTINGS
3D print support roof and window
ByAdrianSkaba_564069Likes292Downloads989

 ByVrimech_968116Likes44Downloads372

 ByPeterG_3243357Likes419Downloads2.1K

 ByClayRadeLikes84Downloads420

 ByGuidoL_547152Likes227Downloads2.4K

 ByTim_1395159Likes38Downloads175

 ByabbymathLikes214Downloads2.1K

 BybvdpLikes48Downloads204

 ByRaisinCosplay_433034Likes260Downloads955

 ByHeinerKrallm_2777937Likes120Downloads487

 ByJonPiasecki_2548868Likes3Downloads19

 By3DPrintyi_1274687Likes106Downloads405