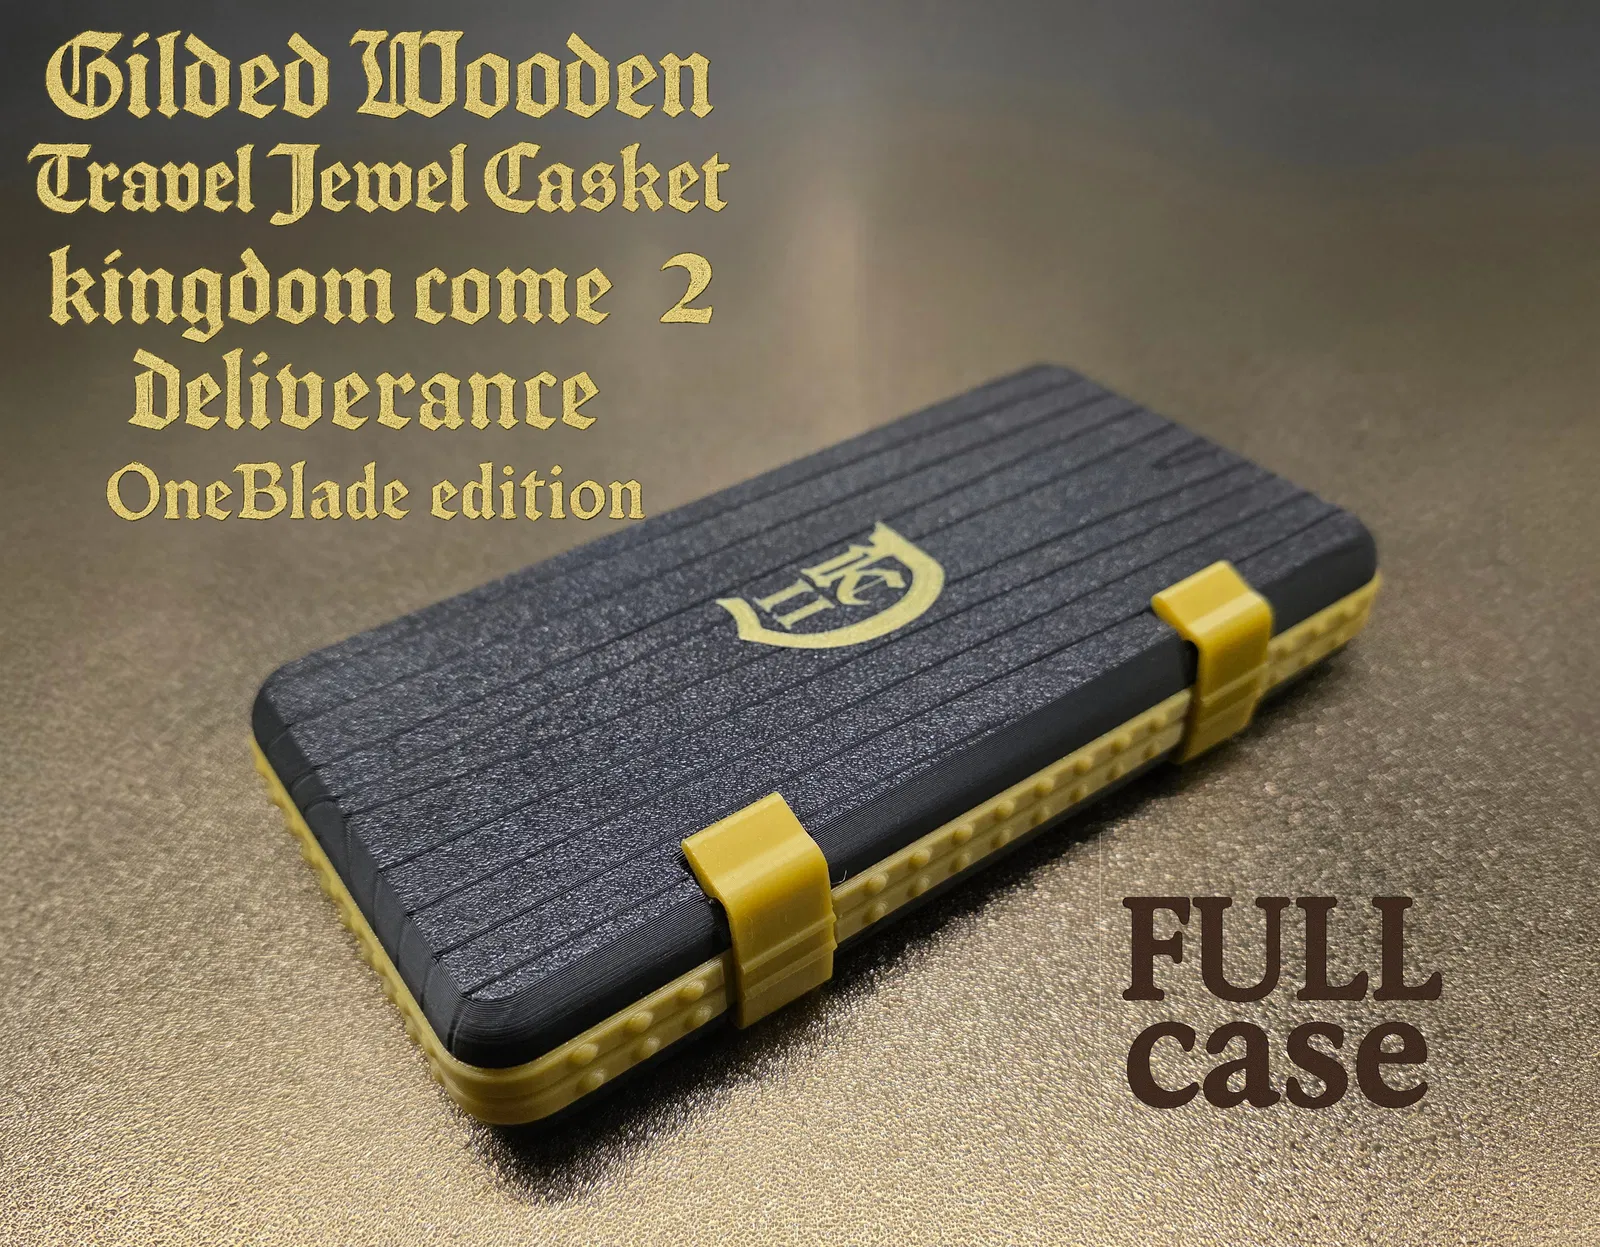
Hộp Đựng Dao Cạo OneBlade KC2D Mạ Vàng Phong Cách Cổ

Khám phá Hộp Đựng Dao Cạo OneBlade KC2D Edition – phiên bản Mini và Full, kết hợp sự thực dụng, thủ công tinh xảo và nét quyến rũ thời Trung Cổ. Được thiết kế tối ưu cho in 3D không cần hỗ trợ, với bản lề bền bỉ và kiểu dáng bo tròn thân thiện khi di chuyển.


Mô tả
OneBlade KC2D Edition – Hộp Cất Giữ Trang Sức Du Lịch Bằng Gỗ Mạ Vàng
A compact travel case available in two main versions:
-
Mini Case – OneBlade with the blade installed and protected
-
Full Case – OneBlade with full accessories
A fusion of practicality, craftsmanship, and medieval charm — created to serve you well and delight your eye with every shave.
A medieval casket is not only metal—it's primarily wood.
I created a hinge system with a partially hidden, durable clip, enclosed in a smooth, rounded shape. The hinges are strong, precise, and tolerant to small calibration differences (around ±0.02 flow).
✠ ✧ ✠ ✧ ✠ ✧ ✠ ✧ ✠ ✧ ✠ ✧ ✠ ✧ ✠ ✧ ✠ ✧ ✠ ✧ ✠ ✧ ✠ ✧ ✠ ✧ ✠ ✧ ✠ ✧ ✠ ✧ ✠ ✧ ✠ ✧ ✠ ✧ ✠ ✧ ✠ ✧ ✠ ✧ ✠
𝕸𝖊𝖒𝖔𝖗𝖎𝖆 𝖔𝖋 𝖙𝖍𝖊 𝕽𝖔𝖞𝖆𝖑 𝕲𝖔𝖑𝖉𝖘𝖒𝖎𝖙𝖍
New times are upon us, bringing wonders that even the oldest masters of the craft could not have imagined. Young warriors now wield strange OneBlades instead of their fathers’ razors — tools so sharp they could shave a troll, adorned with ebony and gold like treasures from a royal vault.
The OneBlade, touched by a spark of magic, changes the countenance of any man — even one wild as a northern bear. (And at times it turns a grim warrior into a rather pleasant fellow — though let this remain between us.)
And since such a jewel rests in your hand, remember: it should not be kept just anywhere. Only in fine boxes of dark wood, framed with bronze, silver, or gold, befitting the wealth and pride of its owner.
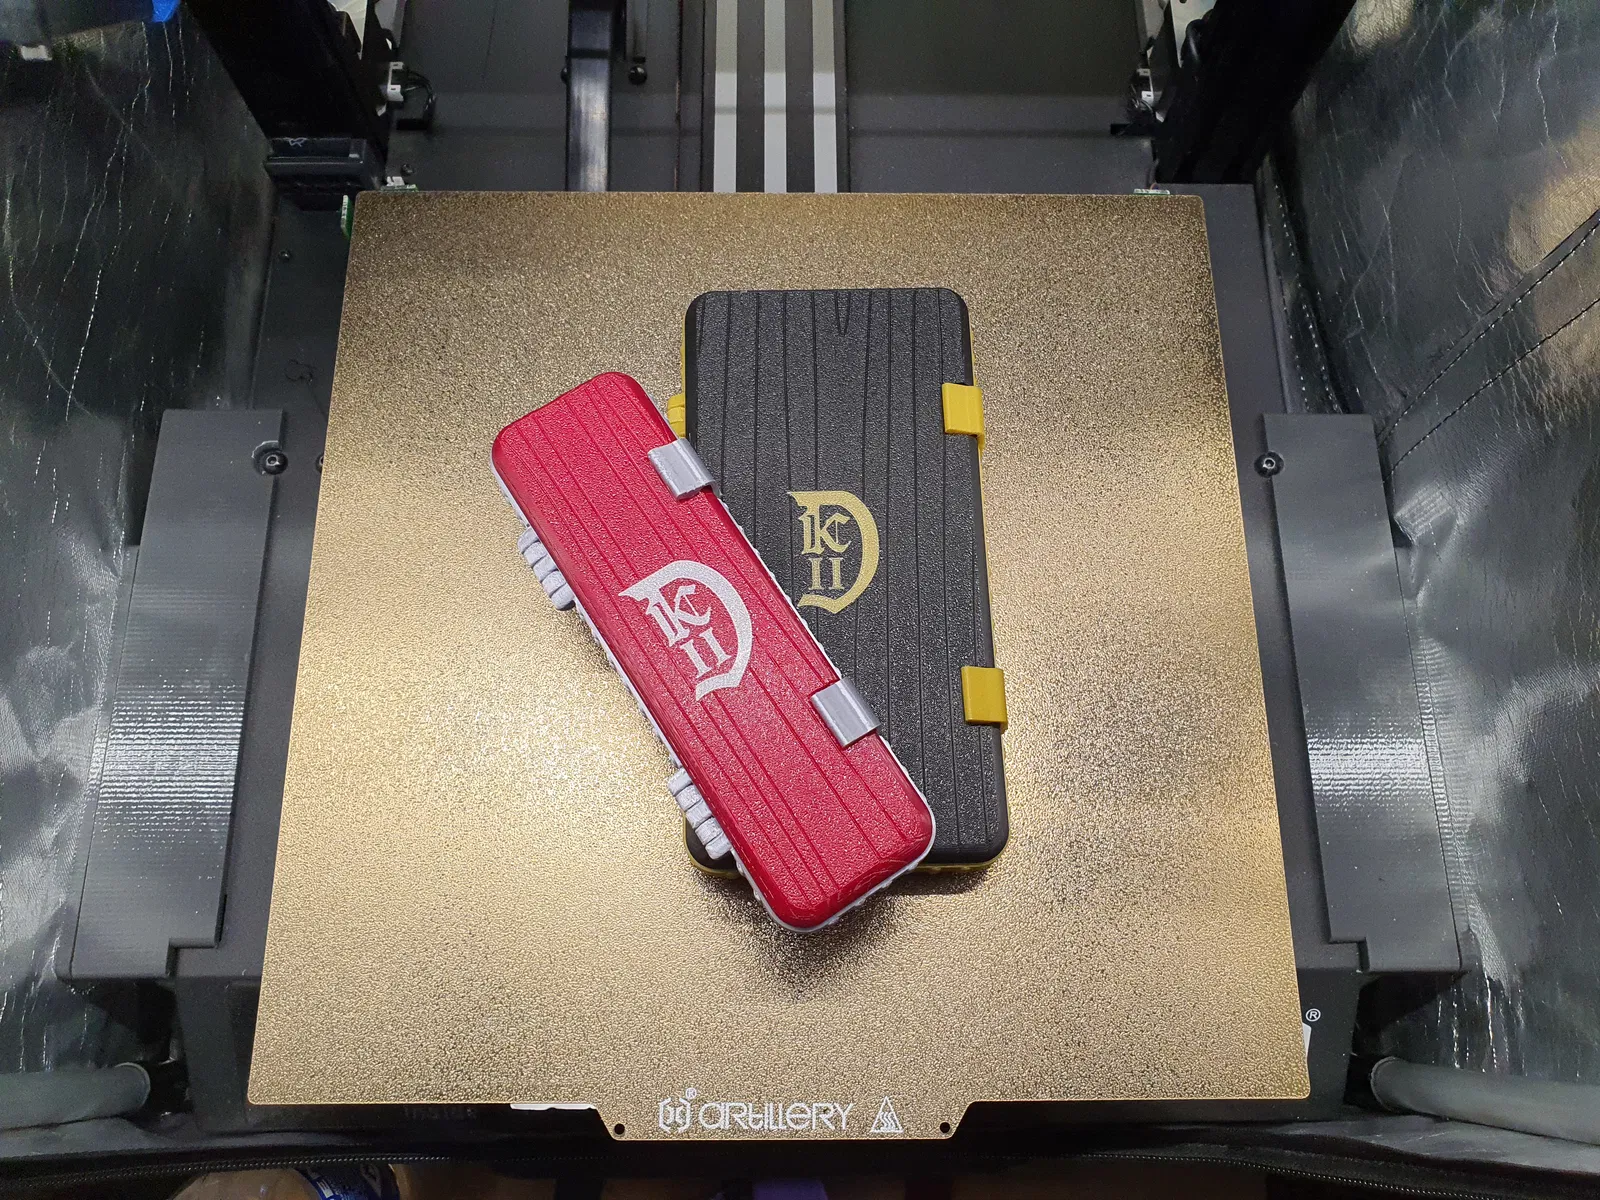
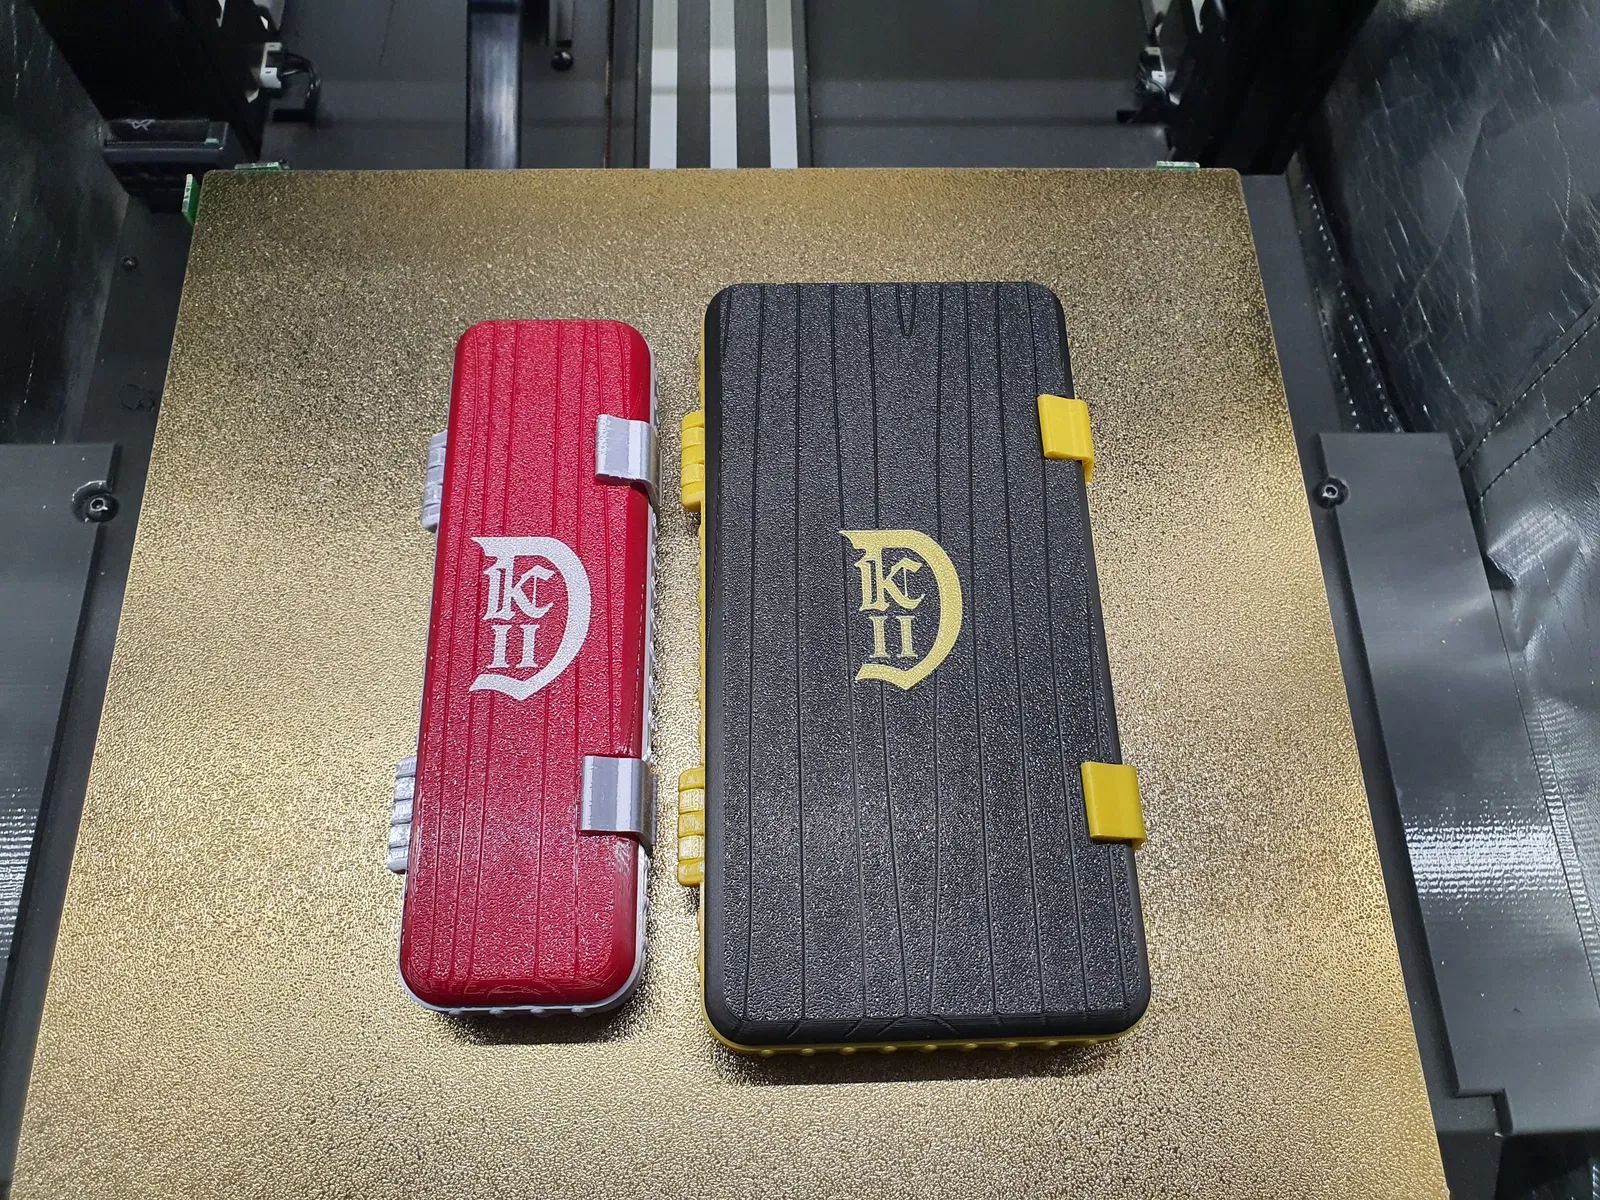
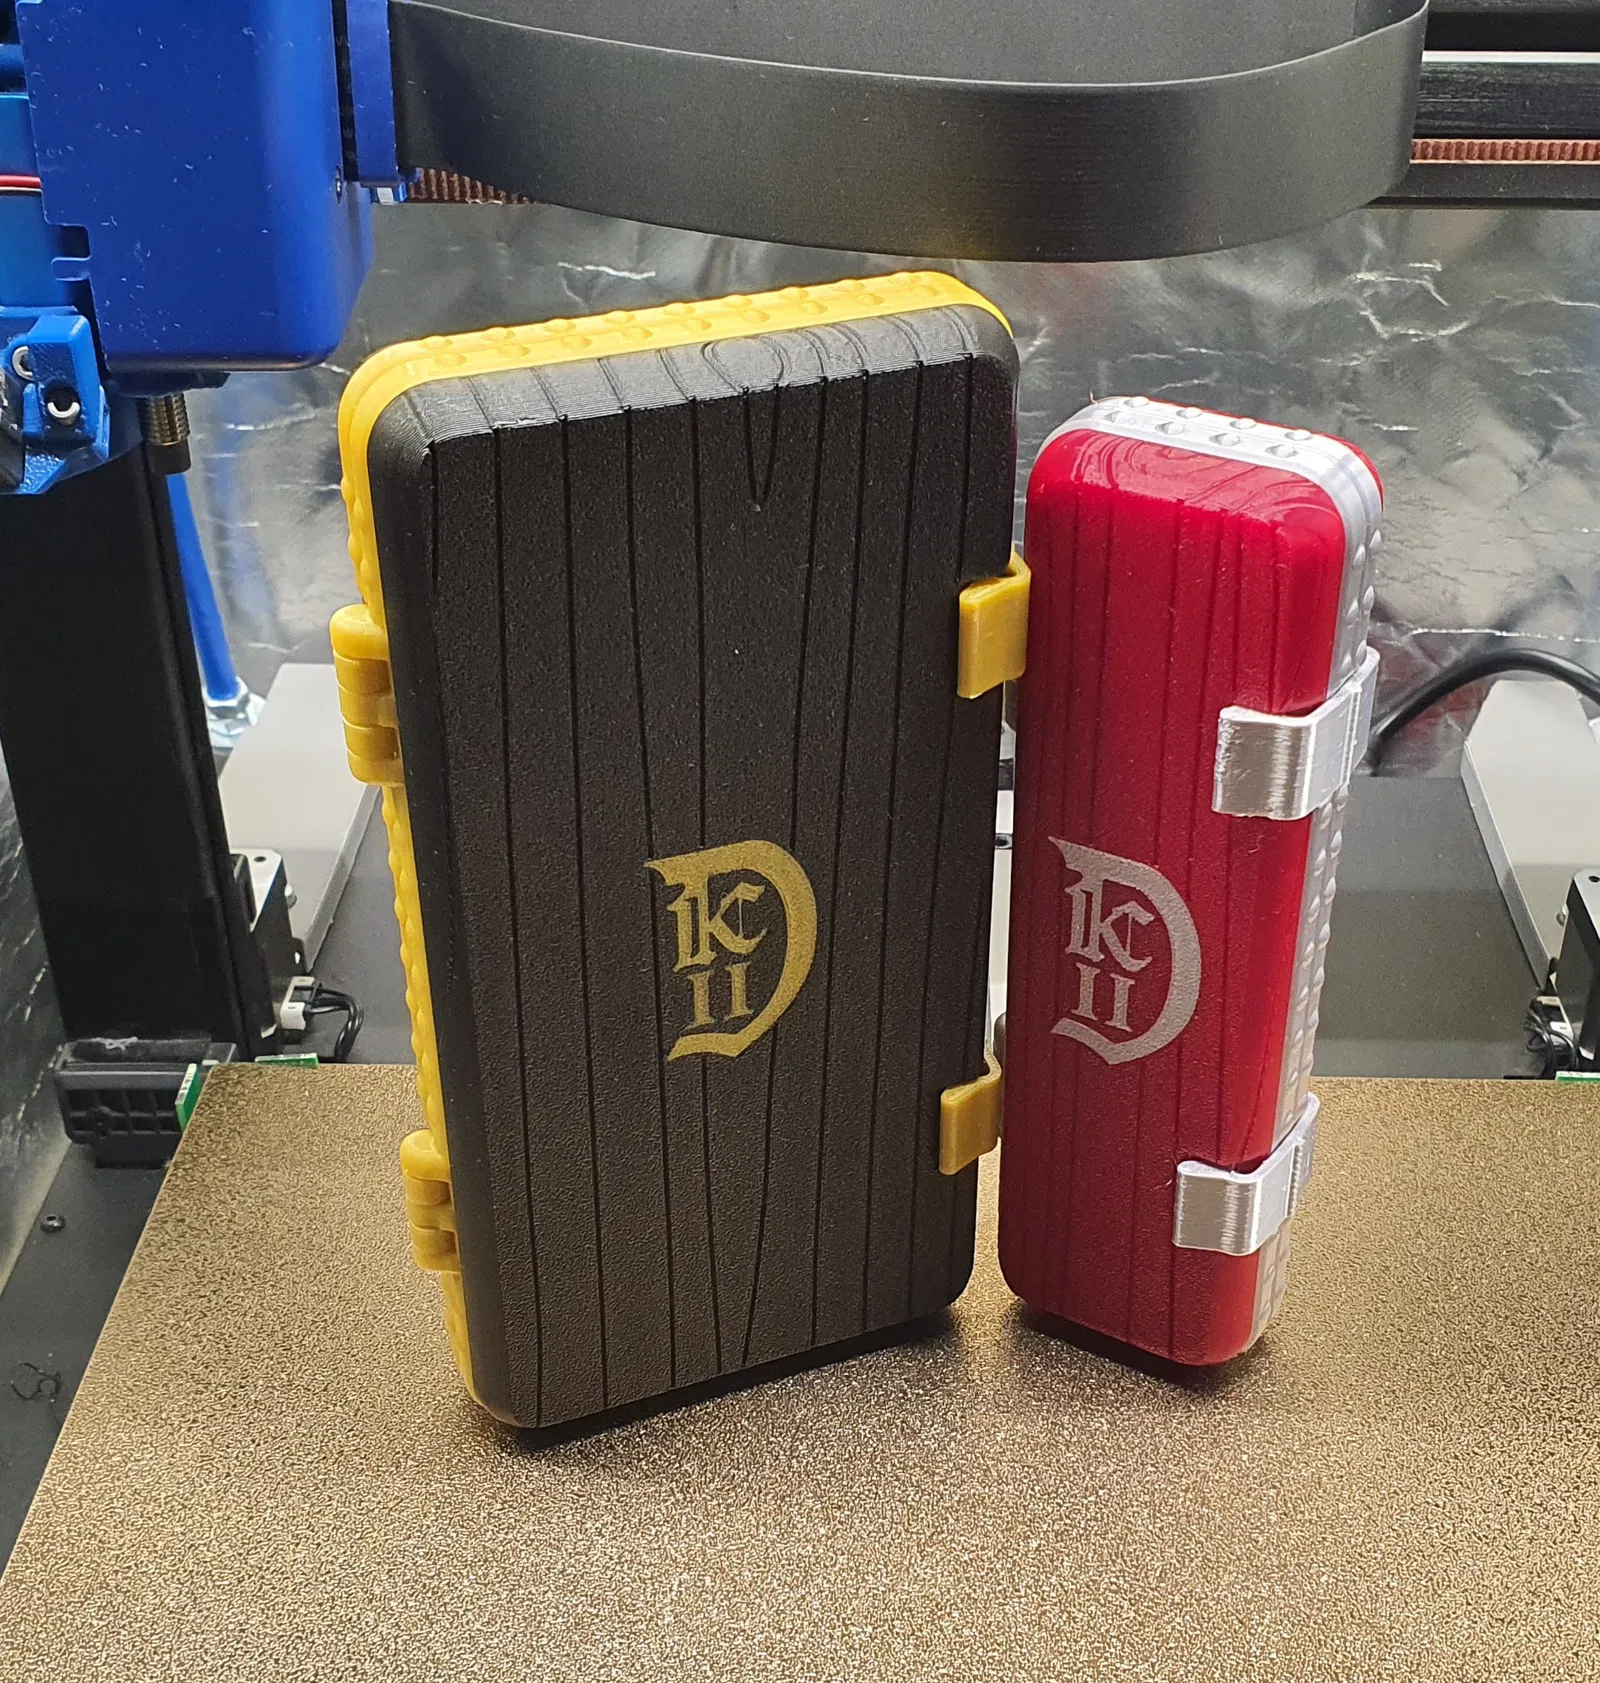
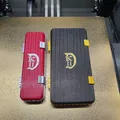
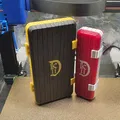
In our workshop we craft two kinds of caskets:
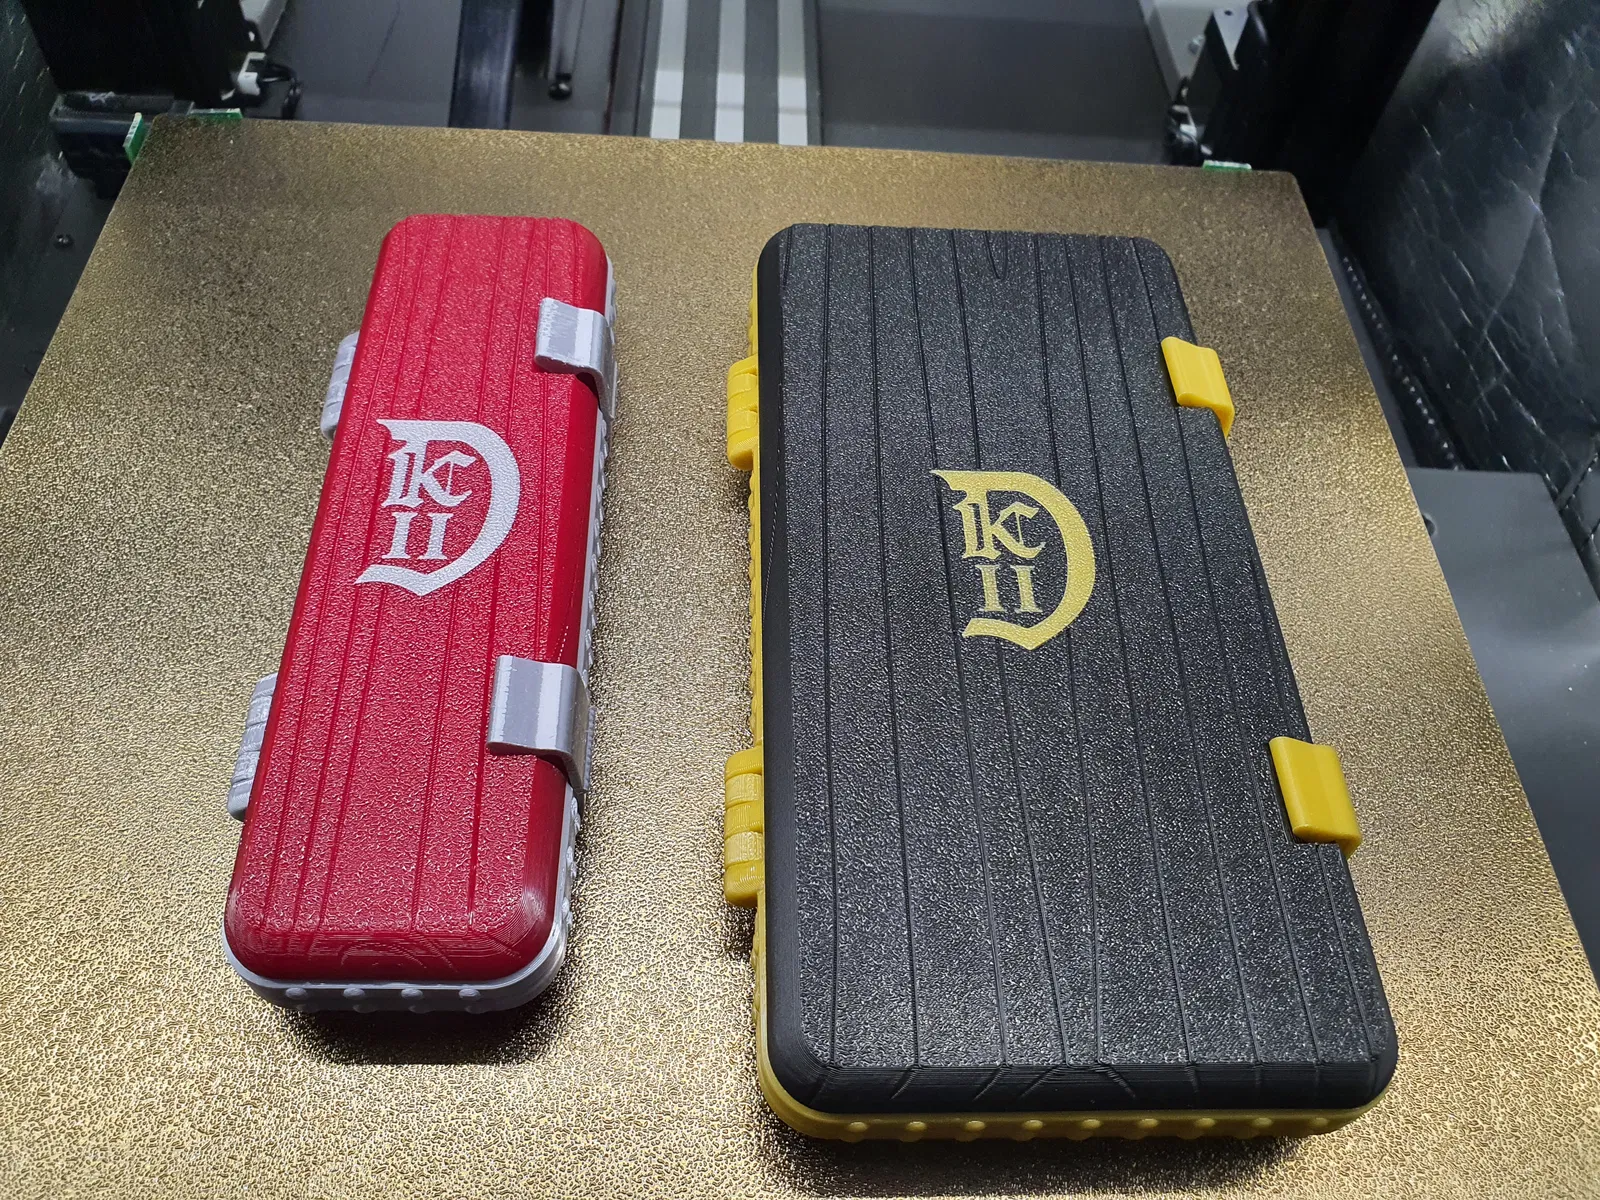
MINI BOX — for the OneBlade alone, for swift journeys when all your belongings ride in saddle‑bags and lightness is key.
FULL BOX — for the OneBlade with its full equipment, for long travels or for resting safely in your chamber among other treasured possessions.
You who read these words — take heed:
If you possess the jewel known as the Philips OneBlade KC2D Edition, give it a worthy setting. Carve the upper and lower plates of the box from a single piece of ebony or black oak, bind them with gold upon two hinges, and close the casket with twin clasps.
The smaller shall fit even within the tiniest pouch, while the greater shall safeguard all thy gear and yet rest easily within thy chest.
✠ ✧ ✠ ✧ ✠ ✧ ✠ ✧ ✠ ✧ ✠ ✧ ✠ ✧ ✠ ✧ ✠ ✧ ✠ ✧ ✠ ✧ ✠ ✧ ✠ ✧ ✠ ✧ ✠ ✧ ✠ ✧ ✠ ✧ ✠ ✧ ✠ ✧ ✠ ✧ ✠ ✧ ✠ ✧ ✠
Assembly videos for the boxes:
✠ ✧ ✠ ✧ ✠ ✧ ✠ ✧ ✠ ✧ ✠ ✧ ✠ ✧ ✠ ✧ ✠ ✧ ✠ ✧ ✠ ✧ ✠ ✧ ✠ ✧ ✠ ✧ ✠ ✧ ✠ ✧ ✠ ✧ ✠ ✧ ✠ ✧ ✠ ✧ ✠ ✧ ✠ ✧ ✠
Why choose the Gilded Wooden Travel Jewel Casket?
-
Easy to print The model is optimized for printing without supports. Built‑in supports can be removed easily after printing.
-
Smooth and travel‑friendly shape Pleasant to the touch, with no protruding elements that could catch on clothing or luggage.
-
Durable hinges and secure closure The compact case features print‑in‑place double hinges, strong and well‑fitted. Partially integrated unbreakable double clips increase protection against accidental opening.
-
Efficient internal layout The arrangement of elements minimizes the space the case occupies.
-
Two size variants
-
Mini Case
-
Full Case
-
-
Two model formats
-
Pre‑assembled version – ideal for multifilament printing or single‑color printing.
-
Separated‑parts version – for multicolor printing without MMU.
-
-
Subtle medieval inspiration The Gilded Wooden Travel Jewel Casket references the style of medieval wooden travel boxes—lightweight, elegant, and material‑efficient.
-
Original KC2D Logo The project also includes my original KC2D logo — a simple, refined, and elegant mark created specifically for the contest. It complements the casket’s character without overwhelming its form.
Models without the logo are also available if you’d like to add your own design.
✠ ✧ ✠ ✧ ✠ ✧ ✠ ✧ ✠ ✧ ✠ ✧ ✠ ✧ ✠ ✧ ✠ ✧ ✠ ✧ ✠ ✧ ✠ ✧ ✠ ✧ ✠ ✧ ✠ ✧ ✠ ✧ ✠ ✧ ✠ ✧ ✠ ✧ ✠ ✧ ✠ ✧ ✠ ✧ ✠
Compatibility
This case fits:
-
Philips OneBlade 360 Kingdom Come II Limited Edition
-
Philips OneBlade QP4631/xx
✠ ✧ ✠ ✧ ✠ ✧ ✠ ✧ ✠ ✧ ✠ ✧ ✠ ✧ ✠ ✧ ✠ ✧ ✠ ✧ ✠ ✧ ✠ ✧ ✠ ✧ ✠ ✧ ✠ ✧ ✠ ✧ ✠ ✧ ✠ ✧ ✠ ✧ ✠ ✧ ✠ ✧ ✠ ✧ ✠
Which version should you choose?
-
If you have a multifilament module → choose the pre‑assembled version (recommended, easiest to print).
-
If you do not have MMU → choose the single‑color pre‑assembled version.
-
If you want to assemble a multicolor version printed in separate parts → read the “Tips & Tricks” section for best results.
-
If you don’t like the contest logo → choose the no‑logo version and add your own decoration. Your case should serve you for a long time—make it yours.
✠ ✧ ✠ ✧ ✠ ✧ ✠ ✧ ✠ ✧ ✠ ✧ ✠ ✧ ✠ ✧ ✠ ✧ ✠ ✧ ✠ ✧ ✠ ✧ ✠ ✧ ✠ ✧ ✠ ✧ ✠ ✧ ✠ ✧ ✠ ✧ ✠ ✧ ✠ ✧ ✠ ✧ ✠ ✧ ✠
Print settings
Filament PLA(tested and recommended, easiest to print) or PET-G
-
Nozzle: 0.4 mm
-
Layer height: 0.2 mm
-
Perimeters: 3
-
Bottom layers: 4
-
Top layers: 5
-
Supports: off
-
only one wall on first layer - enabled
Tip: Print clips and small parts with 0% infill to reduce the chance of detaching from the build plate.
✠ ✧ ✠ ✧ ✠ ✧ ✠ ✧ ✠ ✧ ✠ ✧ ✠ ✧ ✠ ✧ ✠ ✧ ✠ ✧ ✠ ✧ ✠ ✧ ✠ ✧ ✠ ✧ ✠ ✧ ✠ ✧ ✠ ✧ ✠ ✧ ✠ ✧ ✠ ✧ ✠ ✧ ✠ ✧ ✠
Assembly
For the mini case version, you will need: case body and two clips(*).
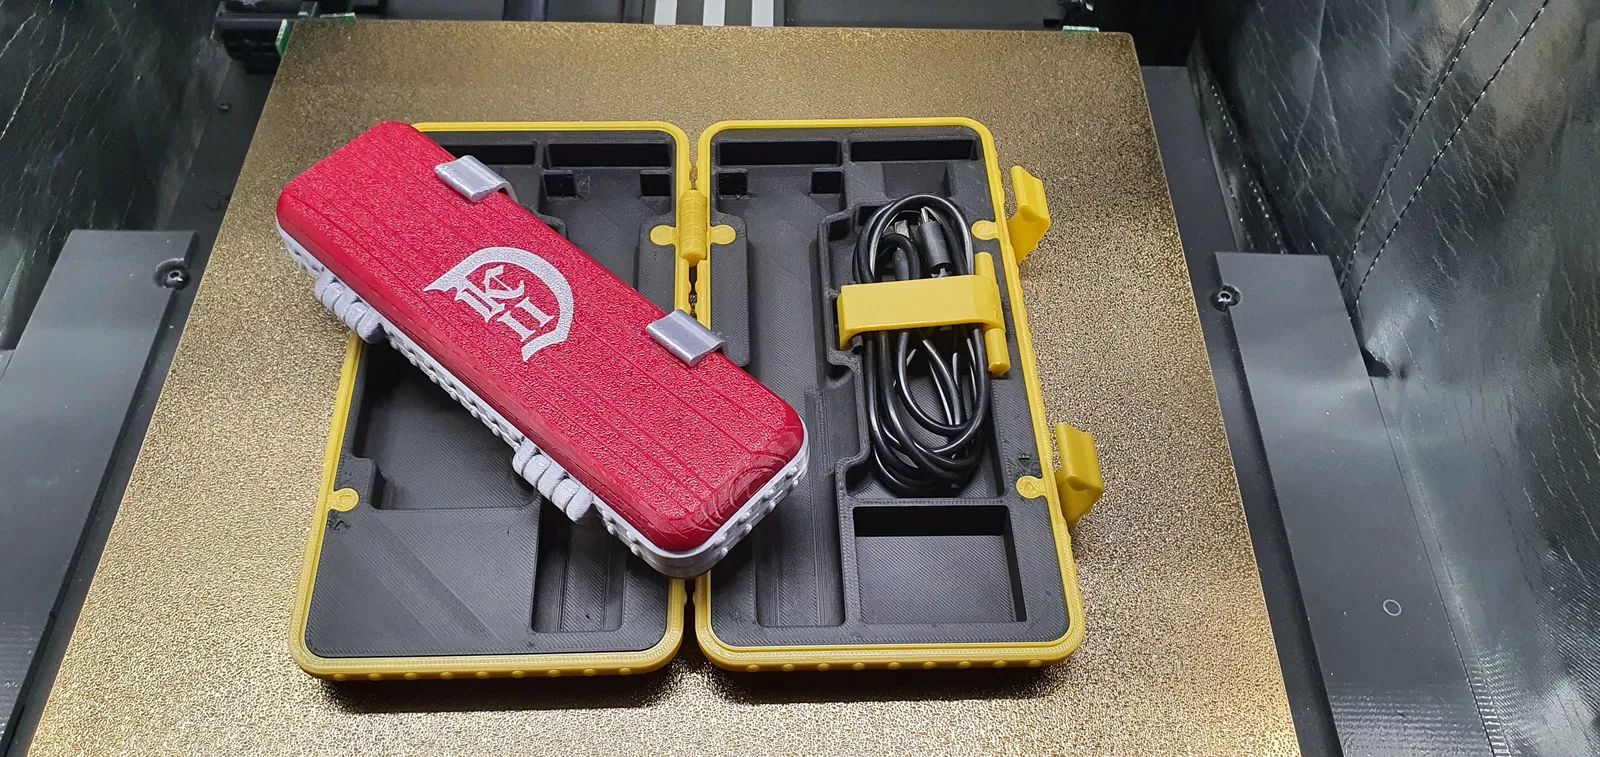
For the full case version, you will need: case body, two clips(*), and a USB cable clip with two hinge parts.
Pre‑assembled version
-
Remove the built‑in supports.
-
Install the clips (*).
-
If you chose the Full Case, add the USB‑cable clip with USB‑cable clip hinges.
-
Ready to use.
Separate‑parts version
-
Remove the supports.
-
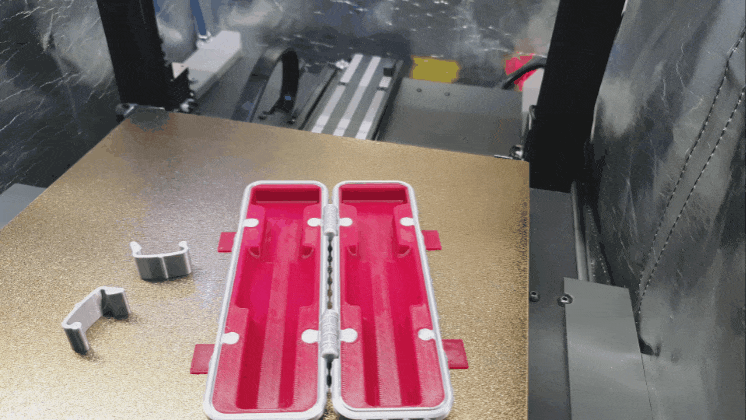
Assemble the hinge frame with the top and bottom parts. The system allows assembly in only one correct orientation—printed arrows will guide you.
-
Install the clips (*).
-
If you chose the Full Case, add the USB‑cable clip with USB‑cable clip hinges.
-
Ready to use.
(*).How to install the clip
Since not all printers have perfectly calibrated flow, I included three clip variants with different hinge diameters so you can choose the one that fits your case best:
-
FilamentCleaner_clip_1 – smallest diameter (one hump on the back)
-
FilamentCleaner_clip_2 – medium diameter (two humps on the back)
-
FilamentCleaner_clip_3 – largest diameter (three humps on the back)
Choose the clip that fits your case properly. (Feel free to share in the comments which size worked best for you — it helps others.)
!!!I’ve also added the assembly method for both the preassembled version and the separate‑parts version in the attached GIFs and YouTube links (at the end of the description).!!!
✠ ✧ ✠ ✧ ✠ ✧ ✠ ✧ ✠ ✧ ✠ ✧ ✠ ✧ ✠ ✧ ✠ ✧ ✠ ✧ ✠ ✧ ✠ ✧ ✠ ✧ ✠ ✧ ✠ ✧ ✠ ✧ ✠ ✧ ✠ ✧ ✠ ✧ ✠ ✧ ✠ ✧ ✠ ✧ ✠
Photo‑based assembly instructions for the box
- Remove the supports:

- Install the clips (*).


- If you chose the Full Case, add the USB‑cable clip.
Cable clips are available in two versions:
- v0 - standard
- v1 - which applies more pressure to the cable
The photo shows version v1.

Make sure that the tabs (highlighted in blue) on both side sections of the hinges are oriented toward the clip and the center of the box.

And additionally: a separate‑parts version:
- Assemble the hinge frame with the top and bottom parts. The system allows assembly in only one correct orientation—printed arrows will guide you.

The parts are designed so they can be assembled in only one correct way. Pay attention to the markers (triangles) highlighted in red — they will help you orient the ‘wooden parts’ correctly in relation to the hinge frame.

✠ ✧ ✠ ✧ ✠ ✧ ✠ ✧ ✠ ✧ ✠ ✧ ✠ ✧ ✠ ✧ ✠ ✧ ✠ ✧ ✠ ✧ ✠ ✧ ✠ ✧ ✠ ✧ ✠ ✧ ✠ ✧ ✠ ✧ ✠ ✧ ✠ ✧ ✠ ✧ ✠ ✧ ✠ ✧ ✠
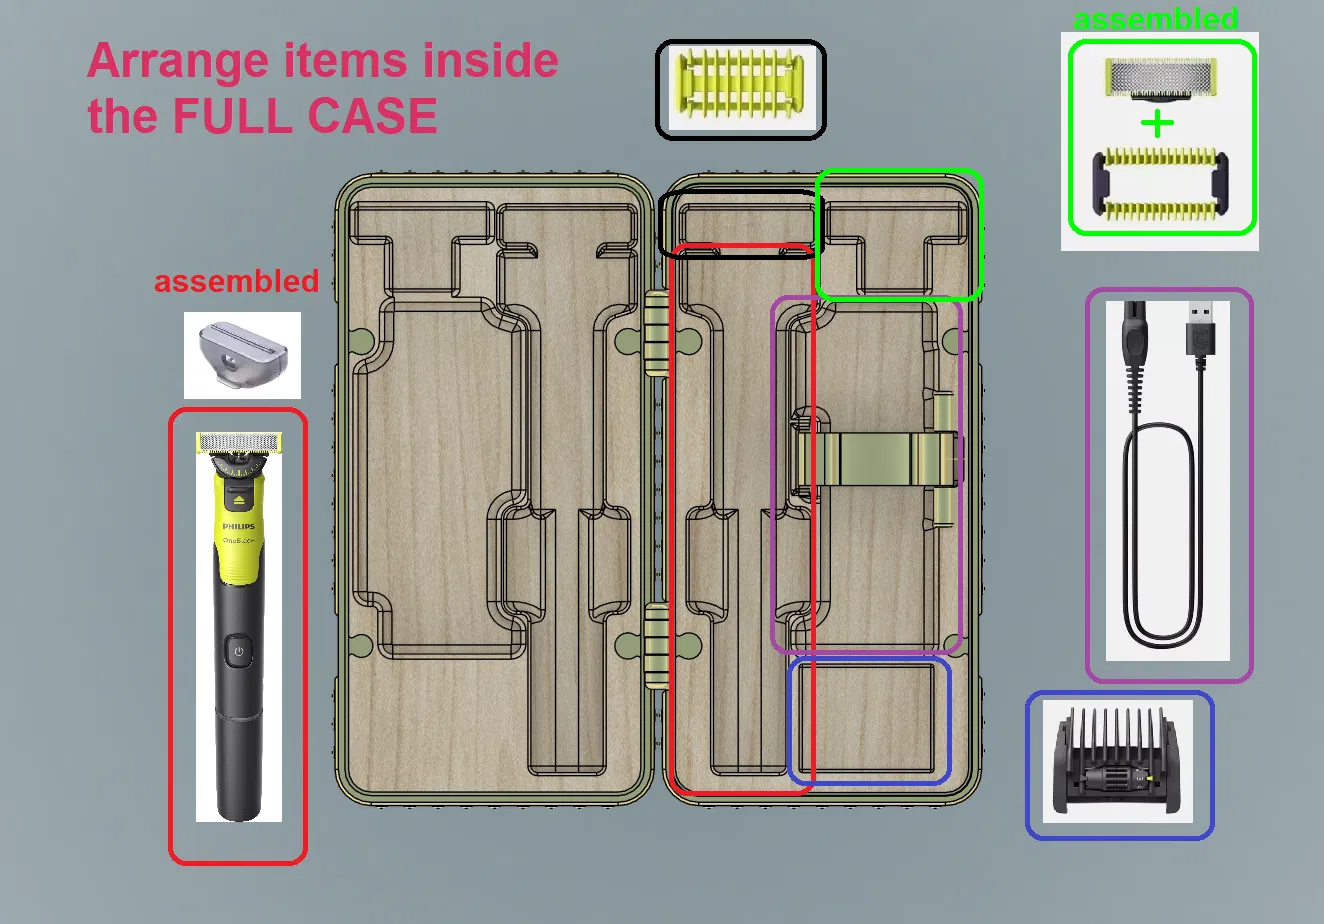
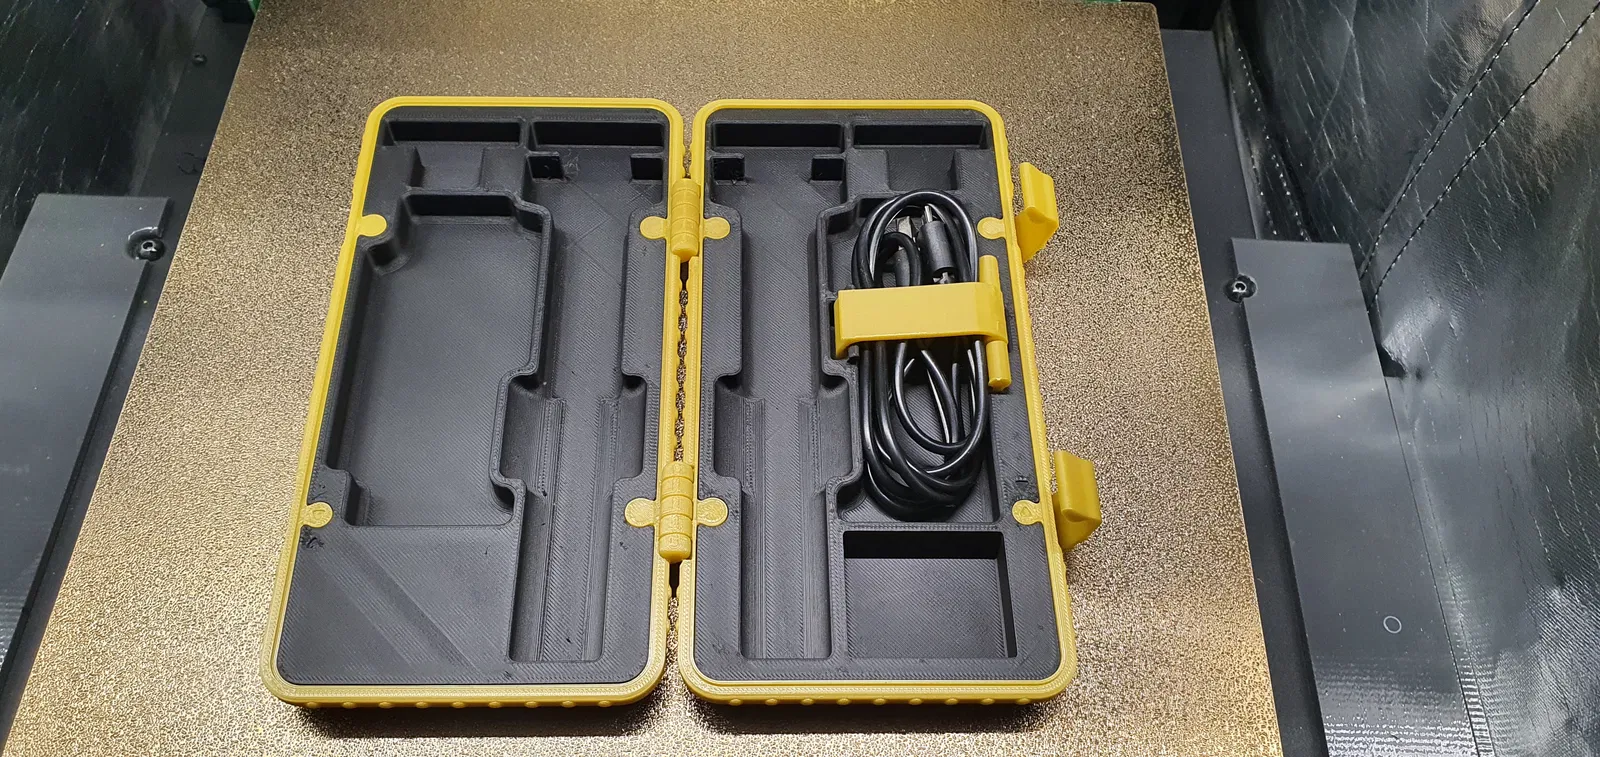
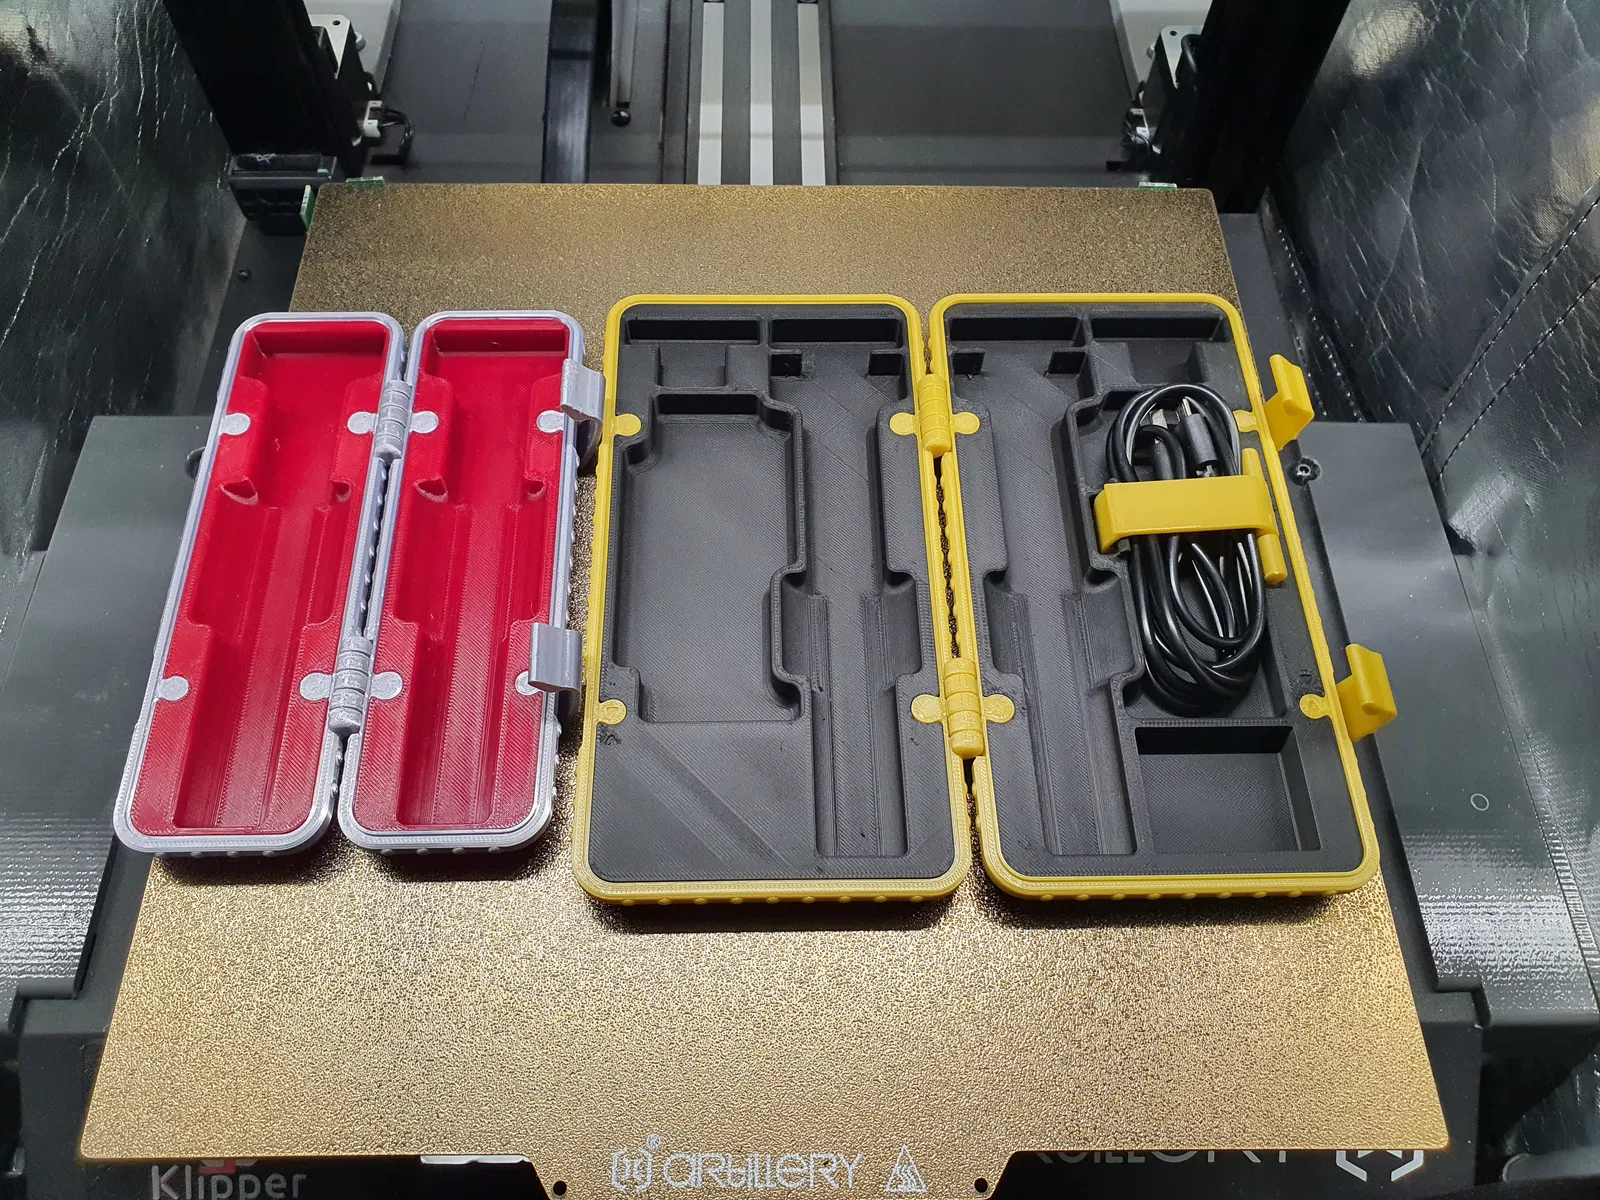
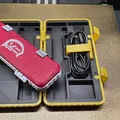
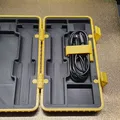
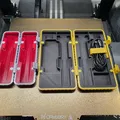
How to arrange items inside the case?
I don’t have the OneBlade yet, so I’m including a reference photo showing where to place each element in the Full CASE.
The MINI Case fits the OneBlade with the blade installed.

✠ ✧ ✠ ✧ ✠ ✧ ✠ ✧ ✠ ✧ ✠ ✧ ✠ ✧ ✠ ✧ ✠ ✧ ✠ ✧ ✠ ✧ ✠ ✧ ✠ ✧ ✠ ✧ ✠ ✧ ✠ ✧ ✠ ✧ ✠ ✧ ✠ ✧ ✠ ✧ ✠ ✧ ✠ ✧ ✠
A few words from the author
The Gilded Wooden Travel Jewel Casket is an evolution of my idea for a compact case with a well‑fitted hinge and an unbreakable, easy‑to‑use clip. This version was designed specifically for the Philips OneBlade & Kingdom Come contest.
Among the many angular boxes resembling tool crates or fruit containers, I missed something more organic and comfortable to hold. So I decided to design my own.
I created a hinge system with a partially hidden, durable clip, enclosed in a smooth, rounded shape. The hinges are strong, precise, and tolerant to small calibration differences (around ±0.02 flow). For this project, I also wanted to learn something new—this time it was wood‑grain structure.
A medieval casket is not only metal—it's primarily wood.
May these boxes serve you well on your travels and please your eye with every shave!
CONCLUSION
💚💚💚If you enjoyed the project please like it.💚💚💚
Post your makes and let me know how it works out for you. If anyone has any comments about them - I'd be happy to listen and improve the models.
✠ ✧ ✠ ✧ ✠ ✧ ✠ ✧ ✠ ✧ ✠ ✧ ✠ ✧ ✠ ✧ ✠ ✧ ✠ ✧ ✠ ✧ ✠ ✧ ✠ ✧ ✠ ✧ ✠ ✧ ✠ ✧ ✠ ✧ ✠ ✧ ✠ ✧ ✠ ✧ ✠ ✧ ✠ ✧ ✠
Tips & Tricks
If you choose the version with the separately printed frame, please read this:
The printed parts must be very precise to ensure proper assembly of the hinge frame with the bottom and top sections of the box. I assume that your printer is correctly calibrated for the filament you plan to use. I strongly recommend verifying your printer’s calibration with a simple test print.
The method is very straightforward: print the two Voron parts linked below and check whether they fit together.
- Guidler A
- Guidler B

!!!Important: you should perform the test for both colors you plan to use for printing the BOX!!!
Check whether they are too tight or too loose:
-
If the assembled parts are too loose, your printer likely has too low flow rate.
-
If the assembled parts are too tight, your printer likely has too high flow rate.

If the parts fit together correctly, you can proceed with printing the assembly version of the BOX. If they do not fit, recalibrate your printer so that the newly printed Voron parts fit properly.
For verification, I printed the FULL CASE in the assembly version myself — and it works.
Remember that the assembly version has the hinges on a separate frame. If you want to maintain the durability of the Pre‑assembled version, consider gluing the frame in place.
Updated 27.02.2026
Updated description.
Giấy phép
Tác phẩm này được cấp phép theo
Standard Digital File LicenseStandard Digital File
File mô hình


Chưa có bản in nào được khoe. Hãy là người đầu tiên!

Chưa có bình luận nào. Hãy là người đầu tiên!