Nhiệt kế Arduino (Arduino Thermometer)

Thiết kế nhiệt kế phòng điều khiển bằng Arduino, dùng Arduino Nano Every, cảm biến DS18B20 và dải LED WS2812B để hiển thị nhiệt độ theo dải màu xanh–đỏ. Có hướng dẫn BOM, đấu dây, CAD, in 3D và code.


Mô tả
Dựa trên dự án của Mirko Pavleski mình đã làm ra thiết kế có thể in 3D này.
BOM vẫn giữ nguyên, mình dùng Arduino Nano Every thay vì Arduino Nano, đồng thời bỏ công tắc để đổi các chế độ hiển thị. Nhiệt kế được cấp nguồn qua cáp micro USB của Arduino.
BOM
Arduino Nano Every
DS18B20 Temperature Sensor
50 LEDs WS2812B 144 Leds/m
Điện trở 4.7k Ohm
Wiring
Sơ đồ đấu dây lấy từ bài gốc. Dải LED thực tế chỉ cần hàn vào Arduino với 3 chân ở đầu dải. Với cảm biến nhiệt độ, một điện trở 4.7k Ohm được mắc song song vào đường data 5V.

CAD
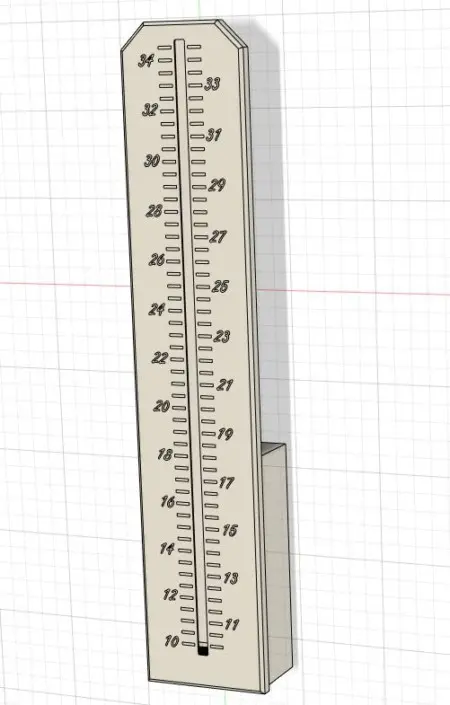
Đầu tiên mình đo dải LED (WS218B 144 LED/m) để lấy đúng khoảng cách giữa các LED. Sau đó mình chèn các con số và vạch chia theo bước 0.5°C. Mình tạo các phần khoét để có thể in nhiều màu. Vì vậy mình tạo các body riêng và gom lại thành một group, để có thể import lại như một model trong slicer.
Với Arduino, mình chỉ làm một hộp nhỏ ở mặt sau. Dây có thể giấu gọn trong đó và cũng có thể dùng để dựng/đặt sản phẩm. Arduino mình cố định trong hộp chỉ bằng keo nến (hot glue).

Printing
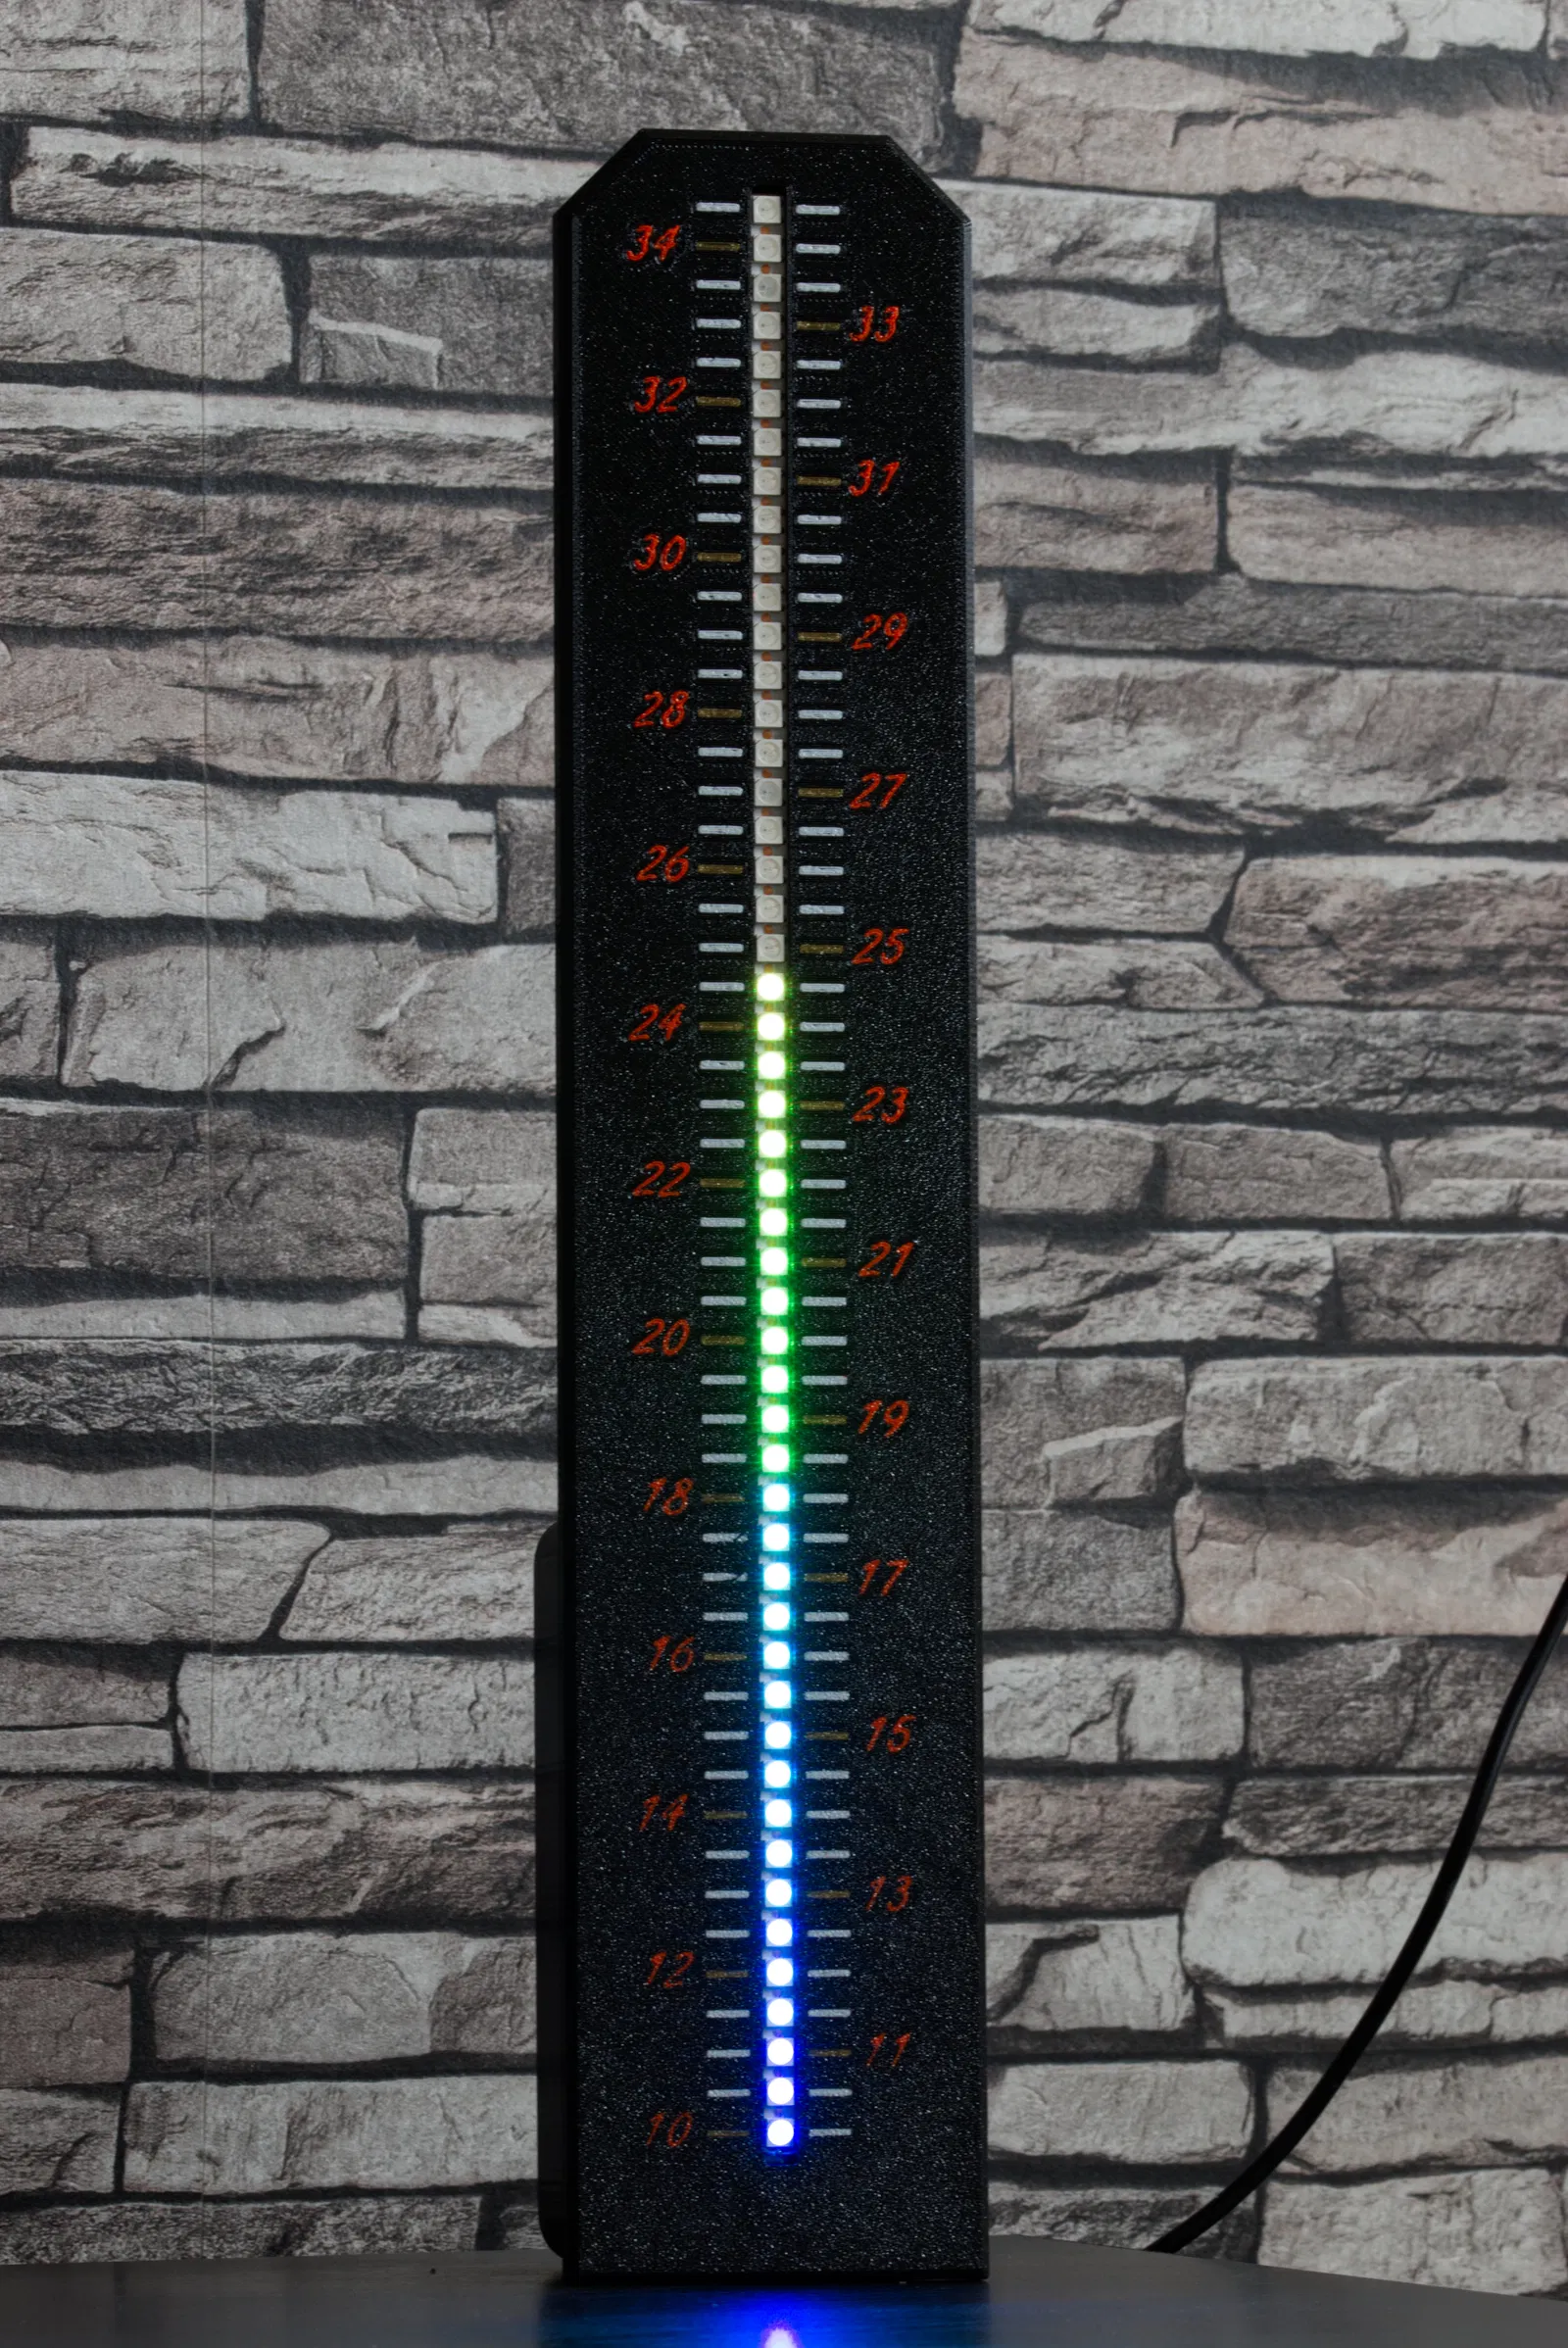
Mình in trên máy Hevo với khổ in 420x420x400 và gắn Palette 2S Pro; phần số màu cam, các vạch ngay tại vị trí số theo bước 1°C màu vàng gold, còn lại các vạch màu trắng. Mình cũng dùng PEI Texure Sheet, tạo bề mặt đẹp nhìn giống như được sơn tĩnh điện.
Dải LED dễ trượt vào từ phía dưới. Ở phần wiring, mình bỏ nút nhấn vì mình chỉ muốn chế độ hiển thị dạng line theo các màu khác nhau (xanh dương đến đỏ). Ngoài ra, mình phát hiện một lỗi trong code khiến chế độ line không cập nhật đúng. Mình đã sửa lỗi đó và chỉnh lại offset vì nhiệt độ hiển thị bị lệch nhẹ.

Code
#include "Wire.h"    // imports the wire library for talking over I2C
#include <OneWire.h>
#include <DallasTemperature.h>
#include <Adafruit_NeoPixel.h>
#define ONE_WIRE_BUS 5

OneWire oneWire(ONE_WIRE_BUS);

DallasTemperature sensors(&oneWire);
 float Celcius=0;

 int buttonPin = 2;    // momentary push button on pin 0
    int oldButtonVal = 0;

#define NUM_PIXEL 50
#define PIN 6
Adafruit_NeoPixel strip = Adafruit_NeoPixel(NUM_PIXEL, PIN, NEO_GRB + NEO_KHZ800);


int nPatterns = 3;
int lightPattern = 2;
int out =0;
int t =0;

void setup()
{
  Serial.begin(9600); //turn on serial monitor
strip.begin();
clearStrip();
strip.show();
strip.setBrightness(2);
pinMode(buttonPin, INPUT);
    digitalWrite(buttonPin, HIGH);  // button pin is HIGH, so it drops to 0 if pressed

sensors.begin();

}
void testing(){
  for(int L = 0; L<50; L++) {
clearStrip();
    strip.setPixelColor(L,wheel(((205+(L*3)) & 255)));//Gradient from blue (cold) to green (ok) to red (warm), first value here 205 = start color, second value here 42 = end color
 strip.show();
delay(100);
}
for(int L = 49; L>=0; L--) {
clearStrip();
    strip.setPixelColor(L,wheel(((205+(L*3)) & 255)));//Gradient from blue (cold) to green (ok) to red (warm), first value here 205 = start color, second value here 42 = end color

strip.show();
delay(100);
}
delay(1000);
}
void dot() {
   sensors.requestTemperatures();
   Celcius=sensors.getTempCByIndex(0)*2-1.5;

int t = map(Celcius, 20, 70, 0, NUM_PIXEL);

for(uint16_t L = 0; L<t; L++) {
clearStrip();
strip.setPixelColor(L,wheel(((205+(L*3)) & 255))); //Gradient from blue (cold) to green (ok) to red (warm), first value here 205 = start color, second value here 42 = end color
}
strip.show(); //Output on strip
Serial.print("The Temperature is: ");
//Serial.print(Celcius);
Serial.print(sensors.getTempCByIndex(0));


delay(1000);
}

void line() {
   sensors.requestTemperatures();
   Celcius=sensors.getTempCByIndex(0)*2-1.75;

int t = map(Celcius, 20, 70, 0, NUM_PIXEL);

for(uint16_t L = 0; L<t; L++) {

strip.setPixelColor(L,wheel(((205+(L*3)) & 255))); //Gradient from blue (cold) to green (ok) to red (warm), first value here 205 = start color, second value here 42 = end color
}
strip.show(); //Output on strip
Serial.print("The Temperature is: ");
//Serial.print(Celcius);
Serial.print(sensors.getTempCByIndex(0)-1.75);

delay(1000);
clearStrip();
}

void loop() {
  // read that stapressurete of the pushbutton value;
  int buttonVal = digitalRead(buttonPin);
  if (buttonVal == LOW && oldButtonVal == HIGH) {// button has just been pressed
    lightPattern = lightPattern + 1;
  }
  if (lightPattern > nPatterns) lightPattern = 1;
  oldButtonVal = buttonVal;

  switch(lightPattern) {
    case 1:
      dot();
      break;
    case 2:
   line();
      break;
      case 3:
      testing();
      break;
       }
}
//Color wheel ################################################################
uint32_t wheel(byte WheelPos) {
if(WheelPos < 85) {
return strip.Color(WheelPos * 3, 255 - WheelPos * 3, 0);
}
else if(WheelPos < 205) {
WheelPos -= 85;
return strip.Color(255 - WheelPos * 3, 0, WheelPos * 3);
}
else {
WheelPos -= 205;
return strip.Color(0, WheelPos * 3, 255 - WheelPos * 3);
}
}
void clearStrip(){
for(int i = 0; i < NUM_PIXEL; i++) {
strip.setPixelColor(i, 0);
}
}
Giấy phép
Tác phẩm này được cấp phép theo
Creative Commons — Attribution — Noncommercial — Share AlikeCC-BY-NC-SA

File mô hình


Chưa có bản in nào được khoe. Hãy là người đầu tiên!

Chưa có bình luận nào. Hãy là người đầu tiên!