
F3D
TurboTurn 4782969:1 Gearbox - Mẫu In 3D 1

1 image

Đồ Chơi Khác

TurboTurn 4782969:1 Gearbox - Mẫu In 3D

By Austin_933070

Downloads
52
Likes
8
Views
449

Files 8 71.3 MB

  • first_11_gears_1766370642.gcodeGCODE · 24.8 MB
  • Remaining_parts_to_print_in_slicer_0.4n_0.3mm_PLA_MK4_8h9m_1766370644.gcodeGCODE · 38 MB
  • nut_V2_-_Part_1_3_1766370635.3mf3MF · 49.5 KB
  • Gear_1_60-20_-_Spur_gear_60_teeth_1766370637.3mf3MF · 392.1 KB

Make a variant with AI

Build another version of this model.

Open Studio

Description

Multi-Part Print

  1. Print first_11_gears.gcode
  2. Print Remaining_parts_to_print_in_slicer.gcode

Video of it spinning

TLDR

  • Feel free to remix, resell, gift, your call. All I ask for in exchange for my work is a like, follow, comment, or DM saying hi!
  • This is V1 so it will likely improve and evolve in the future
  • I printed with settings to make it print as fast as possible on my Prusa mk4
  • If on a different machine print the following
    • 14 Gear 1 60-20 - Spur gear (60 teeth).3mf
    • 8 nut V2 - Part 1 (3).3mf
    • 2 pipev2 - Part 1 (1).3mf
    • 1 holders 60-20 fits 14 - Part 1
  • Total weight
    • 280g
  • Total Time
    • 14 hours on my current settings
  • WATCH THE VIDEO FOR FULL ASSEMBLY
  • This is my FIRST EVER REAL CAD design.
    • Don't hate me if tolerances are not exact, but they should be very close
    • Please comment if I made mistakes and I will fix them
  • Required tools
    • 3d printer
    • computer
    • super glue / soldering iron
  • Things to expect
    • alignment is important but can be adjusted
    • You have to start at a lower gear and work your way up to get the gears to spin fast. Starting at to high of gear can cause gear slipping, Which wont hurt anything.

Design

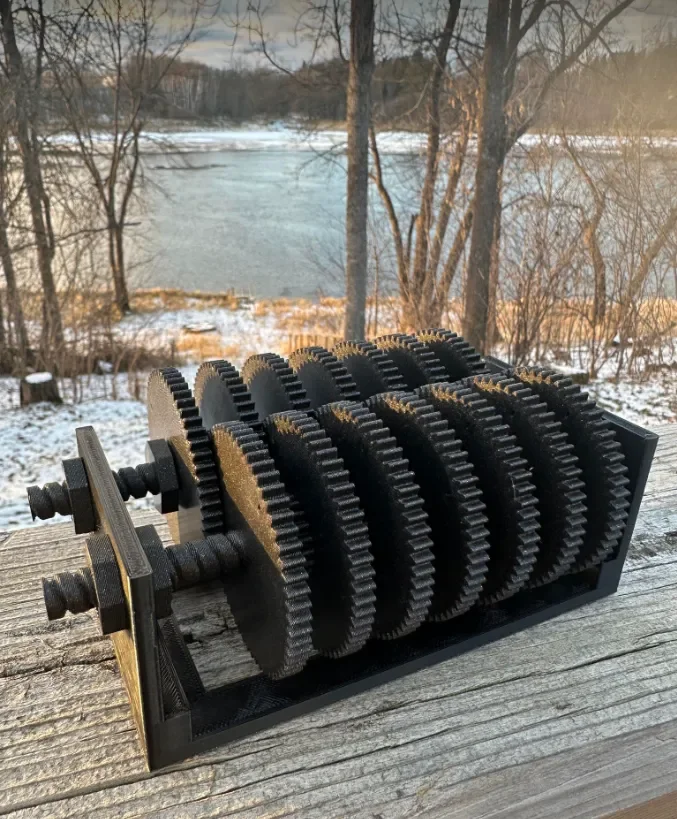
  • Larger gear portion 60 teeth 
  • smaller gear portion 20 teeth
  • 14 gears in total
  • (60/20)^14 = 4782969:1
  • The pipe is a bolt so that it can be adjusted to exact position before locking it in place

Assembly

  • Watch the assembly video to see how I did it, otherwise
  1. Print all parts
  2. Insert both bolts
  3. Insert a nut on the inside of the bolt
  4. Leave just enough room on the inside to insert more gears
  5. Stagger the gears from side to side
  6. Insert the nut on the other inside side
  7. insert the 4 nuts on the outside
  8. Get the positioning correct and test to make sure it rotates freely
  9. Superglue or solder the bolts and nuts in place to make them no longer move
    1. I soldered them
  10. Bob's your uncle.

Onshape Files

Backstory

I wanted to learn how to make gears specifically gear ratios, so after 5 iterations I came up with this simple scalable design.

Conclusion

If this receives positive feedback I can always scale this up to be much bigger.

Read more Show less

Print spec

Formats
3mfgcode
Model files
8
Total size
71.3 MB
Largest file
38 MB

0 comments

See all