



Đèn trang trí Minecraft Ore tùy chỉnh
 BydmtinkdevLikes74Downloads293
Build another version of this model.
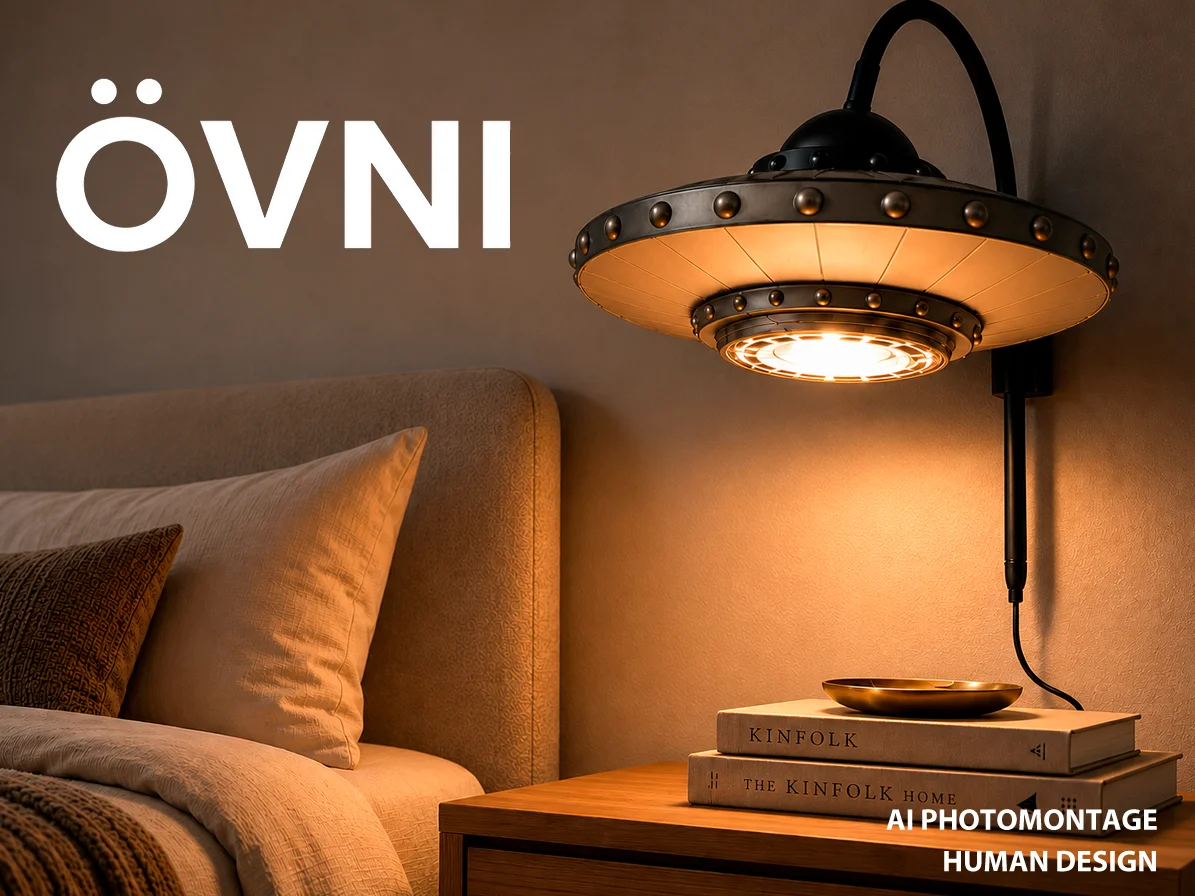
ÖVNI is a 3D printed accessory designed to turn an IKEA NÄVLINGE lamp into a small UFO with an abduction beam.
It is printed in several PLA parts, requires no supports, and can be assembled without screws or glue. The UFO fits easily around the lamp bulb and includes an iris-style diaphragm that lets you adjust the amount of light coming through, creating the effect of a classic UFO tractor beam.
The main body is made of four parts: the two halves of the UFO, a threaded ring that holds them around the lamp, and the diaphragm, which is trapped between the two body halves. The diaphragm itself consists of three main parts and eight moving blades.
The iris mechanism was redesigned from the super clever design by Samantha Giedzinski (https://www.thingiverse.com/thing:5857034). Many thanks to Samantha for sharing such an elegant and inspiring solution with the maker community.
The diaphragm assembly and the final installation around the lamp are shown in two included videos.
For better stability, avoid extending the lamp head too far from the base when using the clamp or table versions of the NÄVLINGE lamp. This does not apply to the floor or wall-mounted versions.
PRINTING AND ASSEMBLY NOTES
Overall, ÖVNI is a fairly easy print. It requires no supports and no technical materials: the heat generated by the lamp seems to be low, and in our tests we have not seen any deformation of the PLA (as always, use this design at your own risk.)
The threaded parts work well even at 0.28 mm layer height, although, as usual, thinner layers will always make the movement smoother and more precise.
The only slightly delicate part is the set of iris blades. For these parts, it is important to make sure your slicer generates 3 layers at 0.16 mm for the main thickness of each blade —not counting the small raised detail— so they fit properly inside the mechanism.
Assembling the 8 iris blades requires a bit of skill, patience, and maker love. The first ones go in quite nicely, but the last one may briefly make you question your life choices. It is a bit tricky, yes, but with calm hands, affection, and without throwing anything across the room, it does come together.
BydmtinkdevLikes74Downloads293

 BybobmakesLikes2.5KDownloads17.5K

 Bymoleculecrtr_1215658Likes544Downloads2K

 ByPiotrRagoLikes161Downloads449

 By3d-paint-labLikes0Downloads210

 Byquibeck_3353173Likes1.5KDownloads11.5K

 Bygeezacoleman_2067246Likes101Downloads185

 Byduo3dprintLikes0Downloads372

 BybigcookiedaddyLikes0Downloads825

 Byaditya-mani-kataraLikes0Downloads918

 ByowlartLikes106Downloads135

 Byh3li0Likes145Downloads486