


Thằn lằn cử động linh hoạt - In tại chỗ (Không cần support)
 Bycream110_291842Likes924Downloads7.7K
Build another version of this model.
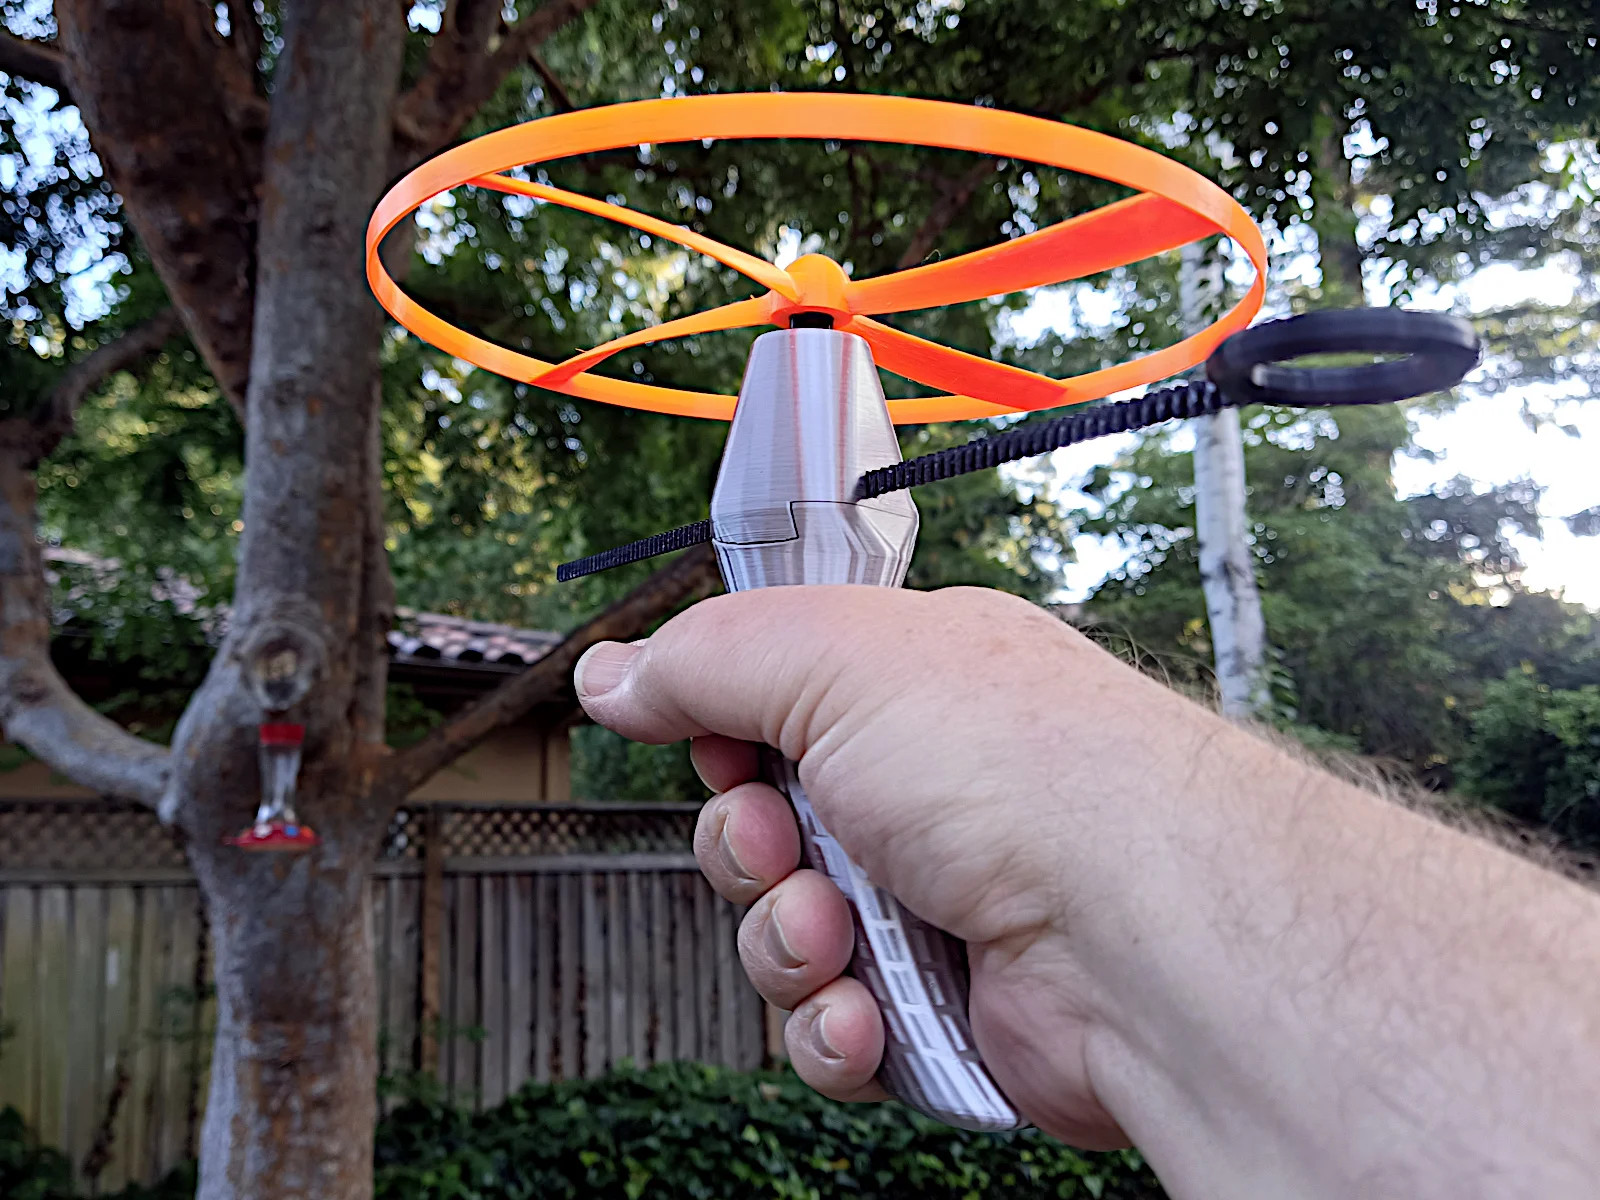
Here's an update to my pullcopter toy with over-engineered features, that is, interesting improvements that aren't necessary for the function of the device, but may improve performance.
The original over-engineered features include:
No tools or fasteners needed for assembly! The handle parts snap together.
Ergonomic handle based on actual anthropometric measurements of human populations (see my blog article about building the handle).
Custom-cut gear using asymmetrical gear teeth (smooth sawtooth using a skewed sinewave profile) to decrease the pressure angle of the meshing teeth while increasing the strength of the teeth in the force direction.
The propeller design (described in my blog article about elliptical-blade propellers), has a number of improvements over the usual pull-copter propeller:
Blades are accurately twisted for constant pitch along the length of the blade.
A blade transitions through three NACA airfoil shapes from the root to the tip: NACA 9440, NACA 6412 (commonly used for propellers), and NACA 3412.
High aspect ratio blades for greater efficiency.
The blades are swept to reduce leading-edge drag. A forward sweep helps collimate the air-jet directly downward to minimize spread and improve thrust.
The propeller ring also uses an airfoil profile, a symmetrical NACA 0020, to reduce drag.
Are you a lefty? No problem! There are two paths for the pullcord, for pulling it with either hand.
Tapered propeller drive cogs allow the propeller to depart in a range of vertical speeds.
Includes a 4-bladed propeller, observed to have a slightly longer flight duration than the 3-bladed version, but the 3-bladed version appears to reach a higher altitude.
Includes a propeller with loop-shaped blades as an experiment that you can try, although it takes more material and is heavier so it doesn't go as high but stays in the air a good amount of time. Wear eye protection when flying this! A 2-loop version consistently self-destructed on testing, but the 3-loop version works OK.
Taller drive gear case for better hand clearance under the propeller.
Thicker attachment rails on the case for better withstanding of pullcord forces.
Propeller library improved with minor fixes and support for loop-shaped blades.
I recommend you print the "clearance_check" STL or 3MF file first. This is a set of all the parts that need to fit together, truncated for quick printing and checking. If the clearances seem too tight, you may need to adjust them in the pullcopter.scad file. There are four clearance parameters starting at line 133.
Otherwise, see the print settings for each individual part below.
Resolution: 0.4mm nozzle, 0.15mm layers for propeller, 0.20mm for everything else
Infill: 20% adaptive cubic
Use 3 perimeters. Enable detection of bridging perimeters. Elephant's foot compensation = 0.1.
Definitely print with a brim because the surface area on the print bed is small. Can be printed together with the pullcord from the same material, since both of them are gears.
No infill needed. The pullcord occupies the full diagonal length of the print bed and there is little room for brim or skirt material. Can be printed together with the drive gear, but the drive gear needs its own brim. To prevent the pullcord from warping, add a helper disc to the end, touching the side with no teeth. This should keep the pullcord on the build plate.
Two sizes of pullcord are included: one to fit a medium build plate (Prusa, Ender, etc.), and one to fit a "mini" build plate.
This has two parts: gear case and hand grip. Their shapes both depend on hand dimensions and they mate together with a slide + snap mechanism. These print upside-down. Use 3 perimeters. It's a good idea to add an infill modifier box to each of the rails on the gear case, 100% concentric infill, to give the rails more strength against pullcord forces.
Two handle sizes are included, to fit an average male hand or an average female hand. You can adjust the handwidth and handlength parameters for your hand. handwidth is the four-finger width with your fingers straight out and touching, measured from the base of the index finger to the base of the pinky, where the first crease of the fingers meet your palm. handlength is the distance from the tip of your middle finger to the first crease where your palm meets your wrist.
If you set your own measurements, you can also set the handle_fingergrooves parameter to true to get finger grooves, which cause the handle to fit only the hand measurements you specify. I don't recommend this for a toy that multiple people would share.
This part may be difficult. It needs supports for angles shallower than 35° from horizontal. Use the "snug" support type, honeycomb pattern, 0.1mm z-contact distance (or zero contact distance if your supports are a different material). Print with 0.15mm layer height, 3 perimeters, 20% cubic infill.
Important: Prior to assembly, lubricate the moving parts by rubbing a paraffin wax candle or a crayon over the drive gear bottom disc and the two bearing contacts on the shaft. Also rub some wax on all surfaces of the pullcord, including the tips of the teeth. You don't need to gum up the teeth with wax.
Insert the drive gear into the handle top. Slide the top over the handle until it snaps together.
Work the pullcord into the channel, and slide it back and forth to smooth out any rough spots. There are two channels, for left-handed and right-handed use.
With the pullcord inserted all the way, place the propeller on top of the drive shaft.
Smoothly pull out the pullcord and watch the propeller fly away! Print extra propellers because they like to get stuck in trees and on rooftops.
This is one of my most ambitious designs, requiring three other separate projects (gear cutting, ergonomic handle, and propeller) to complete before starting on the pullcopter. The handle and the propeller designs each went through two major design changes, basically re-starting from scratch. Everything was done in OpenSCAD. Many failed propellers were printed - some failed while printing, others just failed to perform due to being overweight or low pitch (and in one case the pitch was reversed without me realizing it).
Category: Mechanical Toys
Bycream110_291842Likes924Downloads7.7K

 ByOnemoredaveLikes861Downloads6.9K

 Byjs14581_2767550Likes118Downloads3.3K

 Byquibeck_3353173Likes351Downloads2.1K

 ByTheMakerStuffLikes315Downloads1.9K

 ByGamemartiz_187350Likes98Downloads370

 ByGoolow_295072Likes598Downloads1.6K

 ByMikWantecLikes264Downloads1.5K

 BySzvmkn_3779340Likes231Downloads1.3K

 ByHacker Man ManLikes248Downloads1.5K

 Bycentarico_3241219Likes257Downloads968

 Byfluffytails37Likes184Downloads765