



HiveBox - Hệ thống lưu trữ mô-đun hình lục giác đa năng
 ByVinors3DLabLikes393Downloads995
Build another version of this model.
📖 Opis ogólny
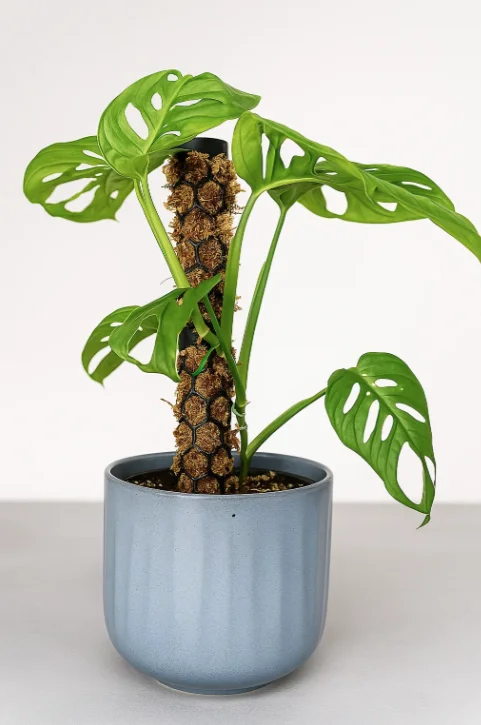
Ten kompletny zestaw modułów palika do mchu został zaprojektowany z myślą o wspieraniu i przyspieszeniu wzrostu pnączy roślin typu Monstera, Scindapsus, Epipremnum, Rhaphidophora itp. Dzięki prostemu systemowi gwintowanemu (gwint zewnętrzny na dole, wewnętrzny na górze) możesz go wydłużać w nieskończoność – po prostu dokręć kolejny segment. Dodatkowo w zestawie znajduje się specjalny moduł ze szpicem, który ułatwia wbicie palika głęboko w ziemię bez uszkadzania korzeni.
🌟 Cechy i zalety
- Modularna budowa: dowolne przedłużanie dzięki gwintom, bez potrzeby klejenia.
- Szpic do wbicia: ułatwia montaż w ziemi, stabilizuje całą konstrukcję
- Struktura plastra miodu (otwory ok. 15 mm)
- łatwe wypełnienie mchem sphagnum lub włóknem kokosowym,
- trzymanie wilgoci blisko łodyg,
- wspieranie rozwoju korzeni powietrznych.
📐 Specyfikacja techniczna
Parametr
Wartość
Średnica zewnętrzna
30 mm
Wysokość jednego modułu
100 mm
Otwory plastra miodu
~15 mm
Infill
0 %
Podpory
brak
Brim
opcjonalny
Materiał
PLA
Czas drukowania modułu
45–60 min
Skalowalny
Tak
🖨 Ustawienia druku
- Filament: PLA
- Wysokość warstwy: 0,20 mm
- Infill: 0 %
- Podpory: wyłączone
- Brim: nie jest wymagany
- Temperatura dyszy: zgodnie ze specyfikacją Twojego PLA
- Temperatura stołu: 65 °C
🔧 Instrukcja montażu i użytkowania
- Wydrukuj dowolną liczbę segmentów oraz moduł ze szpicem do wbicia.
- Nałóż pierwszy segment na moduł ze szpicem, dokręć gwint.
- Wypełnij wnętrze każdej rury wilgotnym mchem sphagnum (lub włóknem kokosowym).
- Wbij palik w ziemię, używając ostro zakończonego modułu.
- Skręcaj kolejne segmenty aż do uzyskania pożądanej wysokości.
- Umocuj łodygi rośliny do palika trytytkami, sznurkiem lub klipsem.
- Regularnie spryskuj mech wodą, aby utrzymać wilgoć i wspierać rozwój korzeni powietrznych.
📖 Overview
This complete set of moss pole modules is designed to support and accelerate the growth of climbing plants like Monstera, Scindapsus, Epipremnum, Rhaphidophora, and similar. Thanks to a simple threaded system (external thread on the bottom, internal thread on top), you can extend it endlessly—just screw on another segment. The set also includes a special spike module that makes it easy to drive the pole deep into the soil without damaging roots.
🌟 Features & Benefits
- Modular Design – extend as much as you like with threaded connections, no gluing required
- Spike Module – simplifies installation in soil and stabilizes the entire structure
- Honeycomb Structure (≈15 mm openings):
- easy to pack with sphagnum moss or coconut coir
- retains moisture close to the stems
- encourages development of aerial roots
📐 Technical Specifications
Parameter
Value
Outer Diameter
30 mm
Module Height
100 mm
Honeycomb Openings
~15 mm diameter
Infill
0 %
Supports
None
Brim
Optional
Material
PLA
Print Time per Module
45–60 min
Scalable
Yes
🖨 Print Settings
- Filament: PLA
- Layer Height: 0.20 mm
- Infill: 0 %
- Supports: Disabled
- Brim: Not required (optional for extra adhesion)
- Nozzle Temperature: Per your PLA’s spec
- Bed Temperature: 65 °C
🔧 Assembly & Usage Instructions
- Print as many modules as you need, plus the spike module.
- Attach the first module onto the spike by screwing the threads together.
- Fill the inside of each tube with moist sphagnum moss (or coconut coir).
- Drive the pole into the soil using the pointed spike module.
- Screw on additional modules until you reach the desired height.
- Secure your plant’s vines to the pole with zip‑ties, wire, or twine.
- Mist the moss regularly to keep it moist and encourage aerial root growth.
Podoba Ci się model? Wrzuć make i zostaw ❤ / Like the model? Post a make and hit ❤
ByVinors3DLabLikes393Downloads995

 Byquibeck_3353173Likes1.5KDownloads11.5K

 ByfifindrLikes216Downloads599

 ByMichael_1442457Likes230Downloads623

 BybobmakesLikes2.5KDownloads17.5K

 ByAdventVR_3326707Likes11Downloads24

 By178222178222_2484344Likes449Downloads1.7K

 ByowlartLikes527Downloads1.3K

 By43DPRINTLikes295Downloads653

 ByJackLikes145Downloads757

 Byst3rndesignLikes173Downloads261

 ByKittenRaeeLikes381Downloads903