
F3D
Spaceballs: Mũ Bảo Hiểm Dark Helmet 11 / 15

15 images

Cosplay

Spaceballs: Mũ Bảo Hiểm Dark Helmet

By Amoda

Downloads
126
Likes
49
Views
776

Files 20 34 MB

  • Spaceballs_Mask_Right_1766620460.stlSTL · 110.2 KB
  • Spaceballs_Mask_Left_1766620461.stlSTL · 148.9 KB
  • Spaceballs_Mask_Screen_1766620462.stlSTL · 288.8 KB
  • Spaceballs_Mask_Vent_1766620463.stlSTL · 522.7 KB

Make a variant with AI

Build another version of this model.

Open Studio

Description

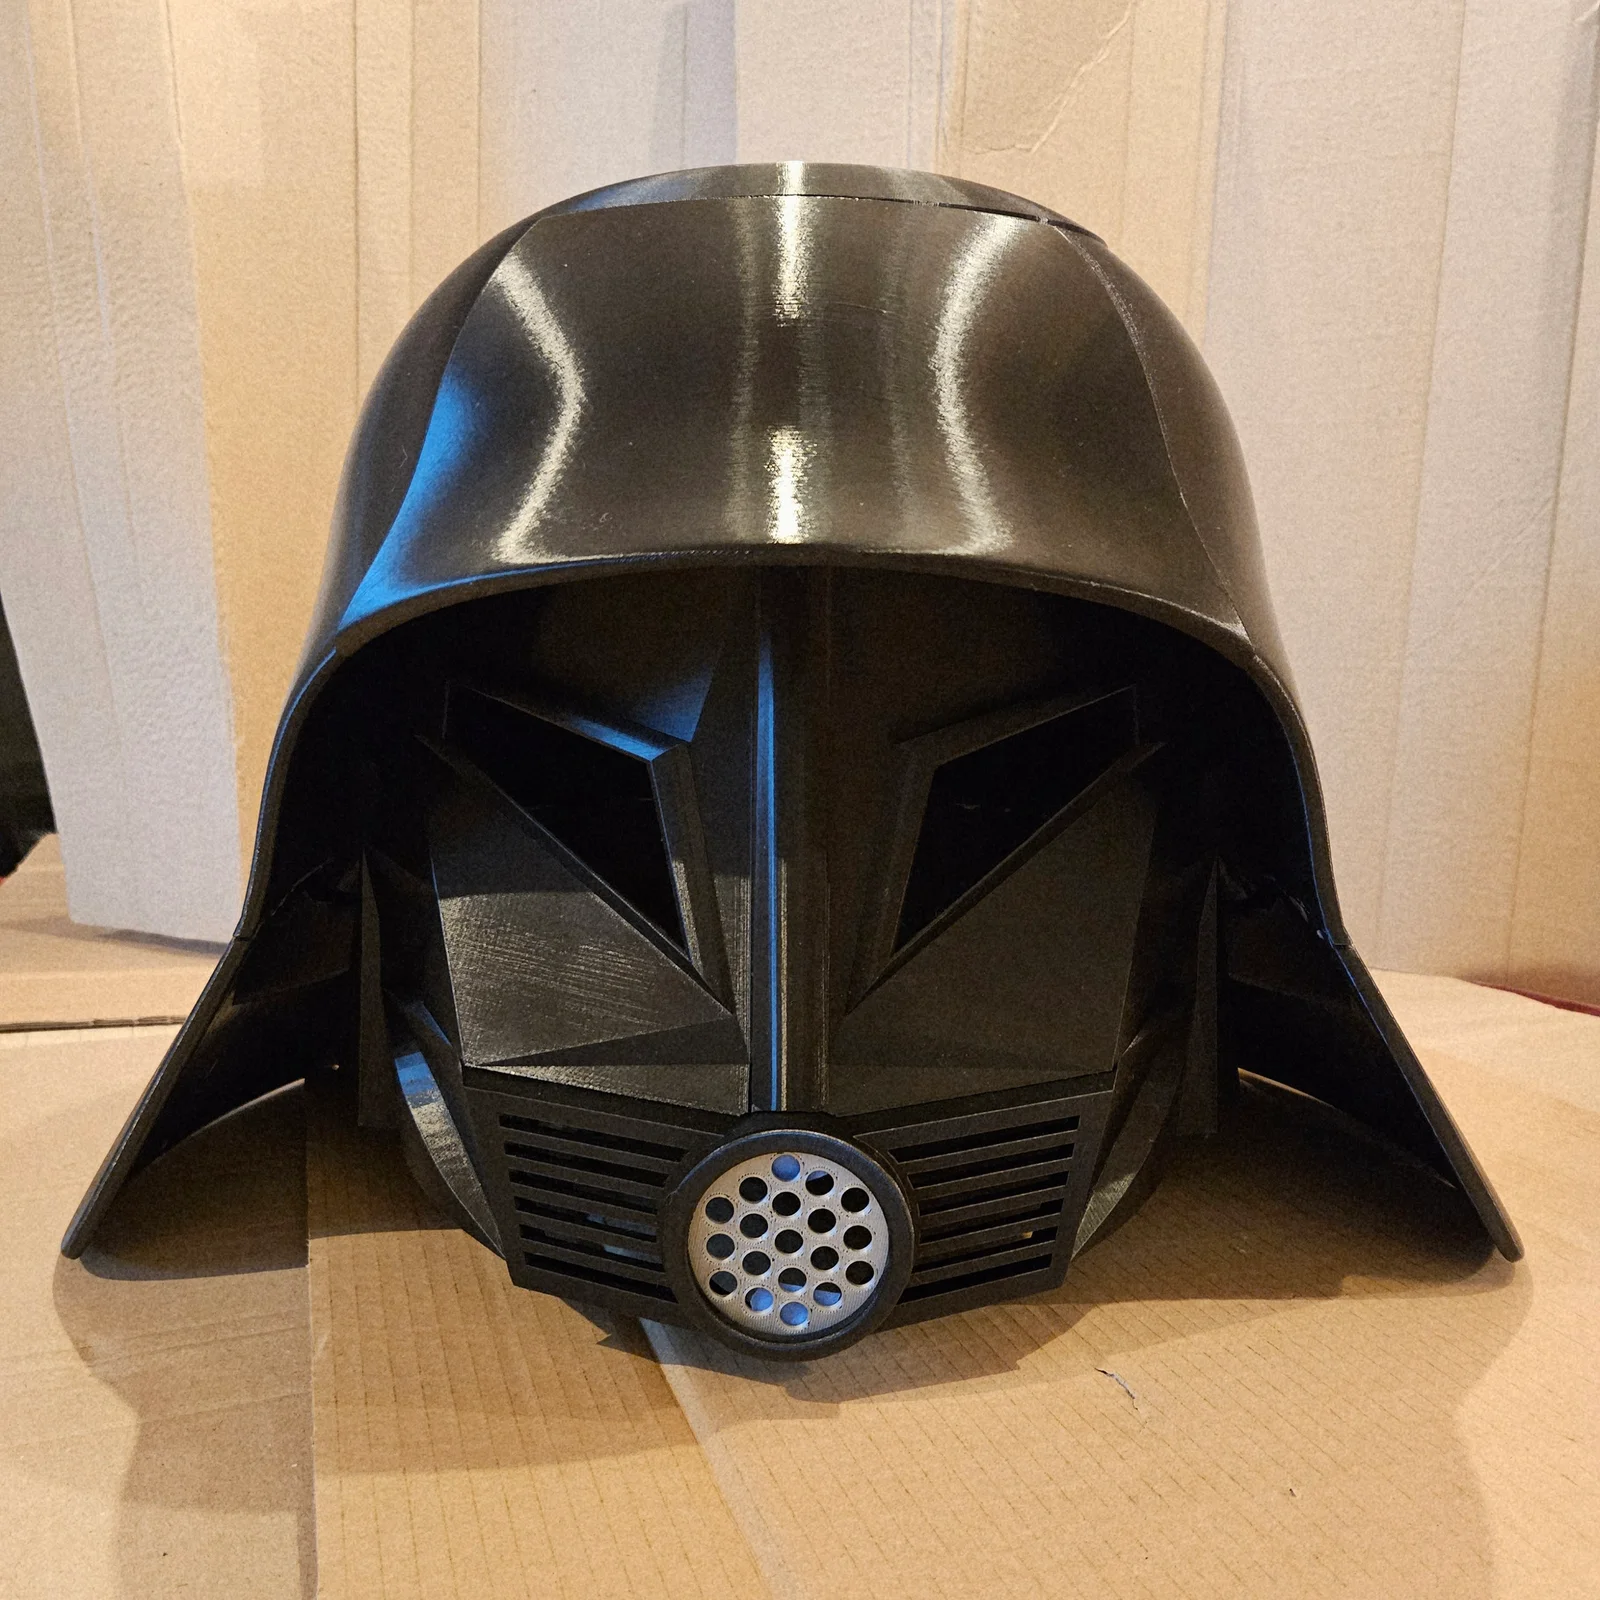
Been working on a Dark Helmet costume and was not satisfied with the files I found online. Originally planned this as a remix, but had to toss the original model and build a new one. The mask for this model is heavily based on a the paper craft (pepakura) creation by Darkside501st which I would not have known about had I not been attempting to remix the Dark Helmet model by MoeSizzlac (https://www.thingiverse.com/thing:2988430) Huge credit to those who came before me for their groundwork. I would have not had a good grasp of scale and form had it not been for those works. Consider this as master's study in that regard. 

The Mask

I built this model for ease of assembly. The printed parts have overlaps for gluing. The model is also relatively low poly by intent. I considered smoothing the model, but was not happy with the results so I left it as is. Feel free to edit it to your liking. It is easier to smooth things over than it is to attain a crisp line. 

Model Notes: 

  • Overlaps for easy assembly.
  • Minimal supports needed on the larger parts. 
  • Oversized fitting holes with plugs. - Why? Because folks may rig the mask different ways with different bolts. Having a plug to glue in place allows you guys to determine the diameter hole you actually need. 
  • Inset area around eyes on the interior for easy attaching of the lenses. I know some folks have used window tint on acrylic sheet. Any method will work well. We plan on using black transparency sheets (gels). because they are inexpensive. 

Printing Notes for the large left/right mask parts:

  • I recommend trimming off about 1 to 2 mm in the slicer so that the model has better bed adhesion. This may not be needed, but it is a long print, so it may save it from failing.  
  • I also used snug supports and had the slicer generate supports for the first 2cm of the model. This also ensured strong bed adhesion. 
  • Other than needing supports for the first layers, only the left side needs additional supports in one spot when printed at 0.15mm. YMMV depending on your printer. (see my 3mf files for orientation and paint on supports) 
  • I used lightning infill to keep the model light. 

The Helmet:

The model is also split with lap joints to make assembly easier. That said, read the printing ans assembly notes!

Model Notes: 

  • Overlaps for easy assembly.
  • Mask ‘stopper’ so that the mask does not fall down when wearing it. 
  • 4 rigging spots have been added to make sorting out attachment easier. I am working on a rigging plan, but wanted to include these as other folks may have their own rigging solutions.

Printing Notes:

  • You will want to use a bit of grid or gyroid infill for these parts. They need to have enough structure to withhold clamping when you glue things together. 
  • Label parts as you print them. Keeping what parts of the flange are which can be confusing. 

Assembly Notes:

I'm not going to lie. The helmet was tricky to assemble the first time. Hopefully with my notes you wont have the same pitfalls I did. 

There are two schools of thought: 

  1. I want my printed piece to be the finished helm. I do not plan to do any more finish work. If this is what you want. You will need to be careful in each stage not get glue on parts or accidentally mar the surface when you are cleaning up the model. I attempted this method at first, but failed sometime around my 2nd or 3rd round of glue failures.
  2. I plan to do finishing surface work on the model. 

The good news is that if you are in school of thought 1, then you can fall back on school of thought 2. 

Now, for assembly… 

For all glued parts, use a good 2 part epoxy glue that is suited for plastics. I have several glues fail on me. Do not use gorilla glue. This glue expands when curing and will push your parts always from each other and mess up your fitting. Then when it fails you have to sand down and scrape the surface quite a bit to get a good fit. Also, when picking an epoxy, consider the working time. Longer working times are better for lining and cleaning up parts. 

  1. Start with the flange. You can glue and clamp these parts together using hand clamps. (See my photos above)
  2. Assemble the top second. Glue and clamp the parts individually, but do not attach the dome. You attach the dome last. 
  3. Pre-fit the flange to the top. This is tricky. The flange is likely flared a bit from gluing and printing and will not line up without some manipulation. I advise taping the front so that it warps correctly to the meet the top. The goal is to have the flange and the top lined up so that you don't have to try to line up and fit parts while you are gluing. 
  4. Attach the top to the flange. You can clamp along the front, but will need to weigh down the top (which is why we did not yet attach the dome) to get good adhesion. A board and a stack of books will do the trick. 
  5. Finally you can glue on the dome. 

Rigging: 

Rigging is in progress. The main concept I am working with is based on hard hat liners. This will attach to the helmet at two points in the back and also on the bolt that holds the mask in place. 

That said, you can devise your own way. 

Attaching the Mask to the Helmet: 

  • The mask fits to the helm by way of the large 20mm holes. I have posted my attachment parts and a pseudo diagram. My solution was to have a hex nut embedded into a cylinder that is then glued into the helmet slots. The mask can then be attached by screwing it into place. The spacers allow the mask to move freely.

Blender File?

My working blender file is as iterative mess… and over half a gig. After I clean it up I may post it here so others can more easily adjust the model.  (No promises, cleaning up after a creative frenzy isn't my forte.)

Other Costume Notes: 

MoeSizzlac's has extensive photos and details on his site. These goes through the steps he did to use the pepakura file for the helmet as well as how he managed to work out his rigging. https://www.moesizzlac.com/projects-DarkHelmet.php This approach may be easier/better/faster than 3D printing the helmet itself. 

I also did a belt remix: Here

Read more Show less

Print spec

Formats
3mfstl
Model files
20
Total size
34 MB
Largest file
17.1 MB

0 comments

See all