


Mô hình Megalodon trong Sea of Thieves - Bản cải tiến chất lượng cao và cắt rời
 ByvexanixLikes168Downloads1.3K
Build another version of this model.
This model is one of the collection Prêt à Faire: Printable Readymade Models
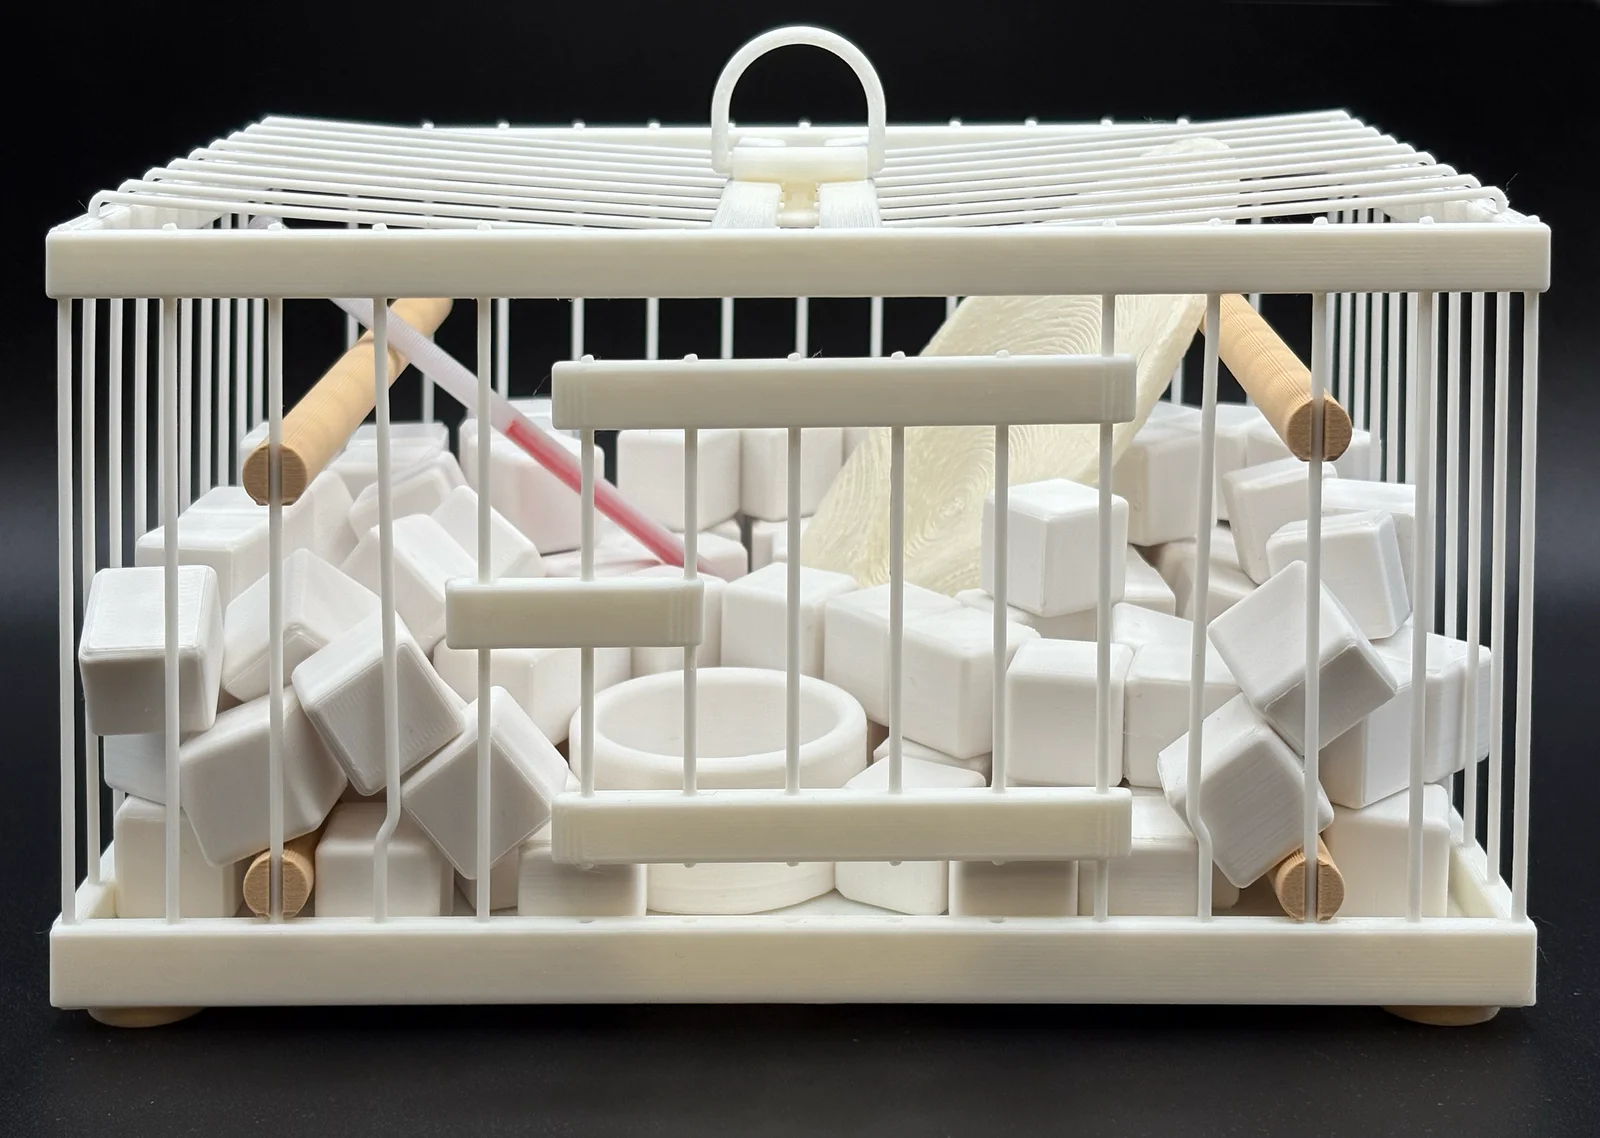
Why Not Sneeze, Rose Sélavy? is a Readymade sculpture by Marcel Duchamp created in 1921. It is among the most elaborate of the Readymades. He classified it as an “assisted Readymade” because the original objects had been manipulated by him.
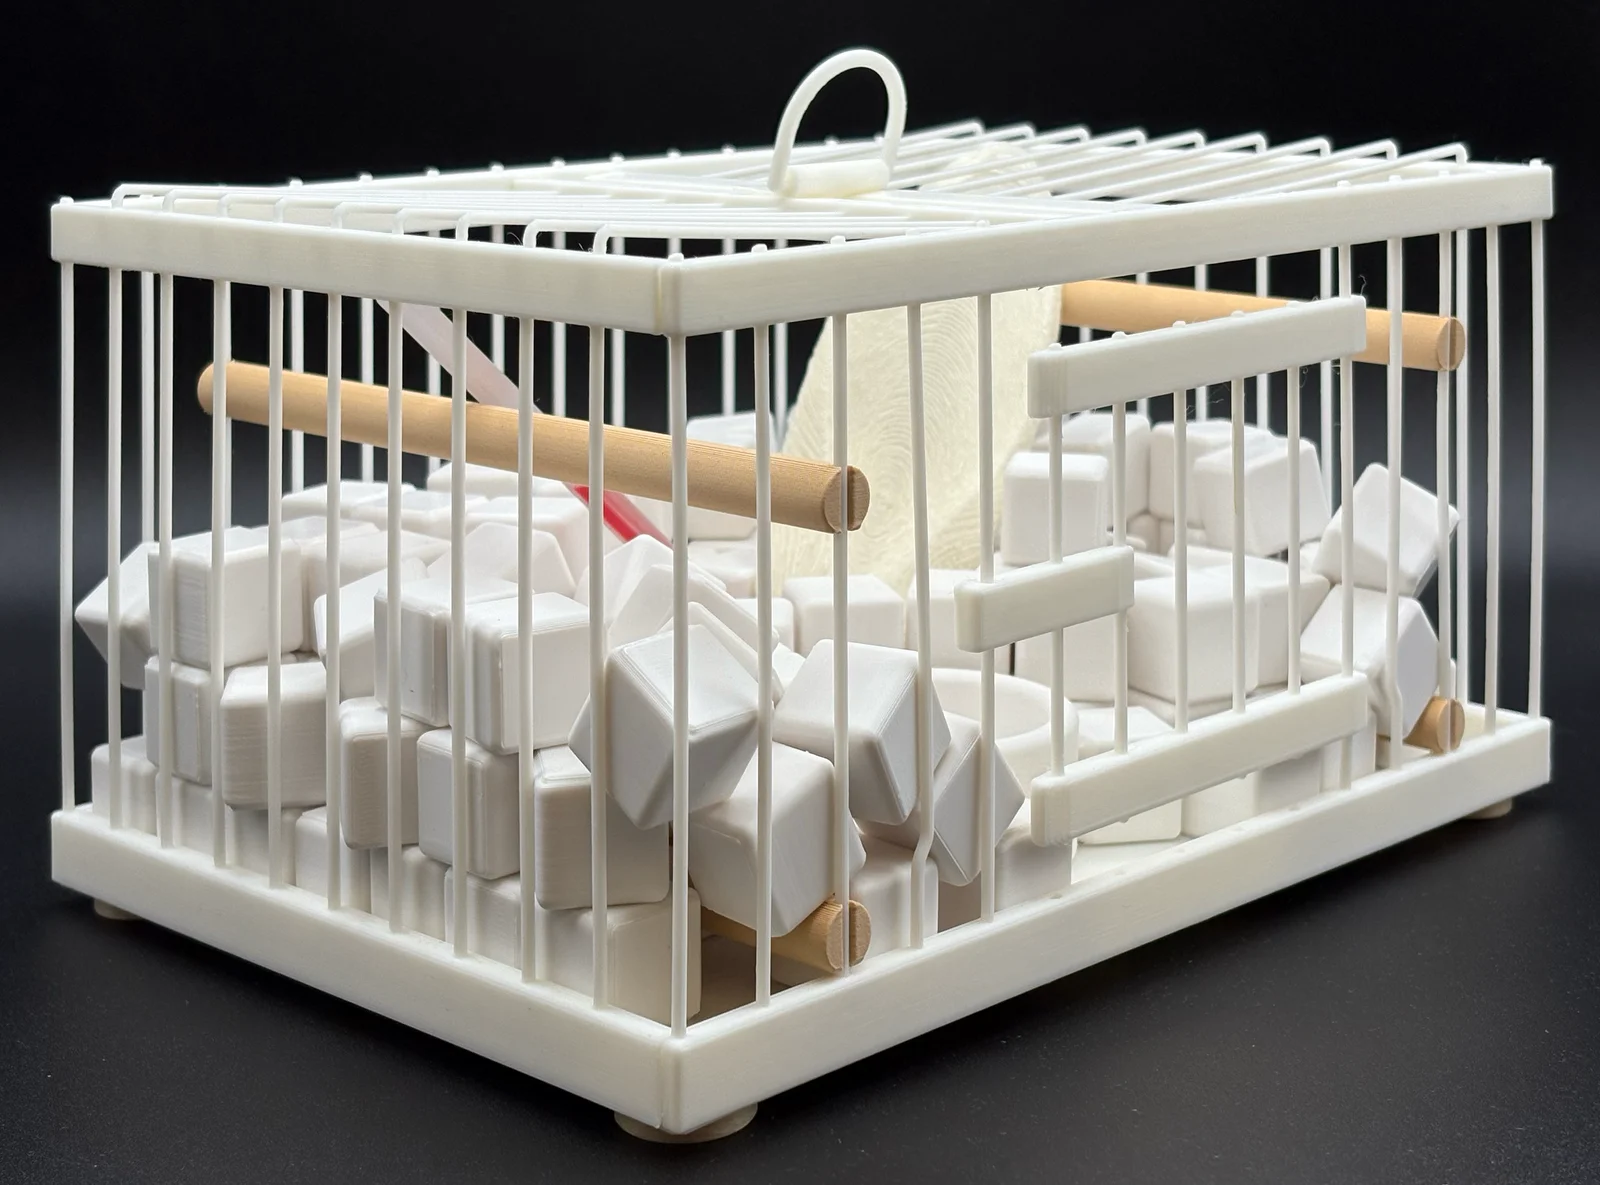
It consists of a birdcage, 152 white marble cubes, a thermometer, a cuttlebone, and a small porcelain dish. The birdcage is made of painted metal and contains wooden perches. There is an inscription on the bottom with the work's title and date.
Unlike many other Readymades, the original was not lost! It resides at the Philadelphia Museum of Art. However, this model is based on the 1964 Milan edition, which featured padded feet and a reverse-reading inscription. Duchamp perhaps enjoyed that one had to hold the work over a mirror to read it. And indeed, he wanted people to pick it up, because the white marble cubes, resembling sugar cubes, made the work unexpectedly heavy.
One reason these models exist is that Duchamp desired this kind of interaction with his work — but of course, you'll get into trouble if you try that in a museum!
Find out more about this work at:
Historical editions include:
Philadelphia Museum of Art
1921 original
Moderna Museet, Stockholm
1963 replica
Hirshhorn Museum, Washington
1964 replica
The model has been modified from the original and replicas to accommodate 3D printing. It is modeled at the original size and must be printed without scaling to ensure the cage bars will print successfully, with enough strength to withstand lifting from the ring at the top of the cage.
It's a complex model. All elements will fit on an MK3 or MK4 build plate. There are two groups of elements here:
THE CAGE CONTENTS
CUBES | In the original, the cubes resemble lightweight sugar but are, in fact, hefty marble. If you are hardcore about fidelity to the original, you'll print the cubes solid or nearly so. Options include:
Printing in solid white resin
Printing in solid white filament
Either way will use a lot of material. In the photos, note an MK4-size build plate with 76 cubes — half the number you need. If printed with 80% infill, this plate uses just under half a roll of filament; thus, it is a good compromise. Of course, you can print them with less infill if you just want the look, but I suspect Duchamp would kind of hate that.
CUTTLEBONE | Filament printing is recommended for this piece. In the photos, note the way I've positioned the cuttlebone. There's no avoiding support on this organic shape, but by angling as you see, you get a layer pattern that emulates the texture of an actual cuttlebone. Any scarring left on the underside from supports is in keeping with the texture as well. Consider a bone or ivory color for the filament here.
THERMOMETER | The thermometer has a tiny indentation at the bottom, which one can use to create a multi-material print. In the photos, note how I've painted the material to signify glass (clear filament), metal (gray or silver), and mercury (red). Print this solid for relative clarity.
DISH | One porcelain dish in white filament or resin will do, though some museums report having 2 dishes in their replica.
THE CAGE | If you've seen the Bicycle Wheel in this series, you're aware that these thin material elements need a bit of compromise to print. I've kept them as close to the original as possible while optimizing for printing. I recommend printing everything except the perches solid, in a cream or ivory off-white filament. It should NOT be white like the cubes. It CAN match the cuttlebone. It is comprised of the following sub-assemblies:
BASE | Note in the photos: there is a tiny offset for painting the letters in multi-material printing, using a dark gray or black filament. A fuzzy skin would be appropriate on them.
CAGE WALLS AND GATE | It should be obvious how to orient these to the build plate using the flat side of the round bars as a guide.
PERCHES | Use a light brown or wood filament for these.
Print assembly parts in the following quantities:
Cubes: Print 152 (2 build plates of 76 each on an MK3/4)
Cuttlebone, Thermometer, and Dish: Print 1 of each (you may print 2 of the dish if you wish)
Cage top, top backing, sides, and gate backing: Print 2 of each
Cage feet: Print 4
Perches: Print 4
All other Cage parts: Print 1 each
Recommended materials:
Creality White Hyper PLA: All cage parts (it's a good off-white to distinguish cage color from cube color)
Hatchbox Matte Black PLA: Lettering on base
Prusament Pristine White PLA: Cubes and dish
Prusament Vanilla White PLA: Cuttlebone
SUNLU Matte Red PLA, Prusament Galaxy Silver PLA, and Polymaker Natural PLA: Thermometer multi-material print
SUNLU Maple Wood PLA: Perches
Elegoo Beige PLA: Feet
My general settings:
Print Settings: 0.2 mm Structural
Filament: Prusament PLA or as appropriate
Printer: Prusa MK3 or MK4 with MMU (for multi-print of base and thermometer)
Supports: Needed only for the cuttlebone; see illustration
Infill: 15%
Brim: None
Advanced settings:
Layers and perimeters: All defaults
Infill: Gyroid fill pattern, Aligned Rectangular top and bottom fill pattern
Support material: Organic style where needed
Custom settings differing from above:
Infill 80-100% at cubes for a proper sense of weight
Enable fuzzy skin for the cuttlebone and feet
Stats for the print:
Total material used:
~1000 grams bright white for cubes and dish
~255 grams off-white for cage, 2 grams black for cage lettering
~24 grams vanilla white for cuttlebone
~33 grams wood color for perches
~9 grams clear, 5 grams silver, and 1 gram red for thermometer
~5 grams beige for feet
Total time: ~98.5 hours (4 days, 2.5 hours)
Total number of build plates: 14 (2 with multi-material)
ASSEMBLING THE CAGE
Use super glue to attach base bottom to base top.
Use super glue to attach feet to the base.
Next, attach the cage gate to the cage front before full assembly.
Note the small bulges on one of the bars on the front cage wall. Identify two corresponding indentations in the gate frames and place the gate on these bulges.
Then attach the 2 gate frames using super glue to trap these and create a hinge. My experience required no sanding or fitting for tolerance: your mileage may vary.
Now attach the large and small latch backing pieces to the back of the gate latch, being careful with alignment. The gate latch should allow the door to stay closed but should open with a little resistance.
Attach the 2 top frame backing pieces to the 2 cage top elements.
Insert the small rake-like tabs on the top elements into the slots on the cage sides and super-glue. You will have 2 inverted L shaped cage elements when done.
Now attach the cage front to the base, and then to the top frame.
Lay the cage front on the work table and attach one cage side/top assembly.
Slip the cage top frame into the large slot at the top frame and secure with super-glue, and align the cage side slot with the angled protrusion on the base, also securing with super-glue.
Small hobby clamps or clothespins are helpful with this step to maintain alignments — I recommend a slow-dry gel glue.
Attach the top handle, aligning the small hole in the side with the center bar “bump” found on the top frame. Use the photo of the sculpture as a guide. Secure with super-glue. If using the visual handle, wait until after step 10 and attach from the top.
Attach the second cage side/top assembly in the same manner as the first.
Before adding the contents, position the 4 perches in a similar manner to the photograph of the actual sculpture. You may wish to super-glue them, but friction will also hold them in.
ADDING THE CONTENTS
Place the small dish inside.
Add all 152 cubes. In some editions, the cubes completely cover the dish; in others, it's visible. Use your judgement.
Now add the cuttlebone and thermometer to the contents. In many versions of the edition, the cuttlebone sticks out of the top of the cage, and the thermometer is leaning up against a perch with the sensor side down among the cubes.
One of the points of this series is to allow people to interact with the works in the manner Duchamp intended — which is to say, NOT as we see them in a museum! For this work, place the finished model on a table or pedestal so that the work invites the viewer to pick it up. An alternative seen in the images: place the work so that a mirror reveals the text underneath. This can be done by suspending the work or placing it on a glass shelf with the mirror under the shelf.
17 DEC: Parts with minor revisions added. 3MF files added, with multi-material painting and other settings as described above.
26 NOV: Uploaded parts with miscellaneous modifications and improvements. Included new renderings and photographs of the model. Re-wrote the description for clarity and consistent formatting across the Prêt à Faire collection.
5 NOV: To my horror, I realized the cubes are too small only after printing a full set! A new cube has been uploaded, which is the correct scale.
SEP 25: After prototyping the cage, I've provided new and stronger elements for the cage and updated the assembly instructions above. The prototype includes only 1 unique instance of each object that assembles to create the cage and provides proof of concept for fit and strength.
ByvexanixLikes168Downloads1.3K

 Bynonoobybut_3307010Likes364Downloads1K

 Byelizabeth3dLikes0Downloads151

 ByDrewmundLikes833Downloads4.6K

 ByPexPeppers Hot Sauce Hot SauceLikes114Downloads562

 ByFotisMintLikes71Downloads416

 ByAryserLikes36Downloads393

 ByxeyosLikes0Downloads108

 Bythecodedkid_388190Likes219Downloads264

 Bymay3dLikes0Downloads600

 ByFastRaccoon_718321Likes461Downloads1.5K

 ByHaggiwatt_565243Likes25Downloads201