



Còi Tàu Hơi Nước Mini
 ByfifindrLikes500Downloads4K
Build another version of this model.
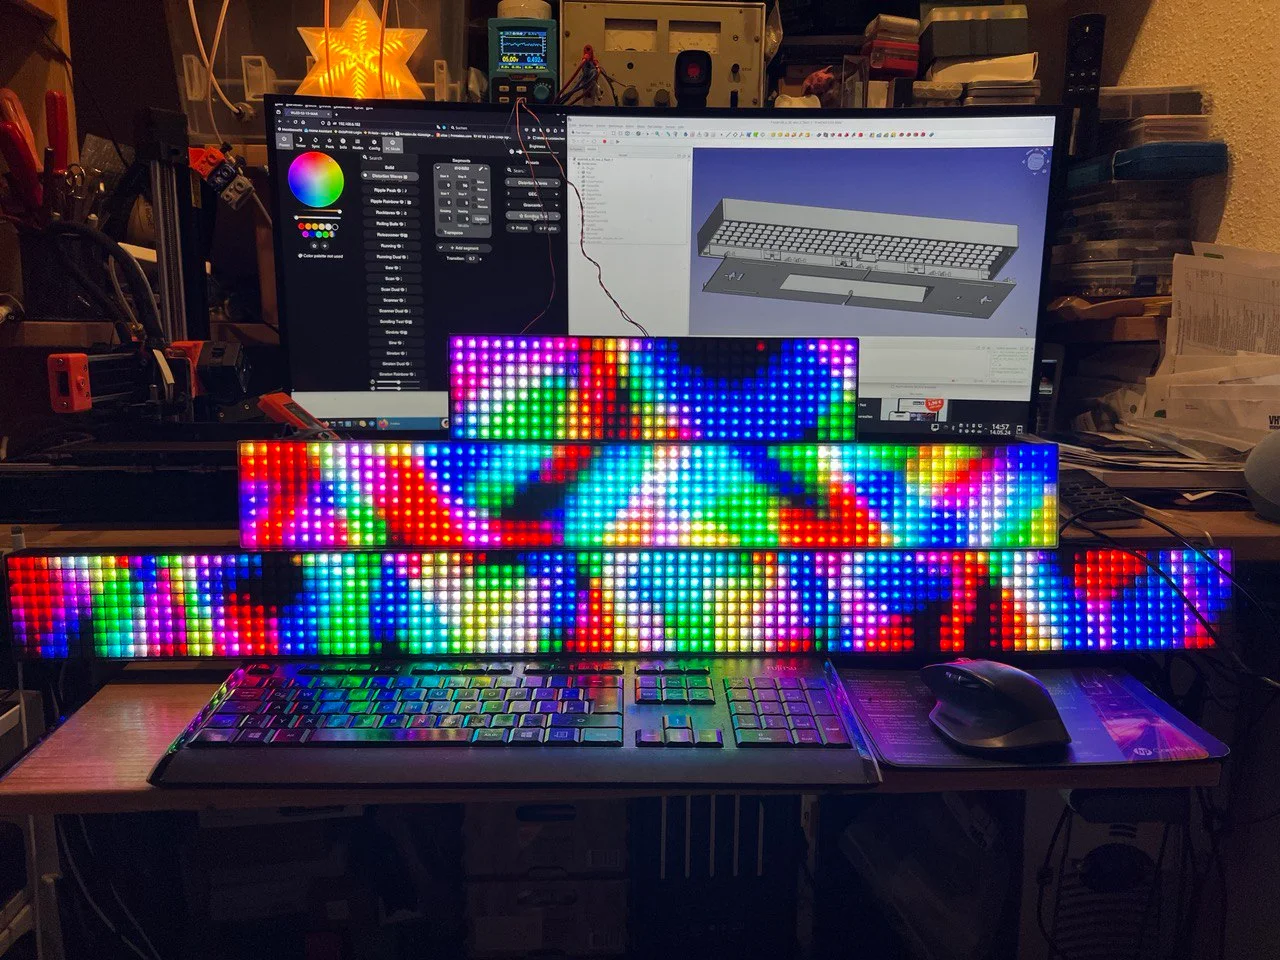
I want to have a led matrix to show information of my weather station.
I first looked at the design from fractalnoise but one 8x32 matrix does not offer enough space. So I decide to make my own design.
To have more space i make the design expandable and I found that the integration of the diffusor in the frontside of the frame gives the best results for me.
You have to change the filament once during the print (manually or automatic with MMU or Prusa XL). I would suggest to cut away a small part of the frame and do a test print. Depending on the filament the transparent layer might not fuse with the rest. The transparent layer is not a separate part, you can use the modifier in Prusaslicer to configure the different filament or use the layer change function. If you do it yourself the diffuser is 0.8mm heigh otherwise you can use the provided 3mf files for the mini and the xl.
On my project the matrix is controlled by WLED. On the project page https://kno.wled.ge/ you will find many information. You can use the esp32 mini or the esp32-s2 mini in this frame.
I used a digital microphone and mounted it directly to the ESP to reduce cabling in the frame. A socket for the max9814 is also there.
The TSOP4838 is used for the remote receiver. If you connect more then two 8x32 matrixes you have to reduce the framerate in WLED from 42 to about 23.
With the USB-C board for the power you can use many power supplies or even power banks. But you have to remove the bridge for 12V default on the Board!!!! The Schottky diode prevents the power delivery to the matrix over the USB-C port of the esp32 and protects the board.
I bought the parts over Amazon
ESP32-s2 https://amzn.eu/d/gxJp9OP
ESP32 https://amzn.eu/d/cfELddv
USB-C Platine https://amzn.eu/d/7T7iZyO
D-Micro https://amzn.eu/d/czdyhYy
TSOP 4838 https://amzn.eu/d/86uxJMH
but there are other sources too.
If you have any questions feel free to send me a message.
Please check you printers dimensional accuracy. I had to increase the models in PrusaSlicer by 1%. If you want to be on the save side, just do that.
If you want, you can just print the expansion parts and use the "matrix8_x_32_expansion_border" to close the ends.
ByfifindrLikes500Downloads4K

 ByWolf_115355Likes513Downloads8.4K

 ByZED4EverLikes313Downloads5.2K

 ByVC_DesignLikes271Downloads748

 ByMatthew_GhostLikes350Downloads934

 Bymrfixit_324954Likes65Downloads471

 ByDan Schwartz SchwartzLikes744Downloads3.4K

 ByBrokentooth_designsLikes83Downloads447

 ByUpcrid3D_1585693Likes808Downloads2.1K

 ByAdam Záhořák ZáhořákLikes39Downloads250

 ByWilko_SLOLikes935Downloads2K

 Bychubbs8697_2027893Likes585Downloads1.7K